background image

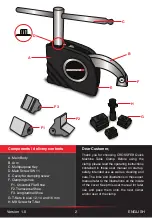
A. Main Body
B. Arm
C. Multipurpose Key
D. Main Screw SW 11
E. Cavity for clamping screw
F. Clamping shoe
   F1. Universal Flat Shoe
   F2. Transverse Shoe
   F3. Longitudinal Shoe
G. T-Nuts in size 12, 14 and 16 mm
H. M8 Screw for T-Nut

C

F

E

A

F3

D

B

F1

F2

G

H

Components / delivery contents

Dear Customer,

Thank you for choosing CROSSFER Quick 
Machine Table Clamp. Before using the 
clamp, please read the operating instructions 
contained in these user manual on startup, 
safety, intended use as well as cleaning and 
care. The links and illustrations in these user 
manual refer to the illustrations on the inside 
of the cover. Keep this user manual for later 
use and pass them onto the next owner 
and/or user of the clamp.

Version 1.0

ENGLISH

2

Summary of Contents for PowerCLAMP

Page 1: ...User Manual Bedienungsanleitung www crossfer machineclamp com www crossfer schnellspanner de PowerCLAMP RiserBLOCK EN DE...

Page 2: ...ery contents Dear Customer Thank you for choosing CROSSFER Quick Machine Table Clamp Before using the clamp please read the operating instructions contained in these user manual on startup safety inte...

Page 3: ...is intended solely for clamping parts on drilling machine tables and milling machine tables Any use other than previously stated is considered as improper use The clamp must never be subject to maxim...

Page 4: ...hine table Place the material to be processed on the table and position the clamp and the material accordingly Attached the suitable Clamp Shoe F to the Arm B Insert the T Nut G in the machine table a...

Page 5: ...e clamp is perfectly placed and the material to be processed is fixed with the vertical force of the Arm B remove the Multipurpose Key C The material is now ready to be processed Clamping Force Weight...

Page 6: ...er Repairs to the clamp during the guarantee period may only be performed by a customer service authorized by the manufacturer otherwise the guarantee is invalid Defective parts may only be replaced w...

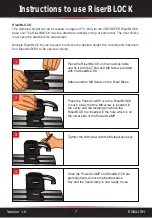
Page 7: ...mping height can be increased in stages of 75 mm with the CROSSFER RiserBLOCK base unit The RiserBLOCK must be attached vertically on top of each other The riser blocks must never be attached like ste...

Page 8: ......

Page 9: ......

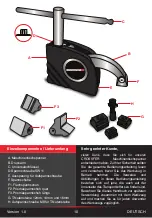
Page 10: ...ter Kunde vielen Dank dass Sie sich f r unseren CROSSFER Maschinentischspanner entschieden haben Zu Ihrer Sicherheit sollten Sie die gesamte Bedienungsanleitung lesen und verstehen bevor Sie das Werkz...

Page 11: ...ilt als nicht bestimmungsgem F r daraus resultierende Sch den bernimmt der Hersteller keine Haftung Der Maschinentischspanner darf nicht einer h heren Umgebungstemperatur als max 110 C 230 F ausgesetz...

Page 12: ...rechend aus Montieren Sie einen geeigneten Spannschuh F am Druckarm B Schrauben Sie die Aufspannschraube H einige Umdrehungen in einen geeigneten T Nutenstein G und schieben Sie dann den T Nutenstein...

Page 13: ...Sobald der Maschinentischspanner optimal ausgerichtet und das Werkst ck mit dem Spannarm B eingespannt ist entfernen Sie den Universalschl ssel Das Werkst ck kann nun bearbeitet werden Version 1 0 13...

Page 14: ...aturen am Maschinentischspanner innerhalb der Gew hrleistungsdauer d rfen ausschlie lich von durch den Hersteller autorisierten Fachwerkst tten durchgef hrt werden Andernfalls erlischt die Gew hrleist...

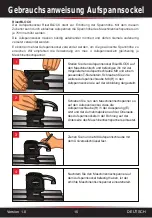
Page 15: ...en auf der Oberseite des Aufspannsockels in der Bohrung auf der Unterseite des Maschinentischspanners einrastet Ziehen Sie nun die M8 Aufspannschraube mit dem Universalschl ssel fest Gebrauchsanweisun...

Page 16: ...CROSSFER GmbH Martinstrasse 108 41063 M nchengladbach Germany 49 0 2161 46 22 988 info crossfer de www crossfer machineclamp com www crossfer de Phone Email Website...

Reviews: