background image

  27

Warranty

T

HIS


CHAPTER


CONTAINS


THE

 C

ROSSMATCH


WARRANTY


FOR


THE

 S

ENTRY

.

L I M I T E D   WA R R A N T Y

Cross Match Technologies, Inc. (“

Crossmatch

”) warrants that the Crossmatch Equipment you have purchased will be 

free from defects in material and workmanship in normal service and under normal conditions for a period of one year 

from the date of shipment. Normal service and normal conditions are defined in the documentation.  This Limited 

Warranty is subject to the terms and conditions set forth below.

Repair or replacement: 

Unless otherwise stated herein, the sole obligation of Crossmatch and your exclusive remedy 

and recourse under this Limited Warranty is for Crossmatch, at its sole election, to either (i) repair the suspected 

defective Equipment and return the same to you or (ii) replace the suspected defective Equipment, all on the terms set 

forth below. The repair or replacement will provide you with Equipment, which in Crossmatch’s opinion, performs 

consistently with its age and usage. 
If you become aware that your Crossmatch Equipment is defective in material or workmanship in normal service and 

under normal conditions during its one year Limited Warranty period, then you must promptly contact Crossmatch’s 

Customer Care Center between Monday through Friday, 8:00am to 6:00pm EST, excluding Crossmatch holidays, 

describe the suspected defect in detail and request a Return Merchandise Authorization (“

RMA

”) number prior to 

sending the affected Equipment for repair or requesting a replacement.   Please see your equipment manual for more 

information on RMA’s.  You will pay the freight to send the Equipment to Crossmatch’s designated Service Center, 

and Crossmatch will pay the freight to return the repaired Equipment to you. Each repaired or replacement Equipment 

is warranted (as set forth herein) for the remaining portion of the original one-year Limited Warranty.
THE FOREGOING CONSTITUTES YOUR SOLE AND EXCLUSIVE REMEDY AND CROSSMATCH’S SOLE 

AND EXCLUSIVE LIABILITY IN CONNECTION WITH YOUR CROSSMATCH EQUIPMENT, AND IS IN 

LIEU OF ANY AND ALL OTHER REMEDIES WHICH MAY BE AVAILABLE TO YOU.

Limitations:

 This limited warranty does not cover visits to repair the Crossmatch Equipment at your premises, or the 

commissioning of the Equipment on site. This Limited Warranty is not a warranty, guarantee or promise that your 

Crossmatch Equipment will conform to its specification or will not fail.    
Crossmatch shall incur no liability under this Limited Warranty and this Limited Warranty is voidable by Crossmatch 

if in Crossmatch’s sole reasonable opinion: (a) the Equipment is used other than under normal use and under proper 

environmental and/or electrical conditions, as specified in the manual; (b) the Equipment is not maintained as specified 

in the equipment manual; (c) the Equipment is subject to abuse, misuse, neglect, accident, flooding, storm, lightning, 

power surges, dirty power, third-party errors or omissions, or acts of God; (d) the Equipment  is modified or altered 

(unless expressly authorized in writing by Crossmatch); (e) the Equipment is installed or used in combination or in 

assembly with equipment or other products not supplied or authorized by Crossmatch; (f) there is a failure to follow 

specific restrictions or operating instructions; (g) database recovery, (h) Crossmatch on-site support, (i) remedial 

customer training; (j) user or virus caused software reloads; (k) data migration to new platform; or (l) payment for the 

Equipment  has not been timely made.
The Limited Warranty does not cover nondurable consumable items including, but not limited to, batteries, paper, 

silicon pads, cleaning solution, towels, printer cartridges and cables.  Replacement supplies of these items may be 

ordered by contacting Crossmatch Sales at 866-725-3926 (toll free in the US) or 561-622-9722.  This Limited 

Warranty does not cover third party peripheral equipment (such as laptops and printers) that is not connected or 

otherwise used in conjunction with the Crossmatch Equipment.  Customers should contact the manufacturer of such 

third party equipment regarding suspected defects in such equipment.
Crossmatch’s obligations hereunder are contingent upon your providing the Equipment serial number as proof-of-

purchase, and upon Crossmatch’s determination that the suspected malfunction is actually due to defects in material or 

workmanship.

THIS LIMITED WARRANTY IS IN LIEU OF ALL OTHER WARRANTIES RELATED TO THE
CROSSMATCH EQUIPMENT, WHETHER EXPRESS, IMPLIED, OR STATUTORY, INCLUDING THE
WARRANTIES OF MERCHANTABILITY AND FITNESS FOR A PARTICULAR PURPOSE, ALL OF
WHICH ARE HEREBY EXPRESSLY DISCLAIMED BY CROSSMATCH.  THIS LIMITED WARRANTY
IS NOT TRANSFERABLE OR ASSIGNABLE TO ANY THIRD PARTY AND SHALL BE FOR THE SOLE
AND EXCLUSIVE BENEFIT OF THE ORIGINAL OEM OF THE CROSSMATCH EQUIPMENT

Summary of Contents for Verifier Sentry

Page 1: ...Verifier Sentry Operator Manual...

Page 2: ......

Page 3: ...Crossmatch Verifier Sentry Operator Manual...

Page 4: ...ange without prior notice Verifier Sentry is a registered trademark and Crossmatch is a trademark of Cross Match Technologies Inc All other trademarks are the property of their respective owners No po...

Page 5: ...he Sentry 9 The right side of the Sentry 10 The back of the Sentry 11 The top of the Sentry 12 The bottom of the Sentry 12 Use the Sentry Start the Sentry 13 Stop the Sentry 14 Scan a Contact Card 15...

Page 6: ...Verifier Sentry Operator Manual 870391 V1 1 E mail 25 Telephone and facsimile 25 Return and repair of the Sentry 26 Delivery costs 26 Contact information 26 Warranty LIMITED WARRANTY 27 Index Content...

Page 7: ...left side of the Sentry 9 Figure 3 The right side of the Sentry 10 Figure 4 The back of the Verifier Sentry 11 Figure 5 The top of the Verifier Sentry 12 Figure 6 The bottom of the Verifier Sentry 12...

Page 8: ...iv Verifier Sentry Operator Manual 870391 V1 1 Figures...

Page 9: ...ront of the Sentry 8 Table 7 The left side of the Sentry 9 Table 8 The right side of the Sentry 10 Table 9 The back of the Sentry 11 Table 10 The top of the Verifier Sentry 12 Table 11 The bottom of t...

Page 10: ...vi Verifier Sentry Operator Manual 870391 V1 1 Tables...

Page 11: ...erifier Sentry and lists the contact numbers for Crossmatch Warranty contains the Crossmatch warranty for the Verifier Sentry Standards The following standards are used in this book Bold UPPERCASE tex...

Page 12: ...USB The Universal Serial Bus USB is a standard method to connect electronic devices User The user captures the biometric and personal information Another name is the operator Wi Fi Wireless local area...

Page 13: ...r could void the user s authority to operate the equipment RF Exposure Requirements This mobile device meets the FCC CE and IC radio frequency RF exposure requirements for the hand held use case When...

Page 14: ...y Replacement Battery replacement Replace battery with Crossmatch Technologies part number 900443 only Use of another battery may present a risk of fire or explosion Caution The battery used in this d...

Page 15: ...the Waste Electrical and Electronic Equipment WEEE Directive In the European Union this label indicates that this product should not be disposed of with household waste It should be deposited at an a...

Page 16: ...6 Verifier Sentry Operator Manual 870391 V1 1 Introduction Introduction...

Page 17: ...TRIC INFORMATION The Verifier Sentry is a portable identification and verification device that provides many methods to capture personal and biometric information Strong design small size and light we...

Page 18: ...o contact by a finger or a capacitive stylus 4 When the battery accepts a charge the Charge indicator illuminates A Red light indicates 500 mA of electricity is supplied to the Sentry This current the...

Page 19: ...cessories 3 During normal operation this port allows the Sentry to be a memory or camera device to a host computer When the On The Go OTG adapter is used the USB connector allows the Sentry to be a ho...

Page 20: ...The button to increase the output from the speaker or from the earphones 3 The button to decrease the output from the speaker or from the earphones 4 The Start button 5 The connection point for earph...

Page 21: ...ary light source 3 The release latch for the battery cover 4 The cover for the battery compartment 5 Contactless card Reader area The card can be outside the hand strap See Scan a Contactless Card on...

Page 22: ...e top of the Verifier Sentry Description 1 The bezel around the platen 2 The slot allows a tool provided by Crossmatch to release the sensor from the Verifier Sentry See Replace the fingerprint sensor...

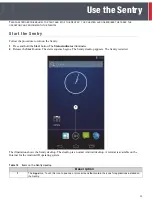
Page 23: ...indicator illuminates 2 Release the Start button The start sequence begins The Sentry desktop appears The Sentry is started The illustration shows the Sentry desktop The desktop is a normal Android de...

Page 24: ...lect Cancel to return to the desktop The following sections describe the procedures that the operator can do with the Sentry The illustrations in the following procedures show a Crossmatch demonstrati...

Page 25: ...yed The application in the illustration is a Crossmatch demonstration application Your application can be different 3 Touch to select Contact Card The instruction to insert the card and enter a PIN ap...

Page 26: ...and a message appears in the window If the fingerprint does not match a red line above and below the fingerprint and a message appears in the window 11 Take the action required by the procedures for t...

Page 27: ...person to press the correct finger on the platen of the Sentry The fingerprint appears in the window The Sentry captures the fingerprint and the application compares the fingerprint to the fingerprin...

Page 28: ...ibe how to capture a fingerprint with a Crossmatch demonstration program Your application can appear different The required steps are the same 1 Start the application to capture the biometrics 2 Sign...

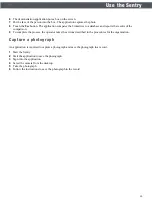
Page 29: ...ts of the comparison 9 To complete the process the operator takes the actions described in the procedures for the organization Capture a photograph An application is required to capture a photograph a...

Page 30: ...20 Verifier Sentry Operator Manual 870391 V1 1 Introduction Use the Sentry...

Page 31: ...the battery and remove the battery from the battery compartment Table 13 Items in the Sentry battery compartment 1 The cover latch for the battery compartment The latch slides to release the cover The...

Page 32: ...se the following procedure to insert a SAM card There are two SAM card connectors in the battery compartment next to the Sentry label 1 Remove the battery See Remove the battery on page 21 2 Select an...

Page 33: ...o the battery contacts 1 Remove the battery See Remove the battery on page 21 2 Press the SIM card into the SIM slot until the card releases from the slot 3 Remove the SIM card 4 Insert the battery Se...

Page 34: ...5 Close and lock the cover on the Micro SD card connector 6 Insert the battery See Install the battery on page 22 Find the Product Label Use the following procedure to find the product label for the...

Page 35: ...r the Sentry during the warranty period at zero charge see Warranty for Warranty Terms After the warranty has expired technical support is available at a given cost per hour Contact the Customer Care...

Page 36: ...end the product to Crossmatch for service Crossmatch accepts all charges to return the product to the customer The product is not in the warranty period The customer accepts all charges Note You must...

Page 37: ...warranty guarantee or promise that your Crossmatch Equipment will conform to its specification or will not fail Crossmatch shall incur no liability under this Limited Warranty and this Limited Warran...

Page 38: ...Center for inspection You will be contacted with an estimated price and time of repair or replacement after analysis No repairs or replacements will be made until Crossmatch receives a Purchase Order...

Page 39: ...12 E e mail 25 e mail see contact information F FCC RF exposure requirements 3 FCC statement 3 flat fingerprints 2 flats 2 freight guidelines 26 not under warranty 26 under warranty 26 front of the S...

Page 40: ...esktop 13 docking station alignment slots 12 front 8 left side 9 light source for photos 11 microphone 8 platen surface 8 read a barcode 19 reader for a contactless card 11 release for the bezel cover...

Reviews: