background image

41

Static IP Configuration

Step 4:

Write down the values for “IP Address,” “Subnet Mask” and
“Default Gateway” in the chart on page 34.

Write down the “IP Address,” “Subnet Mask” and “Default Gateway”

Step 5:

Select “Obtain an IP address from a DHCP Server” on this dialog.

Select “Obtain an IP address from a DHCP Server”

Step 6:

A dialog appears warning you that values on these pages will
override DHCP values. Click 

Yes

.

Click 

Yes

 to use DHCP

Summary of Contents for Pivio

Page 1: ...Crossport Systems PivioTM Network Security System Crossport Systems Inc www crossport com User s Guide Rev 1 7g April 16 2001...

Page 2: ...on of Pivio Network Security System Rob Arnold Tom Arnold Steve Coretti Edgar Faulkner Chad Fischer Ron Heinrichs Case Kuehn Aaron Logue John Mohr Nikos Mouat Bill Patterson Jess Roberts Divina Segui...

Page 3: ...IP configuration 21 What is a dynamic IP address 22 Configuring the Pivio Firewall 23 Configuration complete 25 Set up your password 26 Registering your Pivio Firewall 28 Testing your configuration 3...

Page 4: ...70 Configuring the Pivio Firewall 72 Configuration complete 74 Set up your password 75 Registering your Pivio Firewall 77 Testing your configuration 81 Chapter 6 Pivio System Services 83 Signing up fo...

Page 5: ...ailable 111 When using software firewalls 112 Chapter 10 Advanced Settings 113 What the Online light means 114 Connectivity settings for the Internet 115 Connectivity settings for your LAN 117 Using S...

Page 6: ...vi Table of Contents...

Page 7: ...incorporates firewall virtual private networking VPN and management services The Pivio System is secure cost effective and an easy to use solution for your Internet security needs The Pivio Network S...

Page 8: ...eptible to these attacks The Pivio System prevents many of the most common types of attacks With the Pivio System you control what information passes to and from your computer IT managers can safely a...

Page 9: ...ions you can send sensitive information to remote locations without compromising security Management Reporting The Pivio System includes detailed and monthly summary reports Reports are presented in a...

Page 10: ...10 Pivio Network Security System User s Guide Technical Support Phone 425 576 8382 Fax 425 576 9953 URL http www crossport com Email support crossport com...

Page 11: ...ate instructions for the Pivio Firewall and the Pivio Plus Firewall The remaining chapters in this User s Guide apply to both the Pivio Firewall and the Pivio Plus Firewall Model identification The ea...

Page 12: ...t for the Pivio Firewall Before you begin installing the Pivio Firewall please check the contents of the box You should have Pivio Firewall AC adapter One red Ethernet crossover cable QuickStart CD RO...

Page 13: ...net Right Flashes with traffic Online On when Internet sites can be reached VPN On when VPN connection is active Update Flashes when Update available AC In Plug AC adapter in here LAN Cable from Compu...

Page 14: ...your DSL Cable modem to your com puter or network hub Unplug it from the modem and plug it into the port labeled LAN located on the Pivio Firewall Step 5 Plug one end of the red cable into the port la...

Page 15: ...15 Getting Started...

Page 16: ...the Pivio Plus Firewall Before you begin installing the Pivio Plus Firewall please check the contents of the box You should have Pivio Plus Firewall AC adapter One red Ethernet crossover cable QuickS...

Page 17: ...hen Internet sites can be reached VPN On when VPN connection is active Update Flashes when Update available AC In Plug AC adapter in here Uplink Cable from Computer hub goes here light green when corr...

Page 18: ...Cable modem to your com puter or network hub Unplug it from the modem and plug it into the port labeled Uplink located on the Pivio Plus Firewall Step 5 Plug one end of the red cable into the port la...

Page 19: ...19 Getting Started...

Page 20: ...20 Pivio User s Guide...

Page 21: ...ternet Once the Pivio Firewall is configured you are protected from intrusion and hacking from outside sources This chapter covers how to configure the Pivio Firewall if you use a dynamic IP address I...

Page 22: ...s There are two general types of IP addresses static and dynamic A static IP address is always the same A dynamic IP address can change every time you connect to the Internet How to determine if you h...

Page 23: ...er to the Pivio Firewall and displays information about configuration If your browser uses a home page that is on the Internet you will automatically connect to the Pivio Firewall The Pivio firewall s...

Page 24: ...a screen shown below it usually means your ISP as signed you a static IP and you need to go to the next chapter to continue the setup If you see this screen it usually means you do not have a dynamic...

Page 25: ...5 Dynamic IP Configuration Configuration complete The Configuration Complete page indicates that the Pivio Firewall found your ISP and obtained an IP address The Pivio Firewall is correctly configured...

Page 26: ...ars Use this screen to define an account and password Step 2 Type in a one to eight character name for the account There is only one account per Pivio Firewall When you choose a different user name yo...

Page 27: ...sword Caution The password can be reset by resetting the Pivio Firewall If someone has access to the firewall they can simply reset the device to change the password If you need a high level of physic...

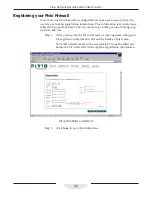
Page 28: ...itted to Crossport Systems You can also set up a billing account and sign up for Pivio Services Step 1 After you log into the Pivio Firewall a screen appears asking you for registration information Fi...

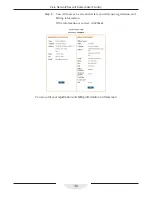
Page 29: ...your billing information for Pivio services Note that fields marked with a red asterisk must be filled out before the Pivio Firewall will accept the billing information Fill out the fields on the Ser...

Page 30: ...System User s Guide Step 5 You will now see a screen that lets you edit your registration and billing information If the information is correct click Next You can edit your registration and billing i...

Page 31: ...n also view and change your registration and billing information Use the Services page to subscribe to Pivio Services Step 7 To complete installation restart your browser You do not need to reboot you...

Page 32: ...and is working If you do not get the expected results please refer to The Pivio Firewall Troubleshooting Guide for information on how to locate the problem Step 1 Launch your Internet browser Step 2...

Page 33: ...time you connect to the Internet When you connect to the Internet through a dial up connection you usually get a dynamic IP address How to determine if you have a static IP address To determine if you...

Page 34: ...reset the Pivio Firewall you will need to re enter these values Write the values in the following table before you erase them Each of these entries will be a set of four numbers separated by periods f...

Page 35: ...mputer on your network Note Without the Pivio Firewall each computer you connect to the Internet requires a separate IP address With the firewall you use only one IP address for all your computers The...

Page 36: ...f available network compo nents that your network is using and click Properties Find the TCP IP setting your network is using There will usually be several different items in this list Your network pr...

Page 37: ...the front You will do two things on this page Write down the IP Address and Subnet Mask that is already there Write these down on the chart on page 34 Change the setting to Obtain an IP Address Automa...

Page 38: ...ove it Multiple Gateway numbers Windows will allow more than one Gateway number although only one of those numbers is actually used If you have more than one Gateway number you need to find the one th...

Page 39: ...down the DNS Server Search Order numbers Step 6 Select Disable DNS Click on Disable DNS Step 7 Click on OK to go back to the Network page Click on OK on the Network page to close the Network page Step...

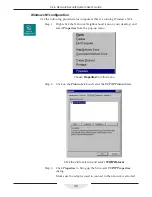
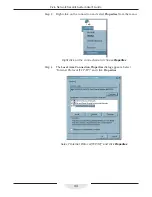
Page 40: ...k Neighborhood icon on your desktop and select Properties from the pop up menu Choose Properties from this menu Step 2 Click on the Protocols tab and select the TCP IP Protocol item Click the Protocol...

Page 41: ...hart on page 34 Write down the IP Address Subnet Mask and Default Gateway Step 5 Select Obtain an IP address from a DHCP Server on this dialog Select Obtain an IP address from a DHCP Server Step 6 A d...

Page 42: ...der numbers Step 8 Use Remove to remove all the DNS values from the list The Pivio Firewall will provide the DNS values to the computer as needed Step 9 Click on OK to go back to the Network page Clic...

Page 43: ...icon on your desktop and select Properties from the pop up menu Choose Properties from this menu Step 2 A folder will open that displays all your network connections Select the connection you use for...

Page 44: ...the connection and select Properties from the menu Right click on the connection and choose Properties Step 4 The Local Area Connection Properties dialog appears Select Internet Protocol TCP IP and cl...

Page 45: ...6 Select Obtain an IP address automatically on this dialog Also select Obtain DNS server address automatically on this dialog Select Obtain an IP address automatically Select Obtain DNS server addres...

Page 46: ...ystem User s Guide Macintosh configuration Use this procedure for computers running the Macintosh OS Version 8 or newer Step 1 Open the Control Panel on the Apple menu and choose the TCP IP item Choos...

Page 47: ...w in the chart on page 34 The Router address is another name for Gateway The Name server addr goes in the DNS Servers listing Write down the values shown in your dialog Step 3 Click on the arrows on t...

Page 48: ...need to enter anything for DHCP Client ID You do not need to enter anything on this dialog Step 5 Choose Close from the File menu to close this dialog When prompted to save your changes click on Save...

Page 49: ...0 UG 40 0 0 eth0 The default route destination 0 0 0 0 towards the IP 192 168 1 1 is the gateway The other entries are a forced broadcast out the device eth0 destination 255 255 255 255 and a connect...

Page 50: ...255 0 NETWORK 172 30 192 0 BROADCAST 172 30 192 255 GATEWAY 172 30 192 1 ifconfig eth0 IPADDR netmask NETMASK broadcast BROADCAST Other Linux implementations may vary Also you may need to update etc...

Page 51: ...in 172 30 192 1 this is the IP address of the Pivio Firewall This usually indicates a problem with your Domain Name Server DNS configuration which you will need to solve before connecting to the Inter...

Page 52: ...lected and click Next Make sure Static IP is selected Step 3 On the next page enter your IP address Subnet Mask Gateway and DNS addresses from the chart on page 34 Enter your IP address Subnet mask Ga...

Page 53: ...53 Static IP Configuration Configuration complete The Configuration Complete page indicates that the Pivio Firewall found your ISP and obtained an IP address The Pivio Firewall is correctly configured...

Page 54: ...ars Use this screen to define an account and password Step 2 Type in a one to eight character name for the account There is only one account per Pivio Firewall When you choose a different user name yo...

Page 55: ...sword Caution The password can be reset by resetting the Pivio Firewall If someone has access to the firewall they can simply reset the device to change the password If you need a high level of physic...

Page 56: ...itted to Crossport Systems You can also set up a billing account and sign up for Pivio Services Step 1 After you log into the Pivio Firewall a screen appears asking you for registration information Fi...

Page 57: ...your billing information for Pivio services Note that fields marked with a red asterisk must be filled out before the Pivio Firewall will accept the billing information Fill out the fields on the Ser...

Page 58: ...System User s Guide Step 5 You will now see a screen that lets you edit your registration and billing information If the information is correct click Next You can edit your registration and billing i...

Page 59: ...n also view and change your registration and billing information Use the Services page to subscribe to Pivio Services Step 7 To complete installation restart your browser You do not need to reboot you...

Page 60: ...and is working If you do not get the expected results please refer to The Pivio Firewall Troubleshooting Guide for information on how to locate the problem Step 1 Launch your Internet browser Step 2...

Reviews: