background image

16

English

Notice the supply power voltage: 

in power connec-

tion, be sure to note whether the power supply volt-

age is the same as that labeled on the tool nameplate� 

When the power supple voltage is higher than the volt-

age applicable to the tool, an accident will happens 

to the user and meanwhile the tool itself will be de-

stroyed. Therefore, in case of the failure to confirm the 

power supply voltage, never plug in arbitrarily� On the 

contrary, when the power supply voltage is lower than 

that needed for the tool, the motor will be damaged�

Safety  guidelines  during  power  tool 

operation

All instructions have to be read� In case of 

using the machine not in accordance with 

the following provisions, electric shock, fire 

or serious injury may occur�


Check that the drill bit has been clamped in proper 

position or not prior to operation�


Power tool working will generate vibration and you 

should carefully confirm that screws in different places 

still are tightened or not prior to operation�


Wear blinder in operation to protect eyes�


Maintain the keenness of the drill bit so as to achieve 

the optimum and safest efficiency.


When replace or assemble the accessories, the op-

eration must follow the instructions of the accessory 

strictly�


If the productor has any problems, you must not try 

to repair personally, please take it to the local assigned 

maintenance center for inspection�


Fix the workpiece as far as possible� The workpiece 

shall be fixed with fixing device or pincer pliers, which 

shall be fastness than holding the piece in hand�


Before powered on, the switch must be confirmed 

in "off" position; before you put down the power tool, it 

must be turned off and the power plug must be pulled 

out�


When the accessory is totally static, then the power 

tool can be put down�


Never let the power wire touch the drill bit or sur-

rounding parts in operation, or the power wire may be 

damaged� The power tool with broken wires must not 

be used� If the power wire is damaged in the working, 

then the damaged wire must not be touched, and the 

plug must be pulled out immediately� The damaged 

wire shall increase the danger of user's electric shock�


Chiseling walls, floors or on similar occasions, pay 

attention to keep away from gas, tap water pipeline 

and electric wire and operating tools in those places 

shall keep away from touching metal parts� The appro-

priate detector shall be used so as to find out the loca

-

tion of the concealed power wire� Or you can require 

the relevant data from the local power supply entity� 

The wires that are drilled through shall result in the fire 

and electric shock� The damaged gas pipe will resulted 

in the explosion� If the water pipe is drilled through, the 

property loss will be caused�


If the accessory installed on the power tool gets 

clamped, the power tool must be turned off immedi-

ately and stay calm� At the time, the power tool will 

generate ultra-high reaction torque, and result in the 

return stroke� The accessory installed on the power 

tool is easy to be clamped, like: the power tool is in 

hypercharge, or the accessory installed on the power 

tool inclines in the workpiece�


The concealed electric wire or the power wire of the 

power tool may be cut off in operation, and then the in-

sulated handle must be held to operate the power tool� 

If the power tool contacts the charged circuit, then the 

metal parts on the power tool shall conduct electricity, 

and the operator may have electric shock�


Two handles of the productor must be held with both 

hands tightly in operation, and the base must be sta-

ble� Both hands can hold the power tool stably; one 

hand operation must be avoided�


The  flat  chisel  must  not  be  used  in  the  rotational 

state (such as rotary drill and hammer drill), or the chis-

el will be blocked and the power tool will lose control�


Only when you wear gloves then you can touch the 

accessories, the drill bits and accessories will be hot 

in operation, and it is easy to get burn� Never imme-

diately touch the drill bit or parts around it upon the 

end of work, for those parts will be scalding and scald 

your skin� Wear gloves and middle rest can reduce the 

vibration and the injury to the hands and arms�


Hands and body must not be placed between the 

power tool and the wall or column so as to prevent 

the power tool from flying off when the drill bits gets 

blocked�


In case using extended power wire, please use dou-

ble insulation power wire with the same specification 

as the power tool�


Avoid stopping an power tool motor when loaded�


Never remove any chips or fragments with your 

power tool's motor running�


Never change the chisel design or use attachments 

and appliances, which are not recommended for your 

power tool� 


When working, never press the power tool too hard, 

as this might lead to the chisel seizing and motor over-

loading�


Avoid the chisel seizing in the material worked in� 

If this happens, do not try to release them with your 

power tool motor� It may damage the motor�


Never force out the chisels stuck in the material you 

are working on with a hammer or other objects the 

chipped off metal particles may harm both the operator 

and the persons who are nearby�


Avoid overheating your power tool, when using it for 

a long time�


During operation, especially on slippery or uneven 

surfaces as well as when working near cliffs, slopes, 

or at elevated conditions, it is necessary to exclude the 

possibility of falling of both the operator and the power 

tool (fencing structures or preventers must be used)�


In the course of the operations related to the de-

struction of building structures, it is necessary to per-

form the correct assessment of the impact of such 

operations and to take necessary safety measures� 

For example, choose the correct place for work and 

consider escape routes depending on the debris fall-

ing direction�


While performing the road work, it is necessary to 

comply with the special safety rules (install the re-

quired road signs, wear appropriate clothing, etc�)�

Warning:  the  chemical  substances 

contained  in  dust  generated  in  sanding, 

cutting,  sawing,  grinding,  drilling  and 

other construction industry activities may 

result  in  cancer,  congenital  deficiency  or  be 

harmful  to  the  fertility.

 The ion of some chemical 

substances shall be:

Summary of Contents for CT18095

Page 1: ......

Page 2: ...ploi pages 5 6 20 25 Italiano Disegni esplicativi pagine Precauzioni generali di sicurezza manuale istruzioni pagine 5 6 26 32 Espa ol Dibujos explicativos p ginas Recomendaciones generales de segurid...

Page 3: ...ovensky Vysvet uj ce v kresy strany V eobecn bezpe nostn pokyny prev dzkov pr ru ka strany 5 6 65 70 Rom n Desene explicative pagini Recomand ri generale privind siguran a manual de instruc iuni pagin...

Page 4: ...4 Inhalt Content Sommaire Indice Contenido ndice indekiler Zawarto Obsah Obsah Con inut Turinys 5 6 111 117 5 6 118 123 5 6 124 129...

Page 5: ...5...

Page 6: ...6...

Page 7: ...ann zum Stromschlag Brand und oder zu schweren Verletzungen f hren Bewahren Sie alle Warnungen und Anweisungen f r die Zukunft auf Der Begriff Elektrowerkzeug in den Warnhinweisen bezieht sich auf Ihr...

Page 8: ...Schmuck oder lange Haare k nnen von sich bewegenden Teilen erfasst werden Wenn die Werkzeuge f r den Anschluss von Staubabsaugung und Sammeleinrichtungen vor gesehen sind vergewissern Sie sich dass di...

Page 9: ...Zu beh rs Wenn das Produkt irgendwelche Probleme aufweist versuchen Sie nicht es selbst zu reparieren sondern bringen Sie das Produkt zu Ihrem lokalen Servicezen trum zur berpr fung Befestigen Sie da...

Page 10: ...u nung oder Schutzausr stung verwenden W hrend der mit Abbruch von Geb uden zusam menh ngenden Arbeiten ist es notwendig die Aus wirkungen dieser Arbeiten richtig zu auszuwerten und erforderliche Sich...

Page 11: ...lle 16 Innenh lle 17 Filzst psel 18 Schmierbohrung Zubeh r Abgebildetes oder beschriebenes Zubeh r geh rt teilweise nicht zum Lieferumfang Installation und Regelung der Elektro werkzeugteile Vor jegl...

Page 12: ...und dr cken Keine berm ige Kraft aus ben die Energie des Schlagmechanismus ist ausreichend f r die effektive Leistung Es ist darauf zu achten dass das Arbeitszubeh r nicht zu tief in das verarbeitete...

Page 13: ...kung ausge bt wer den Beim Abladen Aufladen ist es unzul ssig irgendei ne Technologie zu verwenden die auf dem Grundsatz der befestigenden Verpackung beruht Umweltschutz Rohstoffr ckgewinnung statt M...

Page 14: ...ls in explosive atmos pheres such as in the presence of flammable liq uids gases or dust Power tools create sparks which may ignite the dust or fumes Keep children and bystanders away while oper ating...

Page 15: ...con sult their physician and the medical implant manufac turer before operating this power tool Power tool use and care The persons with lowered psychophysical or men tal aptitudes as well as children...

Page 16: ...d like the power tool is in hypercharge or the accessory installed on the power tool inclines in the workpiece The concealed electric wire or the power wire of the power tool may be cut off in operati...

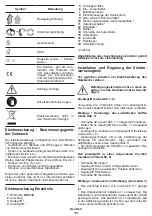
Page 17: ...manufacture XXXXXXX serial number HEX 30 HEX 30 chuck or accessory shank type Read all safety regulations and instructions Wear safety goggles Wear ear protectors Wear a dust mask Symbol Meaning Disco...

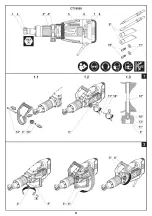
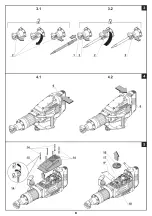
Page 18: ...accessories see fig 3 Release the retainer 2 as shown in figure 3 1 Install replace the working accessory in the chuck When installing the working accessory it is necessary to clear the shank end pre...

Page 19: ...and remove it see fig 5 Remove inner cover 16 Attention don t remove felt plug 17 Clean with cloth the area around the lubrication hole 18 Add the grease 50g from tube 9 into lubrication hole 18 as sh...

Page 20: ...les instruc tions Le non respect des avertissements et des instructions peut provoquer une d charge lectrique un feu et ou des blessures graves Conserver tous les avertissements et instructions pour...

Page 21: ...ussi re La familiarit acquise par une utilisation fr quente des outils ne doit pas vous faire devenir plus complaisant et ignorer les principes de s cu rit des outils Une action n gligente peut provoq...

Page 22: ...e doit tre d branch e imm diatement Le fil endommag augmentera le risque de choc lectrique des utilisateurs En burinant les murs planchers ou occasion simi laires faites attention pour tenir l cart de...

Page 23: ...himiques doit tre avant tout travail de r paration et de remplace ment de la machine la fiche d alimentation doit tre au pr alable retir e le dioxyde de silicium transparent et les autres produits de...

Page 24: ...ntage de la poign e suppl men taire voir la fig 1 Posez le boulon 12 comme illustr la fig 1 1 Posez l crou 13 dans la poign e de fixation 3 comme illustr la fig 1 1 Posez la poign e suppl mentaire 4 e...

Page 25: ...ceaux de tuyau treuils crics etc Entretien de l outil lectrique mesures pr ventives Avant de commencer travailler avec l outil lec trique s assurer qu il est d branch Lubrification d outil lectrique v...

Page 26: ...leggere il manuale di istruzioni Regole generali di sicurezza ATTENZIONE Leggere tutte le avverten ze di sicurezza e tutte le istruzioni La mancata osservanza delle avvertenze e del le istruzioni pu...

Page 27: ...co in situazioni impreviste Vestirsi adeguatamente Non indossare abiti lar ghi n gioielli Tenere capelli indumenti e guanti lontano dai componenti in movimento Vestiti lar ghi gioielli o capelli lungh...

Page 28: ...uire attentamente le istruzioni dell ac cessorio quando si sostituisce o viene montato Se il prodotto presenta dei problemi non si deve tentare di ripararlo personalmente ma si prega di por tarlo al c...

Page 29: ...are la caduta dell operatore e dell u tensile Nel corso delle operazioni necessarie per la demoli zione di strutture edilizie bisogna svolgere una valuta zione dell impatto di tali operazioni e di con...

Page 30: ...rbo nio 9 Tubo con lubrificante 10 Vite di bloccaggio della impugnatura supplemen tare 11 Rondella 12 Bullone 13 Dado 14 Vite di copertura esterna 15 Copertura esterna 16 Copertura interna 17 Tappo fe...

Page 31: ...zioni sul proprio corpo Durante il funzionamento assicurarsi di regolare l accessorio in base al materiale lavorato n troppo vicino alla punta poich in questo modo l utensile elet trico dovr essere sp...

Page 32: ...cchi elettrici Categoricamente non far cadere alcun oggetto sulla confezione durante il trasporto Durante lo scarico carico non si possono utilizzare qualsiasi tipo di tecnologia che funziona sul prin...

Page 33: ...e las advertencias e ins trucciones puede provocar una descarga el ctrica incendio y o lesiones graves Conserve todas las advertencias e instrucciones para referencia en el futuro El t rmino herramien...

Page 34: ...positivos para la co nexi n de las instalaciones de extracci n y reco lecci n de polvo aseg rese de que se conecten y utilicen correctamente El uso del dispositivo para la recolecci n de polvo puede r...

Page 35: ...rmar que el inte rruptor est en la posici n apagado antes de apagar la herramienta el ctrica se debe apagar y desenchufar Cuando el accesorio est totalmente est tico re ci n en ese momento se puede de...

Page 36: ...o de la direcci n en que caigan los escombros Mientras se realizan obras de pavimentaci n es necesario cumplir con las reglas especiales de segu ridad instalar los letreros requeridos usar vestimenta...

Page 37: ...a herramienta el ctrica Antes de llevar a cabo cualquier trabajo sobre la herramienta el ctrica debe desconectarse de la fuente de energ a No apriete demasiado los elementos de ajuste para evitar da a...

Page 38: ...traci n excesiva del accesorio de tra bajo en el material que se est procesando por ejem plo cuando afloje la suciedad o en el transcurso de la destrucci n de estructuras de edificios dado que el acce...

Page 39: ...usar ning n tipo de tecnolog a que funcione bajo el principio de sujeci n de embalajes Protecci n del medio ambiente Recicle las materias primas en lugar de eliminarlas como basura Las herramientas l...

Page 40: ...O Leia todos os avisos de seguran a e todas as instru es O incumprimen to das instru es e avisos de seguran a pode ter como consequ ncia a exist ncia de perigo de inc ndio de choques el tricos e ou de...

Page 41: ...s est o ligadas e de que s o devidamente utilizadas A utiliza o da recolha do p pode reduzir os perigos relacionados com o p N o permita que a familiaridade ganha com a utiliza o de ferramentas o torn...

Page 42: ...esligada e a ficha retirada da tomada Quando o acess rio estiver completamente est ti co pode pousar a ferramenta el trica Nunca permita que o fio da alimenta o toque na broca ou em qualquer uma das p...

Page 43: ...da dire o de queda dos res duos Ao efetuar trabalhos em estrada necess rio se guir as regras especiais de seguran a instala o dos sinais rodovi rios exigidos utiliza o de roupa ade quada etc Aviso As...

Page 44: ...idas Instala o e afina o dos elementos da ferramenta el ctrica Antes de proceder limpeza ou repara o da fer ramenta el ctrica deve deslig la da electricidade N o aperte demasiado os elementos de apert...

Page 45: ...siva A energia do mecanismo de percuss o suficiente para um desempenho eficaz Evite penetra o excessiva do acess rio de tra balho no material a ser processado por exemplo quando libertar solo ou duran...

Page 46: ...Quando carregar descarregar n o use qualquer tipo de tecnologia que funcione com o princ pio de fi xa o da caixa com pin as Protec o ambiental Reciclagem de mat rias primas em vez de elimina o de lixo...

Page 47: ...ciddi yaralanmalara yol a abilir leride ba vurmak zere t m uyar lar ve talimatlar kaydedin Uyar larda ge en elektrikli alet elektrik ebekesin den beslenen kablolu elektrikli alet veya pille al an kabl...

Page 48: ...f veya pasif t bbi implantlar n i levini engelleyebi lir Ciddi veya l mc l yaralanma riskini azaltmak i in t bbi implantlar olan ki ilerin bu elektrikli aleti al t r madan nce doktorlar na ve t bbi im...

Page 49: ...sakin kal nmal d r Bu esnada elektrikli alet y ksek d zeyde kar kuvvet uygulayacak ve geri tepmeye neden olacakt r Elektrik li alete tak l olan aksesuar kolayl kla s k abilir elekt rikli alet a r y kl...

Page 50: ...li kullan m na imkan verecektir Sembol Anlam K r c Gri renkle i aretli yerler yumu ak tutamak yal t ml y zey Seri numaras etiketi CT model XX retim tarihi XXXXXXX seri numaras HEX 30 HEX 30 kovan veya...

Page 51: ...ntaj de i tirilmesi bkz ek 3 Tutucuyu 2 ekil 3 1 de g sterildi i ekilde serbest b rak n leme aksesuar n tak n de i tirin leme aksesu ar n takarken ba lang ta sap ucunu temizlemek ge rekir Aksesuar sad...

Page 52: ...lama deli inin 18 etraf n bezle temizleyin T pten 9 ya lama deli ine 18 ek 5 te g sterildi i gibi 50g gres ekleyin kapa 16 yerine yerle tirin D kapa 15 tak n ve vidalar 14 s k n r nle birlikte verilen...

Page 53: ...cze stwa oraz wszystkie instrukcje Nieprzestrze ganie instrukcji i ostrze e mo e skutkowa pora eniem pr dem elektrycznym po arem i lub po wa nymi obra eniami Wszystkie ostrze enia i instrukcje zachowa...

Page 54: ...zbieraj cych py y za pewni aby zosta y pod czone i prawid owo u y wane U ywanie urz dze do zbierania py w mo e zmniejszy zagro enia zwi zane z obecno ci py w Nie pozw l aby do wiadczenie zdobyte w wyn...

Page 55: ...b innych cz ci b d cych w ruchu poniewa mog uszkodzi przew d Nie u ywa elektronarz dzia z uszkodzonym przewodem zasilania W przypadku uszkodzenia przewodu zasilania podczas pracy nie dotyka go i natyc...

Page 56: ...szkodliwie wp ywa na p odno Szkodli wymi substancjami chemicznymi mog by na przy k ad przed przyst pieniem do naprawy lub wymiany wyposa enia wy czy wtyczk z gniazda przezroczysty dwutlenek krzemu i...

Page 57: ...Monta demonta dodatkowego uchwytu patrz rys 1 W o y rub 12 jak pokazano na rys 1 1 Za o y nakr tk 13 do uchwytu zaciskowego 3 jak pokazano na rys 1 1 Zamontowa dodatkowy uchwyt 4 i dokr ci uchwyt zac...

Page 58: ...y pomocy innych narz dzi lub obiekt w rur ki wyci gi podno niki itp Konserwacja elektronarz dzia profilak tyka Przed przyst pieniem do wykonywania wszystkich procedur elektronarz dzie nale y konieczni...

Page 59: ...upozorn n a pokyn m e v st k razu elektrick m proudem po ru nebo v n mu razu Ve ker upozorn n a pokyny uschovejte pro bu douc pou it Pojem elektron ad u van v upozorn n ch odka zuje na va e elektron a...

Page 60: ...vejte ignorovat z sady bezpe nos ti pr ce s n ad m Nepozornost m e ve zlomku vte iny zp sobit v n raz Upozorn n Elektron ad m e p i provozu vy tv et elektromagnetick pole Toto pole m e za ur it ch ok...

Page 61: ...slu enstv namontovan v elektron ad uv zne pak je nutno elektron ad okam it vypnout Zachovejte klid V tomto okam iku vytvo elektron ad velmi vysok reak n to iv moment s n sledn m zp tn m r zem P slu en...

Page 62: ...d Symbol V znam Sb je ka sti ozna en edou m kk dr adlo s izolovan m povrchem t tek s v robn m slem CT model XX datum v roby XXXXXXX v robn slo HEX 30 HEX 30 se skl idlem nebo pro p slu enstv s d kem P...

Page 63: ...olohy Ut hn te up nac rukoje 3 Ut hn te roub 10 Mont v m na p slu enstv viz obr 3 Uvoln te zar ku 2 jak je zn zorn no na obr zku 3 1 Instalujte vym te pracovn p slu enstv P i insta laci pracovn ho p s...

Page 64: ...yt 16 Upozorn n neodstra ujte plst nou vlo ku 17 O ist te had kem plochu kolem mazac ho otvoru 18 Dopl te mazivo 50 g z tuby 9 do mazac ho otvo ru 18 jak je to zn zorn no na obr 5 Vra te vnit n kryt 1...

Page 65: ...ektrick m pr dom po iar a alebo v ne zranenie Uchovajte si v etky bezpe nostn upozornenia a pokyny pre bud ce pou itie Term n elektrick n radie v upozorneniach odkazuje na va e elektrick n radie nap j...

Page 66: ...z sady bezpe nosti Neopatrn innos m e sp sobi v ne zranenie v zlomku sekundy Varovanie Elektrick n radie m e po as prev dz ky vytv ra elektromagnetick pole Toto pole m e za ur it ch okolnost sp sobov...

Page 67: ...sobi po iar a z sah elektrick m pr dom Po kodenie plynov ho po trubia povedie k expl zii Prev tanie potrubia pre vodu sp sob stratu vlastnost Ak sa pr slu enstvo nain talovan na elektrickom n rad uch...

Page 68: ...znam Spr vna interpret cia symbolov v m umo n spr vne a bezpe n pou itie elektron radia Symbol V znam Zb ja ka asti ozna en sivou m k k dr adlo s izolovan m povrchom t tok s v robn m slom CT model XX...

Page 69: ...obr 2 Uvo nite skrutku 10 Uvo nite up naciu rukov 3 ako je to zn zornen na obr 2 Umiestnite pr davn rukov 4 do po adovanej po lohy Utiahnite up naciu rukov 3 Utiahnite skrutku 10 Mont v mena pr slu e...

Page 70: ...ivo po ka d ch 50 ho din ch prev dzky Uvo nite skrutky 14 vonkaj ieho krytu 15 a zlo te ho pozri obr 5 Odstr te vn torn kryt 16 Upozornenie neod stra ujte plsten vlo ku 17 O istite handri kou plochu o...

Page 71: ...iuni Reguli generale de siguran AVERTISMENT Citi i toate avertismen tele i instruc iunile de siguran Neres pectarea avertismentelor i a instruc iunilor poate avea drept rezultat un oc electric incendi...

Page 72: ...e a prafu lui asigura i v c acestea sunt conectate i utiliza te n mod adecvat Utilizarea dispozitivului de colectare a prafului poate reduce pericolele legate de praf Nu permite i ca familiarizarea re...

Page 73: ...nu trebuie utilizat n cazul n care cablul de alimentare este deteriorat n timpul func ion rii acesta nu trebuie atins iar tec rul trebuie scos din priz imediat Cablul deteriorat va cre te peri colul d...

Page 74: ...eficien e congenitale sau pot afecta fertilitatea Atomul electrizat al unor substan e chimice va fi nainte de orice lucrare de repara ie sau de n locuire a ma inii mai nt i trebuie s scoate i fi a ele...

Page 75: ...a demontarea m nerului adi ional vezi fig 1 Monta i bulonul 12 a a cum apare n fig 1 1 Monta i piuli a 13 n maneta 3 a a cum apare n fig 1 1 Monta i m nerul adi ional 4 i str nge i maneta 3 vezi fig 1...

Page 76: ...str ine sec iuni de conduct trolii p rghii etc M suri de ntre inere a uneltei electrice m suri preventive nainte de a executa orice lucrare asupra uneltei electrice scoate i fi a de alimentare din pr...

Page 77: ...60 Hz 420268 W 1500 W 840 100 127 V A 220 230 V A 10 6 5 min 1 1400 a J 50 HEX 30 kg lb 19 41 89 dB A 96 dB A 103 m s2 12 85 dB A 2006 42 EC EN 60745 1 EN 60745 2 6 Wu Cunzhen Merit Link Internationa...

Page 78: ...78 RCD RCD RCD GFCI ELCB...

Page 79: ...79...

Page 80: ...80 CCA CT XX XXXXXXX HEX 30 HEX 30...

Page 81: ...81 1 HEX 30 2 3 4 5 6 7 8 9 10 11 12 13 14 15 16 17 18 1 2 4 4 1 12 1 1 13 3 1 1 4 3 1 2...

Page 82: ...82 10 12 3 2 10 3 2 4 3 10 3 2 3 1 2 2 3 2 1 HEX 30 5 15 32 2 0 6 4 1 6 4 2 7 8...

Page 83: ...83 5 50 14 15 5 16 17 18 50 9 18 5 16 15 14 9 5 www crown tools com...

Page 84: ...0 60 Hz 420268 W 1500 W 840 110 127 V A 220 230 V A 10 6 5 min 1 1400 J 50 HEX 30 kg lb 19 41 89 dB A 96 dB A 103 m s2 12 85 dB A 2006 42 EC EN 60745 1 EN 60745 2 6 Wu Cunzhen Merit Link International...

Page 85: ...85 RCD RCD RCD GFCI ELCB off...

Page 86: ...86 off...

Page 87: ...87 CCA CT...

Page 88: ...88 HEX 30 HEX 30 1 HEX 30 2 3 4 5 6 7 8 9 10 11 12 13 14 15 16 17 18...

Page 89: ...89 1 2 4 4 1 12 1 1 13 3 1 1 4 3 1 2 10 12 3 2 10 3 2 4 3 10 3 2 3 1 2 o 2 3 2 1 HEX 30 5 15 32 2 0 on off 6 4 1 on off 6 4 2 7 8...

Page 90: ...90 5 50 14 15 5 16 17 18 50 g 9 18 5 16 15 14 9 5 www crown tools com...

Page 91: ...95 220 230 50 60 420268 1500 840 110 127 A 220 230 A 10 6 5 1 1400 50 HEX 30 19 41 89 dB A 96 dB A 103 2 12 85 dB A 2006 42 EC EN 60745 1 EN 60745 2 6 Wu Cunzhen Merit Link International AG Stabio 24...

Page 92: ...92 RCD GFCI ELCB...

Page 93: ...93...

Page 94: ...94...

Page 95: ...95 CT XX XXXXXXX HEX 30 HEX 30 1 HEX 30 2 3 4 5 6 7 8...

Page 96: ...96 9 10 11 12 13 14 15 16 17 18 1 2 4 4 1 12 1 1 13 3 1 1 4 3 1 2 10 12 3 2 10 3 2 4 3 10 3 2 3 1 2 2 3 2 5 15 32 2 0 6 4 1 6 4 2 7 8...

Page 97: ...97 5 50 14 15 5 16 17 18 50 9 18 5 16 15 14 9 5 www crown tools com...

Page 98: ...95 220 230 50 60 420268 1500 840 110 127 A 220 230 A 10 6 5 1 1400 50 HEX 30 19 41 89 dB A 96 dB A 103 2 12 85 dB A 2006 42 EC EN 60745 1 EN 60745 2 6 Wu Cunzhen Merit Link International AG Stabio 24...

Page 99: ...99 RCD GFCI ELCB...

Page 100: ...100...

Page 101: ...101 CT XX XXXXXXX HEX 30 HEX 30...

Page 102: ...102 1 HEX 30 2 3 4 5 6 7 8 9 10 11 12 13 14 15 16 17 18 1 2 4 4 1 12 1 1 13 3 1 1 4 3 1 2...

Page 103: ...103 10 12 3 2 10 3 2 4 3 10 3 2 3 1 2 2 3 2 5 15 32 2 0 6 4 1 6 4 2 7 8 5 50...

Page 104: ...104 14 15 5 16 17 18 50 9 18 5 16 15 14 9 5 www crown tools com i...

Page 105: ...kant nurodym ir sp jim kyla elektros sm gio gaisro ir arba sunki su alojim pavojus Visus sp jimus ir nurodymus i saugokite atei iai sp jimuose vartojamas terminas elektrinis rankis rei kia m s pagamin...

Page 106: ...rint suma inti sunki ar net mirtin su alojim pavoj rekomenduojame asmenims kurie turi medicininius implantus prie naudojant elektrin rank pasitarti su savo gydytoju ir medicininio implanto gamintoju E...

Page 107: ...lektrinio rankio maitinimo laid tad visuomet rekomenduojama rank laikyti u izoliuotos rankenos Jei elektrinis rankis prisilies prie atviros grandin s metalin s jo dalys veiks kaip laidininkai ir gali...

Page 108: ...nuo maitinimo tinklo Pasl pt laid arba buitini aptarnavimo linij pa eidimo pavojus Simbolis Reik m Jud jimo kryptis Sukimosi kryptis U rakinta Atrakinta Dvigubos izoliacijos apsau gos klas enklas patv...

Page 109: ...lektros tiekimo tam p tampa turi atitikti parametrus nurodytus elektros prietaiso identifikacin je lentel je Elektros instrumentas pateikiamas tinkamai sutep tas ir parengtas dirbti Naujam elektros pr...

Page 110: ...kadangi jis gali sul ti arba galite netekti teis s garantin remont Elektrinio rankio valymas Kad elektrinis rankis tarnaut ilgai ir saugiai b tina laikyti j var Per v dinimo angas 5 reguliariai pra p...

Page 111: ...CT18095 220 230 50 60 420268 1500 840 110 127 220 230 10 6 5 1 1400 J 50 HEX 30 19 41 89 A 96 A 103 2 12 85 A 2006 42 EC EN 60745 1 EN 60745 2 6 Wu Cunzhen Merit Link International AG Stabio 24 10 20...

Page 112: ...112 RCD GFCI ELCB...

Page 113: ...113...

Page 114: ...114 CCA CT XXXXXXX HEX 30 HEX 30...

Page 115: ...115 1 HEX 30 2 3 4 5 6 7 8 9 10 11 12 13 14 15 16 17 18 1 2 4 4 1 12 1 1 13 3 1 1 4 3 1 2 10 12 3 2 10 3 2 4 3 10 3 2 3 1...

Page 116: ...116 2 2 3 2 1 HEX 30 5 15 32 2 0 6 4 1 6 4 2 7 8 5 50 14 15 5 16 17 18 9 50 18 5 16 15 14 9...

Page 117: ...117 5 www crown tools com...

Page 118: ...118...

Page 119: ...119...

Page 120: ...120...

Page 121: ...121...

Page 122: ...122...

Page 123: ...123...

Page 124: ...124...

Page 125: ...125...

Page 126: ...126...

Page 127: ...127...

Page 128: ...128...

Page 129: ...129...

Page 130: ...130...

Page 131: ...131...

Page 132: ......

Reviews: