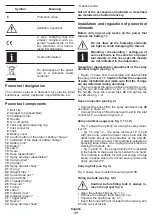
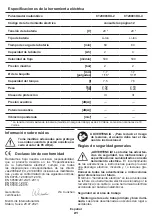
background image

18

English


It is recommended to prepare the solution for spray-

ing in a special container and then pour it into the 

tank 

8

� In this case, it is possible to mix it better� How-

ever, it is allowed to prepare the solution for spraying 

directly in the tank 

8

:


fill the tank 

8

 with water (you can see the volume 

of the filled water on the scale 

15

);


the cap 

6

 is marked and can be used as a meas-

uring cup� Pour the chemical into the cap 

6

 and add 

it to the tank 

8

 (see fig. 6.2). 

Caution: observe the 

recommended proportions when preparing the 

solution.


Screw the cap 

6

 onto the neck of the tank 

8

, install 

the sprayer top 

2

, and close the latches 

14


Holding the power tool in an upright position with 

one hand on the handle 

4

, and with the other hand on 

the bottom of the tank 

8

, shake the power tool several 

times to mix the solution for spraying�

Charging procedure of the power tool 

battery

Initial operating of the power tool
The power tool is supplied with a partially charged 

battery 13. Before the first use, the battery 13 must 

be fully charged.
Charging process (see fig. 7, 9)


Open the battery cover 

9

 (see fig. 7.1, 9.1).


Press the battery lock 

12

 and remove the battery 

13


(see fig. 7.2-7.3, 9.2-9.3).


Connect the charger 

19

 to the power supply�


Insert battery 

13

 into charger 

19

 (see fig. 7.4, 9.4).


Disconnect the charger 

19

 from power supply after 

charging�


Remove the battery 

13

 from the charger 

19

� In-

sert the battery 

13

 into the power tool, then close the 

cover 

9

Charger indicators (see fig. 8, 10)

Charger indicators 

29

 and 

30

 inform of the battery 

13


charging process� Signals of the indicators 

29

 and 

30


are shown on the label 

28

 (see fig. 8, 10).


Fig� 8�1, 10�1 - (the green indicator 

30

 is on, the 

battery 

13

 is not inserted in the charger 

19

) - the 

charger 

19

 is connected to the power network (ready 

for charging)�


Fig� 8�2, 10�2 - (the green indicator 

30

 is blinking, 

the battery 

13

 is inserted in the charger 

19

) - the bat-

tery 

13

 is being charged� 


Fig� 8�3, 10�3 - (the green indicator 

30

 is on, the 

battery 

13

 is inserted in the charger 

19

) - the bat-

tery 

13

 is fully charged�


Fig� 8�4, 10�4 - (the red indicator 

29

 is on, the bat-

tery 

13

 is inserted in the charger 

19

) - the charging pro-

cess of the battery 

13

 is terminated due to inappropriate 

temperature� When the temperature conditions are nor-

mal, the process of charging will resume�


Fig� 8�5, 10�5 - (the red indicator 

29

 is blinking, the 

battery 

13

 is inserted in the charger 

19

) - the charging 

process of the battery 

13

 is terminated because of its 

failure� Replace the faulty battery 

13

, its further use is 

prohibited�

In the process of charging the battery 13 

and  the  charger  19  become  hot,  it  is  a 

normal process.

Switching the power tool on / off

Short-term switching on / off

Switching on: 


To turn on the power tool, move the on / off switch 

5


to the "ON" position (see fig. 11.1).


To start spraying, press and hold the trigger 

31

 in 

this position (see fig. 11.1).

Switching off: 


To stop spraying, release the trigger 

31

 (see fig. 11.2).


To turn off the power tool, move the on / off switch 

5


to the "OFF" position (see fig. 11.1).

Long-term switching on / off

Switching on: 


To turn on the power tool, move the on / off switch 

5


to the "ON" position (see fig. 11.1).


To start spraying, press and hold the trigger 

31

 in 

this position (see fig. 11.1). Move the trigger 

31

 forward 

to fix it in the pressed position (see fig. 11.3).

Switching off: 


To stop spraying move the trigger 

31

 back and re-

lease it (see fig. 11.3).


To turn off the power tool, move the on / off switch 

5


to the "OFF" position (see fig. 11.1).

Design features of the power tool

Temperature protection (see fig. 8.6, 10.6)

The temperature protection system enables to auto-

matically deactivate the power tool in case of excess 

load or when the temperature of the battery 

13

 is ex-

ceeding 80°C� The system guarantees protection of 

the power tool from damage in case of noncompliance 

with the operation conditions�

When this protection system is activated indicators 

11


will  blink  as  shown  onto  fig.  8.6,  10.6  during  3  sec

-

onds�

Overheating protection (see fig. 8.6, 10.6)

Overheating protection system of the engine automati-

cally switches off the power tool in case of overheat-

ing� In this situation, let the tool cool before turning the 

power tool on again�

When this protection system is activated indicators 

11


will  blink  as  shown  onto  fig.  8.6,  10.6  during  3  sec

-

onds�

Overload protection (see fi

g. 8.6, 10.6)

Overload protection system of the engine automati-

cally switches off the power tool when it is operated 

in a manner that causes it to draw an abnormally high 

current�

When this protection system is activated indicators 

11


will  blink  as  shown  onto  fig.  8.6,  10.6  during  3  sec

-

onds�

Summary of Contents for CT29003HX

Page 1: ......

Page 2: ...guridad manual de instrucciones páginas 3 12 21 28 Русский Пояснительные рисунки страницы Общие указания по ТБ инструкция по эксплуатации страницы 3 12 29 37 Украïнська Пояснювальні малюнки сторінки Загальні вказівки по ТБ iнструкція з експлуатації сторінки 3 12 38 45 Қазақ тілі Түсіндіргіш әлеміштер беттер Жалпы қауіпсіздік жөніндегі ұсыныстар пайдалану нұсқаулығы беттер 3 12 46 53 3 12 54 60 3 1...

Page 3: ...3 ...

Page 4: ...4 ...

Page 5: ...5 ...

Page 6: ...6 ...

Page 7: ...7 ...

Page 8: ...8 ...

Page 9: ...9 ...

Page 10: ...10 ...

Page 11: ...11 ...

Page 12: ...12 ...

Page 13: ...lectric shock fire and or serious injury Save all warnings and instructions for future refer ence The term power tool in the warnings refers to your mains operated corded power tool or battery operat ed cordless power tool Work area safety Keep work area clean and well lit Cluttered or dark areas invite accidents Do not operate power tools in explosive atmos pheres such as in the presence of flamm...

Page 14: ...ng parts If devices are provided for the connection of dust extraction and collection facilities ensure these are connected and properly used Use of dust collection can reduce dust related hazards Do not let familiarity gained from frequent use of tools allow you to become complacent and ignore tool safety principles A careless action can cause severe injury within a fraction of a second Warning P...

Page 15: ... using only identical replacement parts This will ensure that the safety of the power tool is maintained Follow instruction for lubricating and changing ac cessories Safety guidelines during power tool op eration Before starting work Do not spray substances that may damage the power tool As a result if the power tool is damaged you will void your warranty Please read the manufacturer s instruction...

Page 16: ...do so may result in power tool damage in which case you will void your right to warranty repairs Dispose of spray residues strictly following the manufacturer s recommendations After rinsing the tank water should be drained to the places from which it cannot get into water bodies or groundwaters After finishing work wash your hands thoroughly wash yourself and rinse your throat It is also recom me...

Page 17: ...ase specific models are not indicated in the illustration Assembly disassembly adjustment of the spray atomizer length see fig 1 Figure 1 shows how to assemble and disassemble the spray atomizer 17 Caution follow the sequence of parts installation and make sure that the O rings are not deformed during assembly You can adjust the spray atomizer length by push ing the curved tube 24 in or out To do ...

Page 18: ...iate temperature When the temperature conditions are nor mal the process of charging will resume Fig 8 5 10 5 the red indicator 29 is blinking the battery 13 is inserted in the charger 19 the charging process of the battery 13 is terminated because of its failure Replace the faulty battery 13 its further use is prohibited In the process of charging the battery 13 and the charger 19 become hot it i...

Page 19: ...rn out batteries in time Decline of pro duction or a significantly shorter runtime of the power tool after charging indicates aging of the battery 13 and the need for replacement It should be taken into ac count that the battery 13 may discharge faster if the works take place in the temperature below 0 С In case of long time storage without use it is recom mended to store the battery 13 at room te...

Page 20: ...undam aged Tape or mask off open contacts and pack up the battery in such a manner that it cannot move around in the packaging Please also observe possibly more detailed national regulations Environmental protection Recycle raw materials instead of dispos ing as waste Power tool accessories and packaging should be sorted for environment friendly recycling The plastic components are labelled for ca...

Page 21: ...uede provocar una descarga eléctrica incendio y o lesiones gra ves Conserve todas las advertencias e instrucciones para referencia en el futuro El término herramienta eléctrica en las advertencias se refiere a su herramienta eléctrica accionada por la red eléctrica con cable o a una herramienta eléctrica accionada por batería inalámbrica Seguridad en el área de trabajo Mantenga el área de trabajo ...

Page 22: ...de baterías recoger o transportar la herra mienta Llevar las herramientas eléctricas con el dedo en el interruptor o conectar las herramientas eléctricas con el interruptor en encendido da lugar a accidentes Saque cualquier llave de ajuste o llave de tuerca antes de encender la herramienta eléctrica Si se deja una llave de ajuste o llave de tuercas unida a una parte giratoria de la herramienta elé...

Page 23: ...en contacto con compo nentes adyacentes Revisar las piezas correspon dientes Limpiar dichas piezas o reemplazarlas si es necesario Proteger la batería contra el calor por ejemplo también contra la irradiación solar continua y el fuego Existe peligro de explosión ADVERTENCIA Leer todas las instruc ciones y advertencias de seguridad Proteger el cargador de batería de la lluvia y la humedad La penetr...

Page 24: ...re la niebla está expuesta a la influencia del viento Esto puede acarrear consecuencias negativas daño a la salud contaminación ambiental No use la herramienta eléctrica si no hay líquido en el depósito Esto causará el desgaste rápido de las piezas de la herramienta eléctrica Si fuera necesario transportar la herramienta eléc trica mientras la usa asegúrese de verificar que esté ajustada la tapa d...

Page 25: ... armado 18 Cinta transportadora 19 Cargador 20 Cuerpo del atomizador del rociador 21 Anillo O 22 Tubo recto 23 Tuerca del tubo curvo 24 Tubo curvo 25 Accesorio roscado 26 Tuerca de la manguera 27 Embudo 28 Etiqueta 29 Indicador rojo 30 Indicador verde 31 Palanca de activación 32 Boquilla 33 Cabezal del atomizador del rociador Accesorios No todos los accesorios fotografiados o descritos están inclu...

Page 26: ...léctrica cuenta con una batería parcialmente cargada 13 Antes del primer uso la batería 13 se debe cargar completamente Proceso de carga ver fig 7 9 Abra la cubierta de la batería 9 ver fig 7 1 9 1 Presione el bloqueo de la batería 12 y retire la bate ría 13 ver fig 7 2 7 3 9 2 9 3 Conecte el cargador 19 al suministro de energía Inserte la batería 13 en el cargador 19 ver fig 7 4 9 4 Después de la...

Page 27: ...rtadora ver fig 4 Para un fácil transporte como también mejor movili dad mientras trabaja use la cinta transportadora 18 Adhiera la cinta 18 a los sujetadores 1 ver fig 4 Si es necesario ajuste la longitud de la cinta 18 para que le resulte cómoda para transportar la herramienta eléctrica Ajuste de la forma de la franja de rociado ver fig 12 13 La forma de la franja de rociado se puede ajustar gi ...

Page 28: ...enta con aire comprimido a través de las ranuras de ventilación 3 Servicio de post venta y servicio de aplicaciones Nuestro serivicio de post venta responde a sus pre guntas sobre el mantenimiento y la reparación de su producto así como también sobre los repuestos La información sobre los centros de servicio los diagra mas de las piezas y sobre los repuestos también se puede encontrar en www crown...

Page 29: ...поставляемые вместе с электроинструментом Несоблюдение предупреждений и инструкций мо жет привести к поражению электрическим током возгоранию и или серьезной травме Сохраните все предупреждения и инструкции для дальнейшего использования Термин электроинструмент используемый в тек сте предупреждений относится к электроинстру менту с питанием от электросети проводной или электроинструменту с питание...

Page 30: ...ь под воздействием наркотиче ских средств алкоголя или лекарств Ослабле ние внимания при работе с электроинструментом может привести к серьезной травме Используйте средства индивидуальной за щиты Всегда надевайте защитные очки Сред ства индивидуальной защиты такие как пыле защитная маска нескользящая защитная обувь каска или средства защиты органов слуха которые используются в соответствующих усло...

Page 31: ...ром другого типа может стать причиной возгорания Используйте электроинструменты только с предназначенными для них аккумуляторами Использование других аккумуляторов может при вести к риску получения травмы и возгорания Когда аккумулятор не используется не хра ните его рядом с такими металлическими пред метами как канцелярские скрепки монеты ключи гвозди шурупы и другие небольшие металлические предм...

Page 32: ...атегорически запрещается использование элек троинструмента детьми или подростками В радиусе 10 метров от работающего не должно быть посторонних людей или животных При при ближении посторонних лиц или животных необхо димо прекратить распыление Соблюдайте особую осторожность при работе в теплицах обеспечьте достаточную вентиляцию При распылении опасных веществ для предот вращения вдыхания или контак...

Page 33: ...ью Наклейка с серийным но мером CT модель XX дата производства XXXXXXX серийный но мер Ознакомьтесь со всеми указаниями по технике безопасности и инструкци ями Носите защитные очки Носите респиратор Носите защитную одежду Носите защитные перчат ки Не работайте в дождь Символ Значение Не нагревайте аккумуля тор выше 45 С Предо храняйте от длительного воздействия прямых сол нечных лучей Не выбрасыва...

Page 34: ...ь Вы можете изменять длину распылителя вдвигая или выдвигая изогнутую трубку 24 Для этого ос лабьте гайку 23 переместите изогнутую трубку 24 и затяните гайку 23 см рис 1 2 Подключение шланга см рис 2 Подключите шланг 16 к корпусу распылителя 20 как показано на рисунке 2 1 Подключите шланг 16 к верхней части опрыски вателя 2 к входному патрубку 7 как показано на рисунке 2 2 Использование распылител...

Page 35: ...зарядное устройство 19 процесс зарядки аккумулятора 13 остановлен из за его неисправности Замените неисправный аккуму лятор 13 его дальнейшее использование запре щено В процессе зарядки аккумулятор 13 и зарядное устройство 19 нагреваются это нормально Включение выключение электроин струмента Кратковременное включение выключение Включение Чтобы включить электроинструмент перемести те включатель вык...

Page 36: ...ента аккумулятор 13 Рекомендации по эксплуатации аккумулятора Своевременно заряжайте аккумулятор 13 не дожидаясь его полной разрядки Если при работе наблюдается падение мощности необходимо пре рвать работу и зарядить аккумулятор 13 Не заряжайте полностью заряженный аккумуля тор 13 это сократит срок его службы Заряжайте аккумулятор 13 при температу ре 10 C 40 C 50 F 104 F Если электроинструмент не ...

Page 37: ...орм только при перевозке аккумуля торов самим пользователем на автомобильном транспорте Соблюдайте особые требования к упаковке и мар кировке при перевозке с привлечением третьих лиц напр самолетом В этом случае при подготовке груза к отправке необходимо участие эксперта по опасным грузам Возможна отправка аккумуляторов только с непо врежденным корпусом Необходимо изолировать открытые контакты и у...

Page 38: ...стачаються разом із електроінструментом Недотримання попереджень та інструкцій може призвести до ура ження електричним струмом займання і або сер йозних травм Збережіть всі попередження та інструкції для подальшого використання Термін електроінструмент який використовуєть ся в тексті попереджень відноситься до електро інструменту з живленням від електромережі про відний або електроінструменту з жи...

Page 39: ...вжди надівайте захисні окуляри Засоби індивідуального захисту такі як пилозахисна маска нековзне захисне взуття каска або засоби захисту органів слуху які використовуються у відповідних умовах зменшують ймовірність отримання травм Не допускайте ненавмисного запуску елек троінструменту Перед підключенням до дже рела живлення та або акумулятора підняттям або перенесенням електроінструменту переко на...

Page 40: ...алежних умов електроліт може вилити ся з акумулятору уникайте контакту з ним Якщо контакт випадково відбувся промийте шкіру во дою Якщо електроліт потрапив в очі додатково зверніться по медичну допомогу Електроліт з акумулятору може викликати свербіж або обпік Уникайте ненавмисного включення Перш ніж вставляти акумулятор переконайтеся в тому що вмикач знаходиться у вимкненому положен ні Якщо при н...

Page 41: ...ете вдихнути або проковтнути частинки речовини яка розпилюється що може стати причиною алергічних реакцій отру єнь і навіть смерті Не спрямовуйте струмінь речовини яка розпилю ється на себе інших осіб або тварин Під час роботи враховуйте напрямок вітру й стій те таким чином щоб вітер не зносив на вас речо вину яка розпилюється Забороняється працювати під час сильного вітру Забороняється працювати ...

Page 42: ...идайте електроін струмент в побутове сміт тя Призначення електроінструменту Акумуляторний оприскувач призначений для роз пилення рідких речовин води пестицидів рідких добрив тощо Елементи пристрою електроінстру менту 1 Кріплення для ременя 2 Верхня частина оприскувача в зборі 3 Вентиляційні отвори 4 Рукоятка 5 Вмикач вимикач 6 Кришка баку і мірний стакан 7 Вхідний патрубок 8 Бак 9 Кришка акумулято...

Page 43: ... 8 лійку 27 не входить до комплекту постачання Рекомендується готувати розчин для розпилення в окремій ємності після чого заливати його в бак 8 У цьому випадку його можна краще перемішати Проте допускається приготування розчину для роз пилення безпосередньо в баку 8 наповніть бак 8 водою обсяг залитої води ви можете побачити на шкалі 15 кришка 6 має розмітку й може використовува тися як мірний ста...

Page 44: ...истема захисту двигуна від перегріву автоматич но вимикає електроінструмент у випадку перегріву У цій ситуації дайте електроінструменту охолонути перш ніж знову увімкнути його При спрацьовуванні цієї системи захисту індикато ри 11 блиматимуть як зображено на мал 8 6 10 6 протягом 3 секунд Захист від перевантаження див мал 8 6 10 6 Система захисту двигуна від перевантаження ав томатично вимикає еле...

Page 45: ...мі кат який ви розпилювати перед цим дотримуйтесь запобіжних заходів За необхідності ви можете відкрутити сопло 32 і прочистити отвір у ньому також отвори в голівці розпилювача 33 проволокою відповідного діаметру див мал 14 Увага не використовуйте для цієї процедури сталеву проволоку голки свердла тощо ви можете пошкодити сопло 32 або голів ку розпилювача 33 Промийте під проточною водою всі принал...

Page 46: ...рындамау тоқ соғуына өртке және немесе ауыр жарақатқа әкелуі мүмкін Барлық ескертулер мен нұсқауларды болашақта анықтама алу үшін сақтап қойыңыз Ескертулердегі электр құрал термині желіден жұмыс істейтін сымды электр құралын немесе батареядан жұмыс істейтін сымсыз электр құралын білдіреді Жұмыс аумағының қауіпсіздігі Жұмыс аумағын таза және жақсы жарықтандырылған күйде ұстаңыз Ретсіз не месе күңгі...

Page 47: ...дейсоқ іске қосылуды болдырмаңыз Құралды қуат көзіне және немесе батареялар жинағына қосу көтеру немесе ұстап жүру алдында қосқыш өшірулі күйде екеніне көз жеткізіңіз Электр құралды саусақты қосқышқа қойып ұстап жүру немесе қосқышы қосулы күйдегі электр құралдарына қуат беру сәтсіз жағдайларға әкеледі Электр құралын қосу алдында кез келген реттеу кілтін алыңыз Электр құралдың айналатын бөлігіне жа...

Page 48: ...ына саусақты қойып ұстау немесе қосулы тұрған электр құралдарға батарея жинағын салу сәтсіз жағдайларға әкеледі Батареяны ашпаңыз Қысқа тұйықталу қаупі бар Батарея зақымдалса және дұрыс емес пайдаланылса булар шығуы мүмкін Ыңғайсыздық сезген жағдайларда таза ауаны қамтамасыз етіңіз және медициналық көмекке жүгініңіз Булар тыныс алу жүйесін тітіркендіруі мүмкін Батарея ақаулы болса сұйықтық шығуы ж...

Page 49: ... ескеріп жел шашыратылған затты апармайтындай етіп тұрыңыз Қатты желде жұмыс жасамаңыз Жаңбыр астында жұмыс істеуге немесе электр құралын жаңбырда немесе қарда қалдыруға тыйым салынады Жұмыс кезінде қоршаған ауаның тұманға толатынын есте ұстаған жөн Ол бүріккіш заттың кішкене тамшыларынан тұрады олар кейіннен қоршаған беттерге орналасады Тұман тұнбасы жағымсыз болатын беттерді жабу керек Көшеде жұ...

Page 50: ...лалары Сымсыз бүріккіш сұйық заттарды суды пестицидтерді сұйық тыңайтқыштарды және т б шашыратуға арналған Қозғалтқыш құралдың құрамдастары 1 Белдік қыстырғыш 2 Бүріккіштің үстіңгі жағы жиналған 3 Ауа алмасатын тесіктер 4 Тұтқа 5 Қосу өшіру батырмасы 6 Резервуар қақпағы және өлшеуіш шыныаяқ 7 Кіріс қосылымы 8 Резервуар 9 Батарея қақпағы 10 Батареяны зарядтау күйін басқару түймесі 11 Батареяны заря...

Page 51: ...ғына кірмейді резервуар 8 мойнына салыңыз Ерітіндіні бүрку үшін арнайы контейнерге дайындаған жөн содан кейін оны резервуарға 8 құю керек Бұл жағдайда оны жақсылап араластыруға болады Алайда шашыратуға арналған ерітіндіні тікелей резервуарға 8 дайындауға рұқсат етіледі резервуарды 8 сумен толтырыңыз толтырылған судың көлемін шәкіл 15 бойынша көре аласыз қақпағы 6 белгіленген және өлшеуіш шыныаяқ р...

Page 52: ...йесі электр құралын өшіреді Бұл жағдайда электр құралын қайта іске қосудан бұрын электр құралын суытып алыңыз Бұл қорғаныс жүйесі іске қосылғанда индикаторлар 11 8 6 10 6 суретте көрсетілгендей 3 секунд ішінде жыпылықтайды Артық жүктемеден қорғау 8 6 10 6 сур қараңыз Құрал қалыптан тыс жоғары токпен жұмыс істейтін жағдайда мотордың артық жүктемеден қорғау жүйесі электр құралын автоматты түрде өшір...

Page 53: ...ныңыз Қажет болса сіз саптаманы 32 бұрап ондағы саңылауды сондай ақ шашыратқыштың басы 33 саңылауларынсәйкесдиаметрібарсымментазалай аласыз 14 сур қараңыз Абайлаңыз бұл процедура үшін болат сым ине бұрғылау т с с қолданбаңыз сіз саптаманы 32 немесе бүріккіш атомизатордың басын 33 зақымдай аласыз Барлық пайдаланылған керек жарақтарды ағын сумен шайыңыз ерітінді араластыруға арналған ыдыстар құйғыш ...

Page 54: ...54 ...

Page 55: ...55 ...

Page 56: ...56 ...

Page 57: ...57 ...

Page 58: ...58 ...

Page 59: ...59 ...

Page 60: ...60 ...

Page 61: ...61 ...

Page 62: ...62 ...

Page 63: ...63 ...

Page 64: ...64 ...

Page 65: ...65 ...

Page 66: ...66 ...

Page 67: ...67 ...

Page 68: ...68 ...

Page 69: ...69 ...

Page 70: ...70 ...

Page 71: ...71 ...

Page 72: ......

Reviews: