11
English
Keep the manual for future reference or for the
next owner.
•
Before using, check the appliance housing integrity;
in case of any damages the appliance must not be used�
Do not direct a laser beam at people or
animals, and do not look at a straight or
reflected laser beam. A laser beam can
blind people, cause an accident or damage
eyes� It is strictly forbidden to look at the laser beam
through optical appliances (binoculars, telescopes,
etc�), this can cause damage to the retina�
Attention:
glasses which are included in the scope of delivery
of the appliance are not protective glasses and are
intended to improve visibility of the laser beam. Do
not look at the laser beam through these glasses -
it may cause injuries.
•
Do not operate the appliance in atmospheres con-
taining explosive gases, dust or vapours�
•
When working be aware of the factors which may
cause wrong measurement results:
•
contamination of laser emitter window;
•
measurement through transparent objects (win-
dows, aquariums, etc�);
•
measurement on reflective surfaces (mirrors, pol
-
ished metal surfaces, etc�);
•
presence of steam, dust, smoke, etc� in the air�
•
Do not expose the appliance to moisture, and do not
allow moisture enter the appliance� Do not immerse
the appliance into liquid�
•
Do not drop or knock the appliance�
•
Protect the appliance against electromagnetic fields
(for example, fields from electric arc welding or induc
-
tion heaters)�
•
In case of sudden changes in ambient temperature,
do not use the appliance for at least 30 minutes�
•
Do not leave the appliance near objects with high
temperature�
Battery tool use and care
•
Recharge only with the charger specified by the
manufacturer.
A charger that is suitable for one type
of battery pack may create a risk of fire when used with
another battery pack�
•
Use the appliance only with a suitable battery pack.
Use of other battery types may cause injuries and fire.
•
Under abusive conditions, liquid may be ejected
from the battery; avoid contact. If contact acci-
dentally occurs, flush with water. If liquid contacts
eyes, additionally seek medical help.
Liquid ejected
from the battery may cause irritation or burns�
•
Do not open the battery.
Danger of circuit�
•
In case of damage and improper use of the bat-
tery, vapors may be emitted. Provide for fresh air
and seek medical help in case of complaints.
The
vapors can irritate the respiratory system�
•
When the battery is defective, liquid can escape
and come into contact with adjacent components
�
Check any parts concerned� Clean such parts or re-
place them, if required�
•
Protect the battery against heat, e.g., also
against continuous sun irradiation and fire.
There
is danger of explosion�
•
Protect the battery charger from rain and mois-
ture.
The penetration of water in a battery charger in-
creases the risk of electric shock�
•
Do not charge other batteries.
The battery charger
is suitable only for charging lithium ion batteries within
the listed voltage range� Otherwise there is danger of
fire and explosion.
•
Keep the battery charger clean.
Contamination
may cause the danger of electric shock�
•
Check the battery charger, cable and plug each
time before using. Do not use the battery charger
when defects are detected. Do not open the battery
charger yourself and have it repaired only by quali-
fied personnel using original spare parts.
Damaged
battery chargers, cables and plugs increase the risk of
electric shock�
•
Do not operate the battery charger on easily in-
flammable surfaces (e.g. , paper , textiles , etc.) or
in combustible environments.
There is danger of fire
due to the heating of the battery charger during charging�
Appliance maintenance
Maintenance of your appliance must be performed
by qualified personnel using the recommended spare
parts� This ensures that the safety of your appliance
will be preserved�
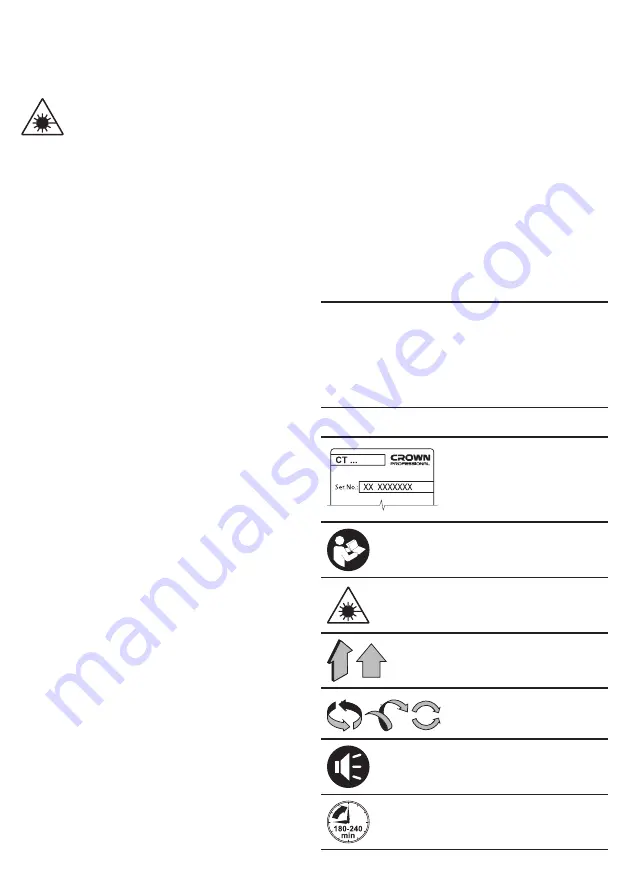
Symbols used in the manual
Following symbols are used in the operation manual,
please remember their meanings� Correct interpreta-
tion of the symbols will allow correct and safe use of
the appliance�
Symbol
Meaning
Serial number sticker:
CT ��� - model;
XX - date of manufacture;
XXXXXXX - serial number�
Read all safety regulations
and instructions�
Caution! Laser radiation�
Movement direction�
Rotation direction�
Acoustic signal�
Battery charging time�
Summary of Contents for CT44022
Page 1: ......
Page 3: ...3...
Page 4: ...4...
Page 5: ...5...
Page 6: ...6...
Page 7: ...7...
Page 8: ...8...
Page 9: ...9...
Page 22: ...22 30...
Page 23: ...23 CT XX XXXXXXX 1 2 3 4 5 6 7 8 9 10 11 12 13 14 15 16 17 18 1 3 10 8 1...
Page 26: ...26 1 11 8 10 3 15 15 11 11 9 3 2 16 16 www crown tools com...
Page 28: ...28 30 CT XX XXXXXXX...
Page 29: ...29 1 2 3 4 5 6 7 8 9 10 11 12 13 14 15 16 17 18 1 3 10 8 1 2 13 18 13 3 2 18 18 13 3 13...
Page 32: ...32 11 9 3 2 16 16 www crown tools com...
Page 34: ...34 30 CT XXXXXXX...
Page 38: ...38 16 www crown tools com...
Page 39: ...39...
Page 40: ...40...
Page 41: ...41...
Page 42: ...42...
Page 43: ...43...
Page 44: ...44...
Page 45: ...45...
Page 46: ...46...
Page 47: ...47...
Page 48: ...48...
Page 49: ...49...
Page 50: ...50...
Page 51: ...51...
Page 52: ......


