12
English
Symbol
Meaning
Locked�
Unlocked�
A sign certifying that the
product complies with es-
sential requirements of the
EU directives and harmo-
nized EU standards�
Attention� Important�
Useful information�
Do not dispose of the appli-
ance in a domestic waste
container�
Intended use
Line laser is intended to draw and / or control horizon-
tal, vertical and inclined lines�
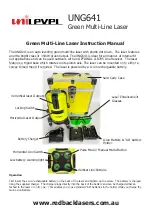
Components
1
Strap
2
Battery case cover
3
Socket for power unit connector
4
Vertical emitter window
5
Horizontal laser beam on / off switch
6
Laser beam on / off switch with a locked laser head
7
Vertical laser beam on / off switch
8
Bubble level
9
Laser head position lock
10
Adjustable leg
11
Swivel bolt
12
Horizontal emitter window
13
Power unit *
14
Carrying belt *
15
Laser viewing glasses *
16
Case *
17
Blind plug
18
Indicator
* Optional extra
Not all of the accessories illustrated or described
are included as standard delivery.
Installation / regulation
Do not draw up the fastening ele-
ments too tight to avoid damaging the
thread.
Mounting / dismantling / adjustment of
some elements is similar for all appliance
models. In this case no particular appli-
ance model is indicated in the explana-
tory drawing.
Adjustable legs (see fig. 1)
In case of an acoustic signal and blinking laser
beams when the appliance is turned on, horizontal
misalignment of the appliance is more than ±3°�
Adjust the position of the appliance with legs
10
with
reference to bubble level
8
indication as shown in
figure 1.
Battery charging
Initial operating
The appliance is delivered with partial battery
charge. Fully charge the battery before the first
use of the appliance.
Charging (see fig. 2)
•
Connect power unit
13
to the mains (indicator
18
lights green, ready to charge)�
•
Connect the plug of power unit
13
to socket
3
(see
fig. 2). During charging indicator
18
lights red� When
charging is complete, indicator
18
lights green�
•
When charging is complete, disconnect plug of
power unit
13
from socket
3
and unplug power unit
13
from the mains�
During charging the battery and power
unit 13 of the appliance may become hot -
it is no problem.
You can use the appliance during
charging. It will cause no harm to the
battery.
Switching on / off
When self-levelling is on
Switching on:
Set lock
9
to position as shown in fig. 3.1. This will
unlock the suspension gear of the laser head, turn laser
power and bubble level lighting
8
on� If the appliance
is positioned on the inclined surface with an angle of
more than ±3°, you will hear an acoustic signal� You
can switch on and off the laser beams pressing on / off
switches
5
and
7
�
Switching off:
Set lock
9
to position as shown in fig. 3.2. This will
lock the suspension gear of the laser head, turn laser
power and bubble level lighting
8
off�
When self-levelling is off
Switching on:
Set lock
9
to position as shown in fig. 3.2, then press
and release on / off switches
6
� Laser power is now on,
Summary of Contents for CT44022
Page 1: ......
Page 3: ...3...
Page 4: ...4...
Page 5: ...5...
Page 6: ...6...
Page 7: ...7...
Page 8: ...8...
Page 9: ...9...
Page 22: ...22 30...
Page 23: ...23 CT XX XXXXXXX 1 2 3 4 5 6 7 8 9 10 11 12 13 14 15 16 17 18 1 3 10 8 1...
Page 26: ...26 1 11 8 10 3 15 15 11 11 9 3 2 16 16 www crown tools com...
Page 28: ...28 30 CT XX XXXXXXX...
Page 29: ...29 1 2 3 4 5 6 7 8 9 10 11 12 13 14 15 16 17 18 1 3 10 8 1 2 13 18 13 3 2 18 18 13 3 13...
Page 32: ...32 11 9 3 2 16 16 www crown tools com...
Page 34: ...34 30 CT XXXXXXX...
Page 38: ...38 16 www crown tools com...
Page 39: ...39...
Page 40: ...40...
Page 41: ...41...
Page 42: ...42...
Page 43: ...43...
Page 44: ...44...
Page 45: ...45...
Page 46: ...46...
Page 47: ...47...
Page 48: ...48...
Page 49: ...49...
Page 50: ...50...
Page 51: ...51...
Page 52: ......


