1. USB DataDiode Host Connections
1.1
USB DataDiode is equipped with a USB Type
A receptacle for attaching your USB media.
1.2
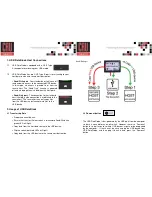
USB DataDiode has two USB Type B ports for attaching to your
host data source and secure host destination.
•
Read/Write port
- Your standard host will have full
read and write access to the connected USB device.
In this mode, no access is granted to or from the
secure host. The “Read Only” circuitry is powered
off, and no data path exists between the host ports.
•
Read-Only port
- The connection to the standard
host is halted, and a connection is established to the
secure host. The secure host can only copy files
from the USB device, but cannot write files to the
USB device.
2. Usage of USB DataDiode
2.1 Transferring Data
•
Properly connect the unit.
•
Ensure that the Host Select switch is switched to Read/Write (the
green LED will light).
•
Copy data from the host data source to the USB device.
•
Flip the switch (both red LEDs will light).
•
Copy data from the USB device to the secure host destination.
Read/Write port
2.2 Remount button
The USB DataDiode is bus-powered by the USB port from the computer
so there is no need for an on/off switch. However, there is a “Remount”
button for a few instances where USB devices might not be recognized
by the computer. If that is ever the case, unplug the USB device from
USB DataDiode, and then plug it back in and press the “Remount”
button.


