background image

PMS 711

2 cyan

85 magenta

76 yellow

10.25.12

CRU Mark

Page 4

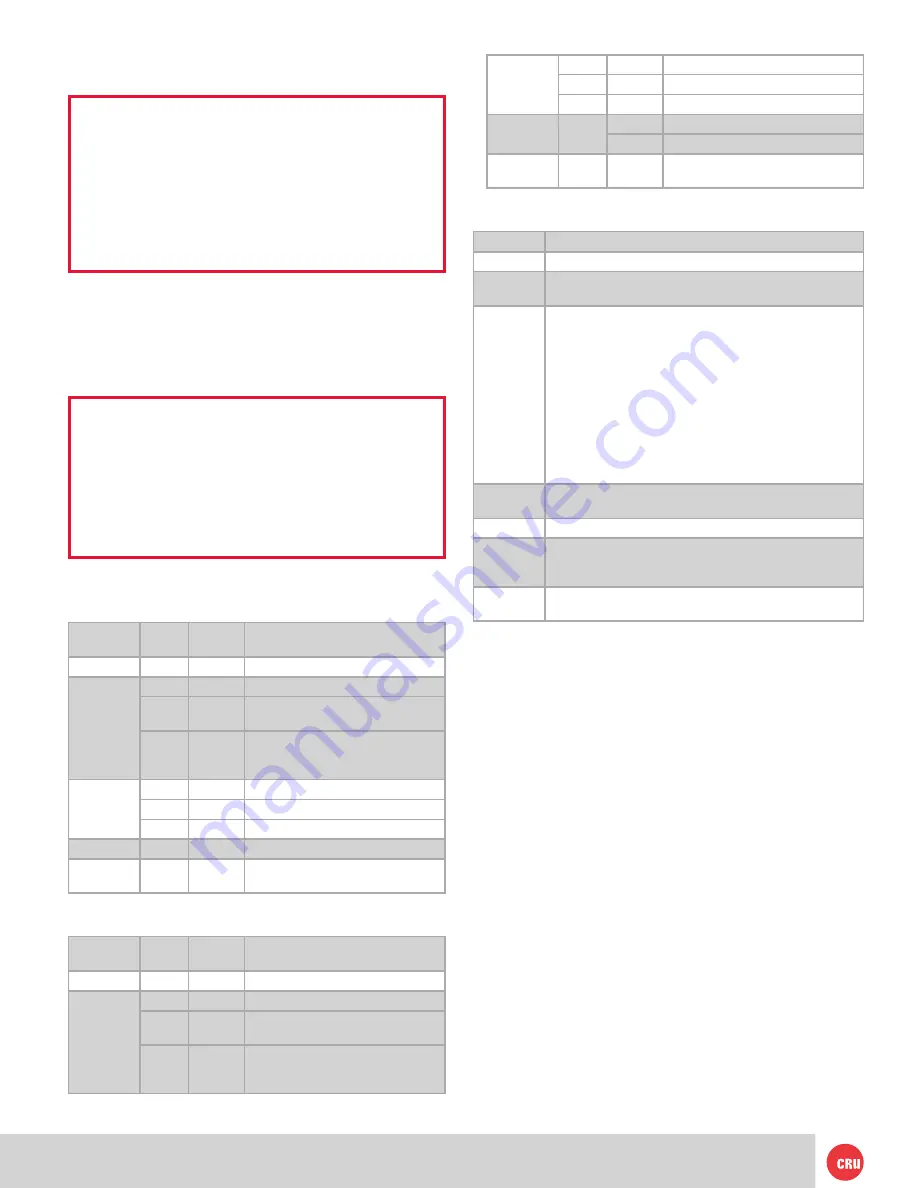
RAID

Green

Solid

RAID is performing as expected

Amber

Solid

RAID is degraded or is being rebuilt

Red

Solid

RAID has failed or is invalid

Drive 

Power

Green

Solid

Bay is powered on

Flashing

Indicates a bay fan failure

Drive 

Activity

Pink

Inter-

mittent

Flashes when the drive inside is 

being accessed

5 LCD Menu Screens

Screen

Description

Mode

Shows the RAID level used.

Status

Indicates the overall health of the RAID. Available status 
messages are “Normal” and “Degraded”.

Disk#

Indicates the status of the individual disk in the numbered 
bay:
• 

OK: Indicates that the hard drive is in use or ready to 

use

• 

No Disk: Indicates taht the ahrd drive was removed or 

not installed

• 

Unused: A new drive was installed and is not used by 
the RAID.

• 

Failing: Indicates the drive is malfunctioning. Possible  
causes of a failure message include an inability to 
recognize the drive, a compatibility problem, or dam

-

aged sectors.

Disk# 

Temp

Displays temperature of the individual disk in the num

-

bered slot.

Sys Temp

Displays the overall temperature inside the system

Fan Status

Indicates whether the fan is operating normally or has 
failed and is in need of a replacement. Contact Technical 
Support if the fan has failed to arrange for a repair.

Change 

RAID Mode

Allows you to change the RAID level (See Section 6.2).

6 RAID Configuration

Use the LCD and menu selection buttons to complete these 

steps. 

Changing RAID levels will erase any data on the 

drives. Make a backup copy of any data you wish to 
keep before changing the RAID.

6.1 Creating a New RAID 

a. 

Disconnect the RAX 3QR unit from the computer.

b.  Insert two hard drives (preferably both the same make, 

model, and capacity) into the RAX 3QR unit and flip the 

power switch on the rear of the unit.

c. 

After the RAX 3QR unit boots up, it will begin alarming 
and the LCD will display the error “Error: Not a RAID 
Set”. Press the 

Enter

 button to silence the alarm. 

d. 

Press  the 

Enter

  button  a  second  time  and  the  LCD 

screen  will  ask  “Make  New  RAID?”  Press 

Enter

 to 

confirm.

e. 

The LCD will display “Select RAID Type”. Press 

Up

 or 

Down

 to cycle through to your desired RAID type and 

press 

Enter

.

f. 

The  screen  will  display  “Will  Erase  all  Data  OK?” 

the key 90 degrees clockwise to power on each hard 
drive.

NOTE:  When 

any

 hard drives are first used with a 

RAX 3QR unit they will show up as blank, unallocated 
drives  and  you’ll  need  to  create  a  RAID  inside  the 
unit  before  you  can  use  it. 

Note that creating a 

RAID will erase all data on the drive, so be 
sure to back up your data before beginning this 
operation

.

Your RAX 3QR unit is now ready to use! If the hard drive 
is  already  formatted,  it  can  be  used  right  away.  If  the 
hard  drives  are  brand  new,  or  their  file  systems  are  not 
compatible  with  your  operating  system,  the  drive  will 
need to be formatted before being used. See Section 7 for 

formatting instructions.

NOTE:  If  any  of  the  drives  are  inaccessible  after 

powering on the unit, try the following steps:

1. Turn off the power.

2. Remove the drive(s) in question.
3. Reinsert the drive(s).

4. Turn on the power.

4 LED Behavior

4.1 RAX210-3QR

LED 

Name

Color

State

Description

Unit Power

Green

Solid

RAX 3QR unit is powered on

System

Green

Solid

System is performing as expected

Amber

Solid

Drive has reached the preset warn

-

ing temperature

Red

Solid

Fan has stopped rotating or the 
drive has reached the preset alarm 
temperature

RAID

Green

Solid

RAID is performing as expected

Amber

Solid

RAID is degraded or is being rebuilt

Red

Solid

RAID has failed or is invalid

Bay Power

Blue

Solid

Bay is powered on

Bay Access

Pink

Inter-

mittent

Flashes when the drive inside is 

being accessed

4.2 RAX211-3QR

LED 

Name

Color

State

Description

Unit Power

Green

Solid

RAX 3QR unit is powered on

System

Green

Solid

System is performing as expected

Amber

Solid

Drive has reached the preset warn

-

ing temperature

Red

Solid

Fan has stopped rotating or the 
drive has reached the preset alarm 
temperature

Summary of Contents for RAX210-3QR

Page 1: ...ble carriers RAX211 3QR enclose and protect hard drives when removed from the RAX unit eSATA FireWire 800 USB 2 0 and USB 3 0 connections are provided for wide variety of connectivity Specially designed drive and carrier interfaces are built to withstand tens of thousands of insertions Rugged all metal construction for superior durability A9 210 0012 Revision 1 0 RAX Branding 2c85m76y PMS 711C 68c...

Page 2: ...t all power switches have been turned off and all power cords have been disconnected to prevent personal injury and damage to the hardware To avoid overheating the unit should be operated in a well ventilated area Remove the drives before transporting the unit to prevent damage to the drive interfaces Table of Contents 1 Pre Installation Steps 2 1 1 Box Contents 2 1 2 Identifying Parts of your RAX...

Page 3: ...is created with its own inde pendent volume There is no data protection 1 No data protection 0 Also known as striping Data dis tributed across all drives in the ar ray There is no data protection 2 No data protection 1 Also known as mirroring All data replicated on two separate disks Due to the 100 duplication only half the total disk capacity is avail able for data storage 2 1 drive 3 Installatio...

Page 4: ...t a RAID Set Press the Enter button to silence the alarm d Press the Enter button a second time and the LCD screen will ask Make New RAID Press Enter to confirm e The LCD will display Select RAID Type Press Up or Down to cycle through to your desired RAID type and press Enter f The screen will display Will Erase all Data OK the key 90 degrees clockwise to power on each hard drive NOTE When any har...

Page 5: ...guration will be selected and the RAX 3QR unit will reboot The RAID is now created 6 2 Changing the RAID Type a Disconnect the RAX 3QR unit from the computer b Press the Up button to cycle the LCD menu to the Change RAID Mode screen and press the Enter button c The LCD will display Select RAID Type Press Up or Down to cycle through the available options to your desired RAID type and press Enter d ...

Page 6: ...n Windows will indicate when it is safe to disconnect the RAX 3QR unit Disconnecting the RAX 3QR unit without first ejecting it can result in data loss Unmounting an eSATA Volume If you purchased an eSATA host card that supports hot swapping follow the instructions for unmounting a USB or FireWire volume above Many eSATA hosts do not support this feature However freeware utilities are Carbon Copy ...

Page 7: ...buzzer will sound when the RAID has failed or is invalid The RAID LED will glow red if this occurs regardless of whether the buzzer is enabled or not Temperature Sliders When your RAX 3QR unit reaches a certain temperature buzzers will sound if they are enabled see the Buzzers subsection above and the fan will kick on You may want to change these default temperatures according to your environment ...

Page 8: ...puter let me eject or unmount my drive A There may be a software application running in the background with an active link to the drive Sometimes you may see a message such as The disk is in use and could not be ejected Try quitting applications and try again 9 RAID Is Not A Backup Because your RAX 3QR unit features redundant RAID modes which protect against a hard drive mechanical failure it is a...

Page 9: ...ent command is CTRL SHIFT ESC Drives connected to the computer via eSATA cannot be ejected in Windows the way FireWire drives can However freeware utilities are available on the Internet that provide a similar function 11 1 Contacting Technical Support Still need help Please contact our Technical Support team through cru inc com support Call us toll free at 800 260 9800 or directly at 360 816 1800...

Page 10: ... make any modification extension or addition to this warranty In no event will CRU or its suppliers be liable for any costs of procurement of substitute products or services lost profits loss of information or data computer malfunction or any other special indirect consequential or incidental damages arising in any way out of the sale of use of or inability to use any CRU product or service even i...

Reviews: