background image

Downloaded 

from 

CruisersOwnersForum 

http://www.CruisersOwnersForum.com

Summary of Contents for 2870 rogue series

Page 1: ...out 2 1 3 Controls and Indicators 3 1 4 Principles of Operation 4 1 5 Getting Underway 5 1 6 Periodic Checks and Services 6 1 7 Storage for Extended Lay Up 7 1 8 General Maintenance 8 1 9 Accessory It...

Page 2: ...1 3 Owner s Manual 1 3 Owner s Manuals Envelopes 1 4 WARRANIY INFORMATION 1 5 Dealership Responsibilities 1 5 Your Responsibilities _ _ _ __ _ 1 5 Warranty Service _ 1 5 2870 Rogue r 1 I Downloaded fr...

Page 3: ...tion of meeting or exceeding existing safety and quality stan dards established by the U S Coast Guard and the Boating Industry of America Cruisers has been manufacturing boats for over 40 years We ta...

Page 4: ...its vari ous systems Section 1 contains a description of the skipper s kit and information about the warranty Section 2 contains boat specifications such as dimensions and capacities There are also la...

Page 5: ...s you chose the envelope may contain some or all of the fol lowing manuals AVAILABLE FEATURES Eng ne Operation Maintenance Electric Schematic DC Panel Information Packet Electric Stove AC Panel Inform...

Page 6: ...ll warranties Fill in the Cruisers limited warranty registration card which is located in an envelope inside the skipper s kiL Keep a record of the hull number for fu ture reference 2 Inspect the boat...

Page 7: ...ions and Layout SPECmCATIONS 2 2 Dimensions 2 2 Engine Options 2 2 GENERAL lAYOUT 2 3 2870 Single Engine 2 3 2870 Twin Engine 2 4 2870 R09 J1 Sarles 2 Downloaded from CruisersOwnersForum http www Crui...

Page 8: ...Clearance 7 7 2 31 m Engine Options Stern Drive Mercruiser 7 4 L MPI 300 HP 244 Kw lIO Bravo III Drive T 5 0 L 220 HP 164 Kw I O Alpha Drives T 5 7 L 250 HP 186 Kw l O AlphaDrives Counter Rotating T...

Page 9: ...ER PUMP L r FUELTANK BILGE BLOWER D TT DC C j HOLDING TANK BATTERY CHARGER WATER HEATER MACERATOR SEACOCK _ _ v YVALVE MACERATOR BATTERY ISOLATOR 2 3 BILGE BLOWERS BATTERY NO 2 _ BATTERY SWITCH BATTER...

Page 10: ...__ YVALVE MACERATOR BATTERY NO 2 BATTERY ISOLATOR GENERATOR GENERATOR STARTER BATTERY NO 3 r l BATTERY NO I BATTERY SWITCH TRANS DEPTII FlNDER BATTERY CABLE TERMINAL GENERATORSEACOCK 0 F 1t AFT BILGE...

Page 11: ...s Switch 3 3 Trim Tab Controls 3 3 Halon Fire Extinguisher Display Unit 3 3 Shifl Throttle Cantrois 3 4 Neutral Throttle Controls 3 4 Steering Wheel 3 4 Wipers Switch 3 4 Aft Bilge Pump Switch 3 4 For...

Page 12: ...ES The port and starboard engines each have their own oil pressure gauge The engine oil pressure gauges indicate the pressure of the lubricating oil inside the engines Make a note of the oil pressure...

Page 13: ...he lights are protected by a reseuable circuit breaker located on the circuit breaker panel PANEL UGHTS SWITCH Push the top of the rocker switch to illuminate the gauges and compass The panel lights a...

Page 14: ...witch to turn this bilge pump off Aft bilge pump located in the engine compartment is elecuically protected by the resettable circuit breaker located on the dash circuit breaker panel FORWARD BILGE PU...

Page 15: ...ttom of the switch to lower the anchor The anchor conrrol is protected by a resetuble circuit breaker located on the dash circuit breaker panel ANCHOR UGHT SWITCH Push the top half of the switch to ac...

Page 16: ...reaker The automatic operation of the forward bilge pump is protected by a circuit breaker on the DC Master Panel BOARD UGHTS This circuit breaker protects the boarding lighlS and cockpit courtesy lig...

Page 17: ...EAD AND WASTE CONTAMINANT SYSTEM 4 20 STEERING SySTEM 4 4 Waste Holding Tank 4 20 TRIM TABS 4 4 Waste Disposal 4 21 Head Operating Instructions 4 24 ELECTRICAL SYSTEM 4 5 BILGE SYSTEM 4 24 DC Electric...

Page 18: ...cools engine exhaust gas as it is being discharged The temperature gauge on the dash panel will tell you if the engine is overheating A CAUTION For engines uith Jrtshwakr cooling systmr The cool ing...

Page 19: ...CAUTION Improper propellt r selection and instal1atirm could result in loss o the propelln and or rive stresses on the rngiru power system leading to engine aillITf Cruisers ncommmds that you consult...

Page 20: ...nd e rplosion luuard Inspect tk entirefuel system regularly All fuel SJ tem components must be checked before each boating season and regularly during the season for any leaks or bad hose conditions M...

Page 21: ...start the engines The third battery is an auxiliary battery which prmides power to all of the other DC elecuical circuits via the master banery switch When the engines are running all batteries are c...

Page 22: ...cxzIJy tripped wilhoutfirst disrovering and remedy ing tJu cause ofthe problem The switch type cinuit bnakn function is twofold they allow you to manu ally enable or interrupt a circuit by moving the...

Page 23: ...acerator pump Also it provides power to the sump pump electric toilet and the waste tank indicator Flip the switch to the on position to send current to the fresh water pump The pump maintains pressur...

Page 24: ...The AC master panel consists of a voltmeter a power transfer slide pro tector and generator controls TJu m ln is an important feature because they allow you to monitor the AC voltage Damage to compon...

Page 25: ...r hookup move the slide protector O er the GE ERATOR breaker on the AC Power Control panel Flip the DOCKSIDE I breaker 0 the on position to send current to he AC POWER NO I and AC POWER NO 2 panels Wh...

Page 26: ...el This is the master switch for the AC Power No 1 panel Put the switch in the on position to send current to all circuit breakers on this panel When this switch is off the flow of current is interrup...

Page 27: ...nt should bt inlLrruplLd If liIL POUXT is not inlLTTuplLd do not USt liIL oulkls and have a qualifud lLehnician make the necessary pain Press tha r Sel button 10 wtor power 10 all tilL out tls Flip th...

Page 28: ...Downloaded from CruisersOwnersForum http www CruisersOwnersForum com...

Page 29: ...X5 N5 WINDLASS DWN 45 L6 A6 OIL PORT 14 X6 K6 BPFWD 46 Yl 6 GNDLTMAST 15 X7 6 LT BILGE 47 S 6 LTCTSY 16 X8 KI LTCTSY 48 6 2 LTCTSY 17 KI S LTCfSY 49 6 6 GND LTCTSY 18 K3 5 BPAIT 50 6 2 GND LTCfSY 19...

Page 30: ...Downloaded from CruisersOwnersForum http www CruisersOwnersForum com...

Page 31: ...BILGE 17 Kl Y5 LTCfSY 55 5 I GNDLTBILGE 18 K3 5 BPAIT 56 6 5 BLOWERS 19 K5 6 BLOWERS 57 5 5 BLOWERS 20 HI 3 START PORT 58 6 6 GND BLOWER 21 H2 7 PUMP TRI rrAB 59 6 5 GNDBLOWER 22 H3 7 PUMP TRlMTAB 60...

Page 32: ...Downloaded from CruisersOwnersForum http www CruisersOwnersForum com...

Page 33: ...KRLCABIN 62 3 2 HORN 20 K8 5 SPKRRCABIN 63 3 2 GNDHORN 21 51 2 5PKRLFSR 64 CI M7 BATTSTBD 22 52 5 SPKR LCKPT 55 C4 M5 BATT PORT 23 53 7 SPKR RCKPT 56 C5 M8 BATT STIlD 24 54 3 SPKR R FSR 67 C8 M4 BATT...

Page 34: ...c currents It will however provide a path for catastrophic short circuit currents which are sufficient to actuate circuit breakers A 5000 6000 volt ampa es Isolation Transforma can be installed betwee...

Page 35: ...rn the FRESHWATER PUMP breaker on Step 3 Open the cold water galley faucet to allow air to escape Qose the faucet when a steady flow of water is apparent Step 4 Open the hot water galley faucet to fil...

Page 36: ...rahwa 16 rystem is charged Danuzge tq the Iuating demmJ will result ifallowed 0 heat up with no waf6 in the system The hot water tank also operates via a heat exchanger Heated cooling water from the e...

Page 37: ...result in damage to 1M wasU system A waste tank indicator is also installed to provide a visual indication of the amount of waste in the t ank The indicaLOr is located on Lhe inboard head compamnent b...

Page 38: ...fwaste IMPORTANT Overboard discharge ofwaste should only be used in approved areas It is your responsibility to com ply with local regulations regarding the discharge of waste To operate overboard dis...

Page 39: ...rboard discharge of waste should on ly be used in approved areas It is your responsibility to com ply with local regulations regarding the discharge of waste To pump out the holding tank using the mac...

Page 40: ...s removed To empty the bowl of excess water operate flush handle until waler level decreases to desired level BILGE SYSTEM IMPORTANT The discharge of oil or oily waste into or upon the navigable water...

Page 41: ...lge area Damage I the pump will occur ifthe pump is allowed w operate with no water The hilge pumps are operational even when the MASTER BREAKER switch is of When water in the bilge reaches a certain...

Page 42: ...s for Engine Exhaust _ _ _ __ _ _5 6 OPERATING INSTRUcrrONS _ __ _ _ 5 8 Pre Start Checklist _ _ _ _ _ _ __ _ _ _ _ _ _S 8 Starting __ _ _ _ _ _ _ __ _ _ _ __ _ _S 9 Stopping Engine _ _ _ _ S IO Fueli...

Page 43: ...ational charts ofareas to be traveled on board Make a practice of letting someone know your uavel plans and route leave a float plan with someone Check local weather reports before casting ofT Watch h...

Page 44: ...____________________ Survival Equipment PFD s Flares ______________ Mirror __________________ Smoke Signals _________ Flashlight ______________ Food ________ Paddle ___________ Water Anchor Raft or Di...

Page 45: ...7 There are also many boating safety courses available to the public Call toll free Courseline 800 33 2628 to find out what courses are offered in your area The minimum standards of safety as required...

Page 46: ...channel is marked with GREEl ODD numbered can buoys The STARBOARD right side of the channel is marked with RED EVEN numbered nun or spar buoys The middle of the channel is marked with RED and WHITE ve...

Page 47: ...xposure to carbon monoxide If you think exhaust fumes are entering your boat correct the problem immediately Observe the following safety precautions Be alert for the odor of exhaust fumes A natural v...

Page 48: ...ile clead in the water o Operating wnh high bow angle j Exhausts from other vessels in confined areas I Operating wnh canvas tops and side curtains in place W hDut ventilation To reduce CO accumulatio...

Page 49: ...tion Operate the bilge blowers for at least four minutes before start ing the engine Allow the blowers to run until cruising speed is attained Check engine oil level Check gas fuel valve to make sure...

Page 50: ...d and will return to the normally on position A CAUTION Failure to release ignition key after engine siLIris may damage the starter motor and drive Do not operare siLIrter continuollS y for more than...

Page 51: ...and the use of your boal A WARNING All precautions must be tDl en roery time you fuel your boat Use the following precautions before fueling to avoid fire and explosion Make sure your boat is securel...

Page 52: ...er the steering response Recognize the Outside Forces Check the wind direction and velocity as well as the water currents Use the external forces to your advantage when maneuvering don t fight them Pr...

Page 53: ...the boat will level out to its planing attitude It is important to get over the hump as soon as possible due to the reduced visibility handling and performance A few seconds at full throt tle should g...

Page 54: ...rovided you do not afJn ate tM mgine ovn 1000 RPM Exceeding 1000 RPM could damage engine and outdrive components l1en operating in shallow water be sure the QUldrive water intakes are submerged at all...

Page 55: ...keeping the line tighL Find an angle that 11 pull the anchor loose Towing the Boat A CArmON Do not use chck hardwarefor grounding and rowing The stress may be too much for deats and mounting plates C...

Page 56: ...her boat to carry the anchor to deeper water If all efforts fail get help from the Coast Guard 2B70 Rogue Senes IMPORTANT You should always offer help to a craft in distress However towing a capsized...

Page 57: ...iodic Checks and Services PERIODIC CHECKS AND SERVICES 6 2 Before Every Use 6 3 Every 50 Hours 6 5 Every 100 Hours 6 6 Monthly 6 6 Quarterly 6 6 Annually 6 7 6 1 Downloaded from CruisersOwnersForum ht...

Page 58: ...ollow provide instructions on how to accomplish each of the required checks and services listed below FREQUENCY Before Every Use Every 50 Hours Every 100 Hours Monthly Quarterly Annually TASK 1 Check...

Page 59: ...e and clamps See your authorized Cruisers dealer for parts and service 3 Inspect conrainer for build up of debris which can clog the strainer and cause a system failure If strainer needs to be cleaned...

Page 60: ...atch Head outlet water seacock located in the engine comparunenl Cockpit washdown seacock located in the engine compartment 2 Inspect hose connections at seacock for leaks A CAUTION When replacing hos...

Page 61: ...rsists or fuel lines are damaged refer the problem to your Cruisers dealer Every 50 Hours CLEAN SEAWATER STRAINERS Refer to Check Strainers in Before Every Use CLEA N FRESHWATER FILTER IMPORTANT Fresh...

Page 62: ...e Section 8 GENERAL MAINTENANCE for details Monthly TEST GFCI OUTLET 1 Provide AC to the boat with shore power hookup Turn the appropriate breaker s on 2 Turn the AC master panel circuit breakers on 3...

Page 63: ...oil Fill ani until oil reaches lhe full line indicaled on me reservoir LUBRICATE SEACOCKS I Lubricale the following seacocks Engine cooling waler seacock only on V8 engines wilh fresh waler cooling H...

Page 64: ...p STORAGE FOR EXTENDED lAY UP 7 2 Lifting and Storing Your Boat Stern Drive 7 2 Transporting 7 3 Winterization 7 4 Fitting Out Mter Storage 7 7 2870 Rogue StIfles 7 1 Downloaded from CruisersOwnersFor...

Page 65: ...high enough to support the boa Spreader bars reduce the side pressure at the boat s sheer line and prevent distortion or damage to the deck or gunwale molding Put slings around the hull at positions m...

Page 66: ...bs Transporting The boat must be supported on a trailer with the same care and concern as on the ground Cover the boat to prevent additional load being added from rain or snow Con taCl your dealer for...

Page 67: ...for signs of deterioration wear or damage Note any damages to engine outdrive cabin equipment helm area etc that has occurred during the past boating season Try to have any repairs made before coveri...

Page 68: ...ket of non LOxic antifreeze Operate system until antifreeze solution is discharged from system 3 Turn system off and relieve pressure in hose if connected 4 Remove drain plug from cockpit wash seacock...

Page 69: ...wash system m Batteries Seacocks Engines Cockpit wash intake Head system intake Head system Y valve overboard discharge Head system macerator pumpout I Be sure the MASTER BREAKER switch is in the off...

Page 70: ...lso stress the cover possibly tearing iL Fitting Out Mter Storage A thorough check of your boat after an extended storage period for any rype of damage is necessary Look for items such as cracks or br...

Page 71: ...Open hot and cold faucets in galley slightly to allow air to escape and fill water heater Close the faucets when a steady flow of water is presenL 4 Bleed air from all remaining faucets as in step 3 5...

Page 72: ...ENERAL MAINTENANCE 8 2 Engine Power Systems 8 2 DC Electrical System 8 2 Freshwater System 8 2 Bilge 8 3 Hull 8 3 General Care and Cleaning 8 4 2870 ROfWe es 8 1 Downloaded from CruisersOwnersForum ht...

Page 73: ...oses can add an objectionable taste to the water To clean your new freshwater system or the system after a long period of storage use the following procedure 1 Make a solution of2 1 2 cups 20 oz of ho...

Page 74: ...Rub bing Compound or power buffing with Mirror Glaze 1 may be necessary GELCOAT REPAIR Scratches or blemishes in the gelcoat may detract from the appearance of your boat but they do not affect the st...

Page 75: ...DECK F1TTINGS AND HARDWARE Stainless steel has been used wherever possible on your boal It is not lotally resistant to corrosion Regular cleaning and polishing with a chrome or stainless steel polish...

Page 76: ...bedded in the fabric The fabric can be cleaned without being removed from the frame Simply brush off any loose din roofparti cles etc hose down and clean with a mild natural soap in lukewarm water no...

Page 77: ...r dry and stored in a dry well ventilated area Many fabricators offer a reasonably priced removal cleaning storage and rehanging service on a yearly basis 5 For optimum appearance and performance Sunb...

Page 78: ..._ 9 2 Courtesy Lights 9 2 Coyers 9 3 Refrigerator 9 3 Spotlight 9 3 Stove 9 3 Trim Tabs 9 3 Air Conditioning Heater Cnit 9 4 Carbon Monoxide CO Detector 9 4 Microwave 9 5 Ice Maker 9 5 Engine Hourmete...

Page 79: ...tch is on Cockpit Washdown The cockpit washdown control panel is in the portside of the cockpit see Section 2 The seacock located in front of the engine must be open to avoid damage to the pump The MA...

Page 80: ...ight effect and spot spotlight effect The joy stick moves the light up down right or left The rheostat controls the speed of light S movement See spotlight information literature in the skipper s kit...

Page 81: ...r rousing inefficient operation and rnmeressary strain on the system Raw water is drawn from the seacock through a strainer and to the pump The pump supplies the unit with a continuous flow ofwaler in...

Page 82: ...accumulated engine operating time and is acti vated when the ignition switch is in the on position The engine hour meter is used to eep an accurate log for scheduled maintenance and LO determine fale...

Page 83: ...Section 10 Troubleshooting TROUBLESHOOTING 10 2 Engines 0 2 Electrical 0 4 Plumbing 10 5 2870 Rogue Serle 10 Downloaded from CruisersOwnersForum http www CruisersOwnersForum com...

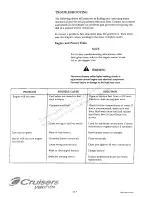
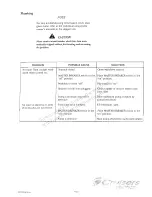
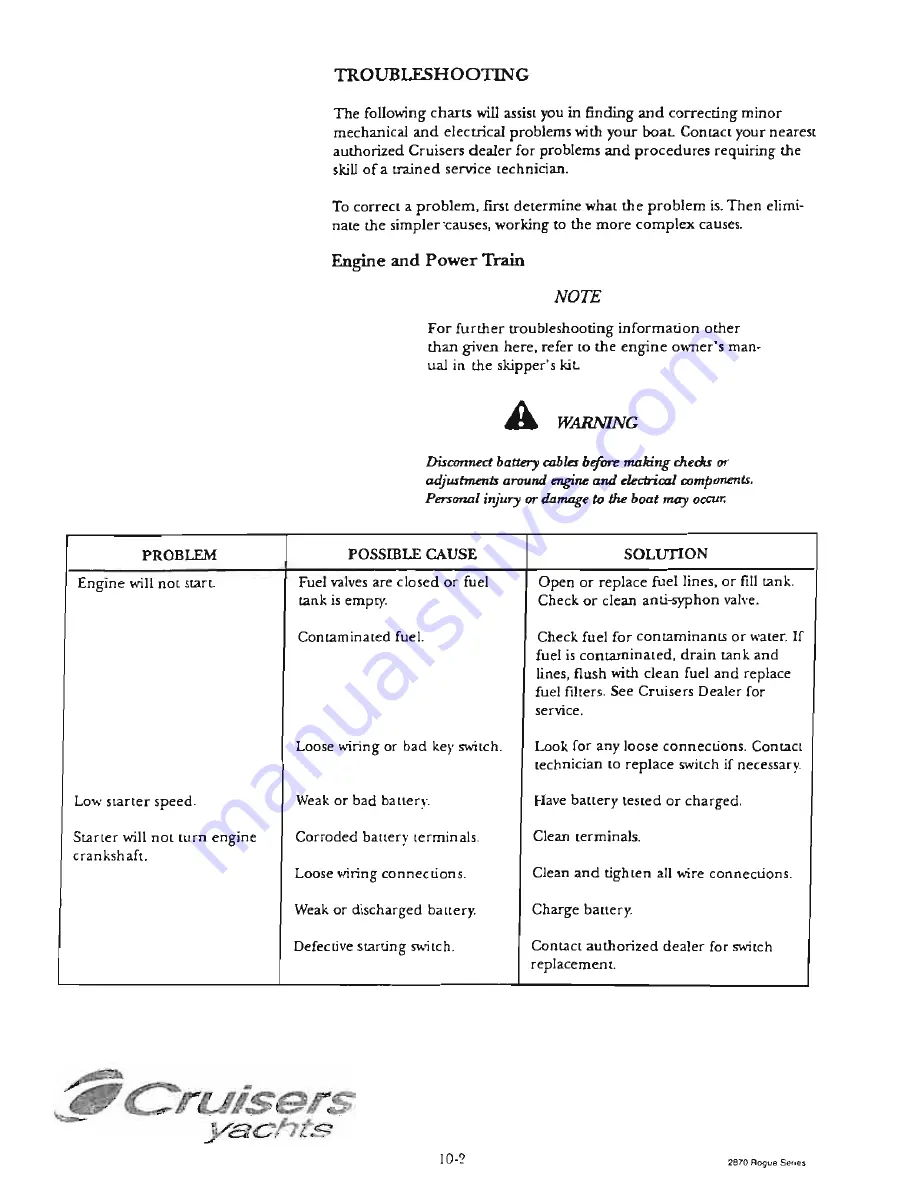
Page 84: ...nts around engine and ekctrical components Personal irifury damage to the boat may occur POSSIBLE CAUSE SOLUTION Fuel valves are closed or fuel Open or replace fuel lines or fill tank tank is empry Ch...

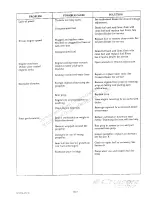
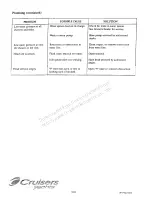
Page 85: ...aler lines See Cruisers Dealer for senice Excessive vibration Foreign objects obstructing the Remove objects from prop by reversing propeller prop or cutting and pulling away obstruction Bent prop Rep...

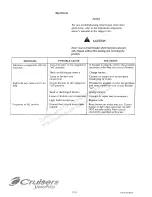
Page 86: ...turn circuit breaker Weak or discharged battery Charge battery Loose or broken wire Connect or repair wire as necessary connection Install plug in outlet Circuit breaker in the uipped or orr position...

Page 87: ...itch off Strainer or hull inlet plugged Pump s automatic shut off is defecti e No water at showers or sinks Freshwater lank is empry when faucets are turned on MASTER BRE KER s itch in we orr position...

Page 88: ...ressure at only Restriction or obstruction in Clean repair or remove obstruction the shower or the sink water line from water line Head will not flush Flush water seacock not open Open seacock Inlet p...

Page 89: ...misuse or accident 2 Boats subjected to improper operation trailering maintenance or storage commercial use or use for purposes other than those for which the boat was designed 3 Defects or damages ca...

Reviews: