Trunk Subwoofer
019 0021
NOTES:
Please read first
•
Instructions show factory size speakers or speakers
with adaptor brackets only. Cutting or fabrication (not
shown) will be required for other speaker sizes.
1.
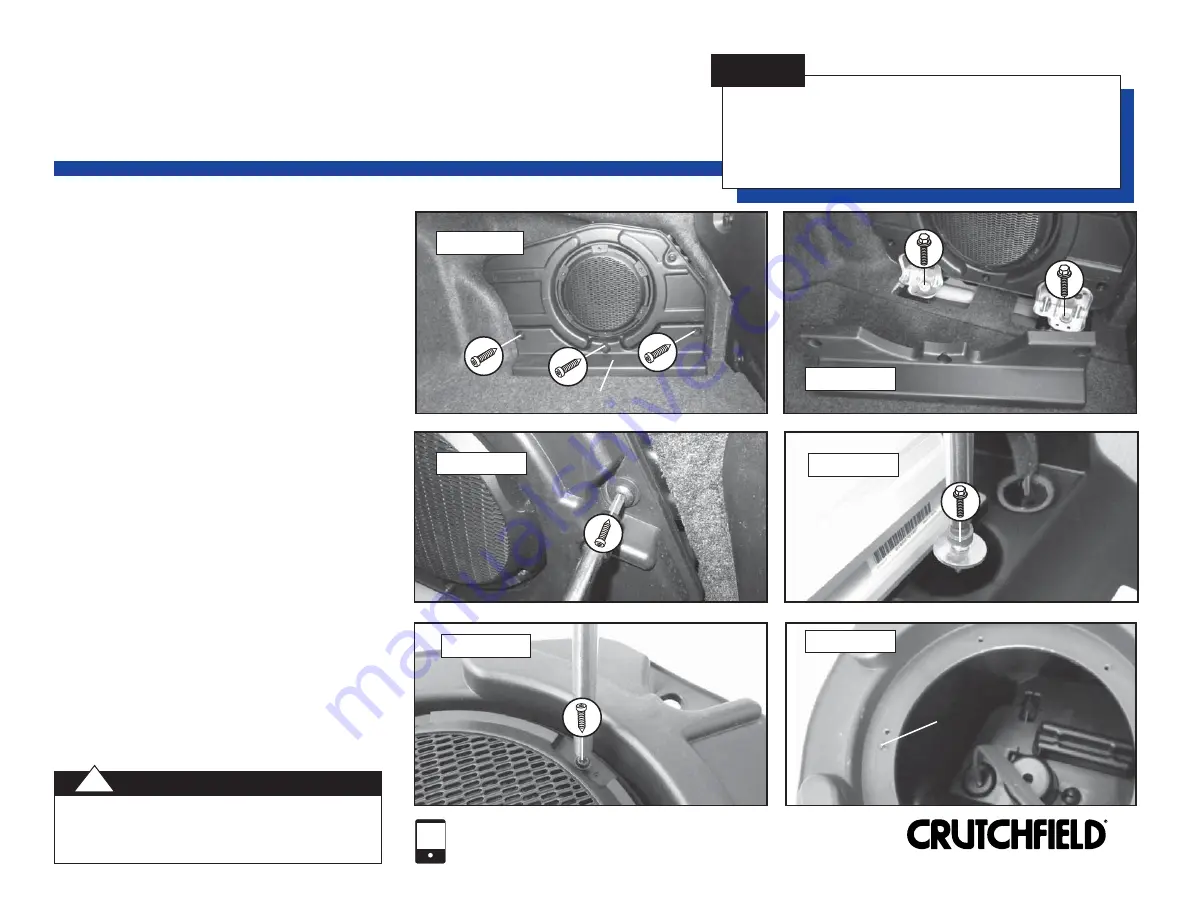
Remove three (3) Torx T20 screws securing
enclosure cover panel
. Remove panel
(Figure
1).
2.
Remove one (1) Torx T40 screw and two (2)
1/2” bolts securing enclosure to body.
Disconnect wiring harness and remove
enclosure (Figures 2 & 3).
3.
Remove one (1) 8mm screw inside cavity
on rear of enclosure and six (6) Torx T20
screws on front of enclosure (Figures 4 & 5).
4.
Remove grille, then pry up subwoofer.
Disconnect wiring harnesses and remove.
5.
Break
off
alignment pins
on mounting
surface to allow proper fit of new speaker
(Figure
6).
6.
Place new speaker in location and mark new
mounting holes. Remove speaker and drill
holes with a 1/8” bit.
7.
Connect speaker wiring and secure speaker
to
enclosure.
8.
Test speaker operation and reassemble by
reversing disassembly steps.
12
FIGURE 3
FIGURE 1
FIGURE 2
FIGURE 5
FIGURE 4
Enclosure Cover Panel
Enclosure Cover Panel
Alignment Pin
Alignment Pin
(1 of 2 shown)
(1 of 2 shown)
FIGURE 6
(1 of 6 screws shown)
(1 of 6 screws shown)
Copyright 2018 Crutchfield Corporation
1-800-955-9094
TECHNICAL SUPPORT
Always be careful when drilling or cutting in a vehicle. WEAR
EYE PROTECTION. Be aware of things such as wiring,
windows, fuel lines and safety devices. Check depth and
location to avoid damage to vehicle appearance.
CAUTION:
!


