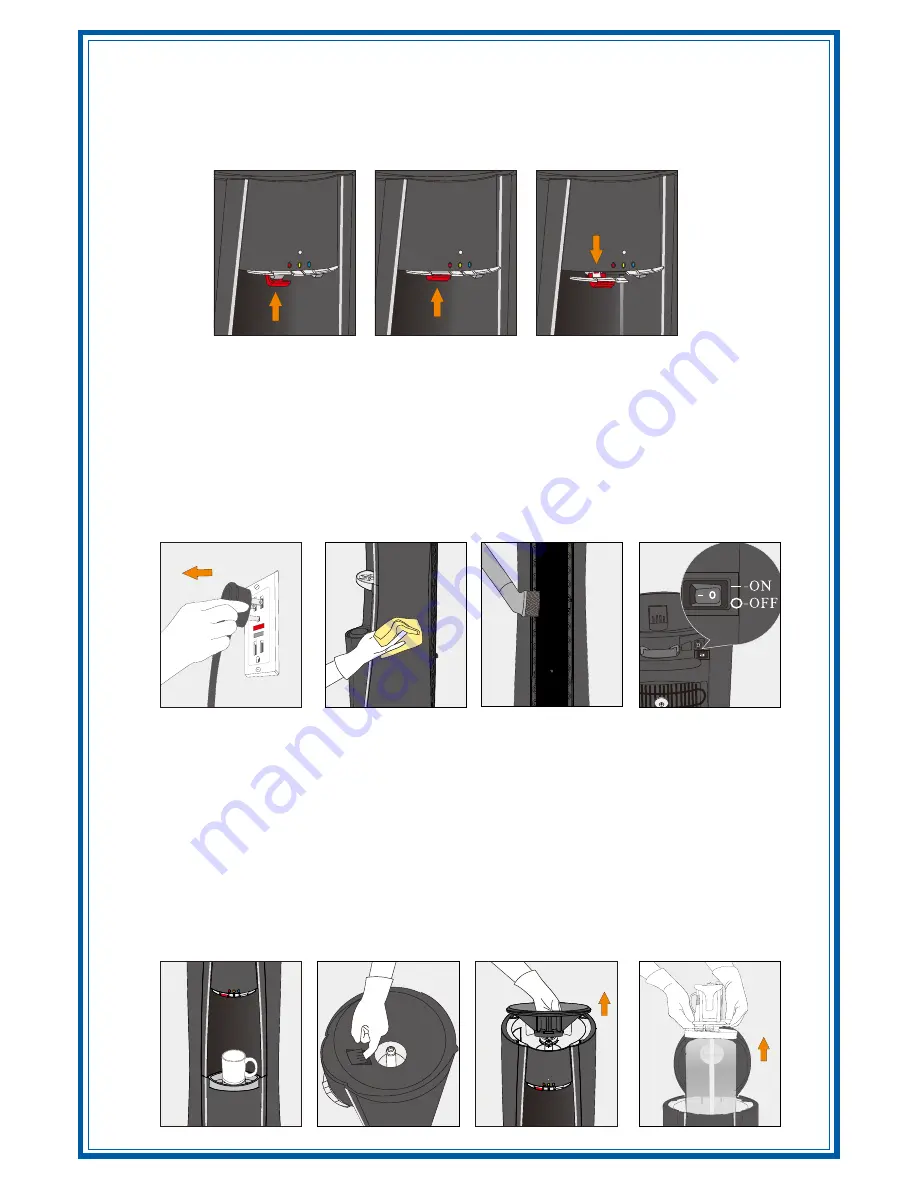
Optimum hot water temperatures will be reached after 20-30 minutes
1. Position bottle, glass or other container below water outlet
2. Push the
lever upwards (Figure 11), (Figure 12), and depress faucet lever to dispense water
RED
(Figure 13)
3. Release hot water lever once desired fill level is achieved
CLEANING
Do not immerse the unit in water for cleaning.
External:
Disconnect power supply cord (Figure 14), use only mild dishwashing liquid or cleaning
products and a soft cloth for cleaning the exterior surfaces (Figure 15). DO NOT use bleach or abrasive
cleaners. Use a vacuum cleaner to remove dirt and lint from the condenser (Figure 16). The unit should
be cleaned every 3 months, except where fingers touch the temperature selectors, which can be wiped
often with hygienic wipes or mild cleaning products.
Caution: Do not clean unit with pressure washer.
Ensure the following when cooler is to be serviced:
Turn off the hot water switch and disconnect power supply cord (Figure 17) .
Replacement of CrystalFlo Water Cartridge
A flashing yellow light above the faucet levers will alert you to when the CrystalFlo Water Cartridge
should be replaced. The system has been pre-set to provide indication after a period of 12 months of
use. User may operate the cooler as normal until the bottle has been emptied.
It is also advised to
replace the CrystalFlo cartridge if there is a leak from the cartridge, taste problem or
discoloration to the water.
1. Place a glass or other container below the water outlets (to catch drips)(Figure 18), and unlatch the
Top Cover Locking Clip (located inside of the Bottle Installation area)(Figure 19), and open Top
Cover (Figure 20).
2. Pull CrystalFlo Water Cartridge upwards to remove (Figure 21) . Do not squeeze the water reservoir
as water could leak out. In addition, it may be helpful to have a bucket nearby to place the used
CrystalFlo in.
Figure 11 Figure 12 Figure 13
Figure 18 Figure 19 Figure 20 Figure 21
Figure 14 Figure 15 Figure 16 Figure 17


