NOTE: Be sure to allow a minimum space of 1-1/2” to 2” under the filter for removing the sump.
NOTE: It is recommended that a shut-off valve be placed on both sides of the filter.
NOTE: It is recommended that a Whole House Leak Detector Smart Valve (CQE-WH-03064) be placed directly upstream
of your household filter to prevent water damage.
*Measure to shoulder inside of fittings. Galvanized pipe butts against this shoulder.
To review the latest edition of the Installation and
Operations Guide, visit
CrystalQuest.com
Use these guidelines for all Crystal
Quest
®
Whole House Compact
Water Filter Systems
Minimum Materials Needed
• Pipe threading tool
• Pipe wrenches
• Pipe joint compound
• Union fittings and pipe
nipples
• Pipe cutter
• Thread seal tape
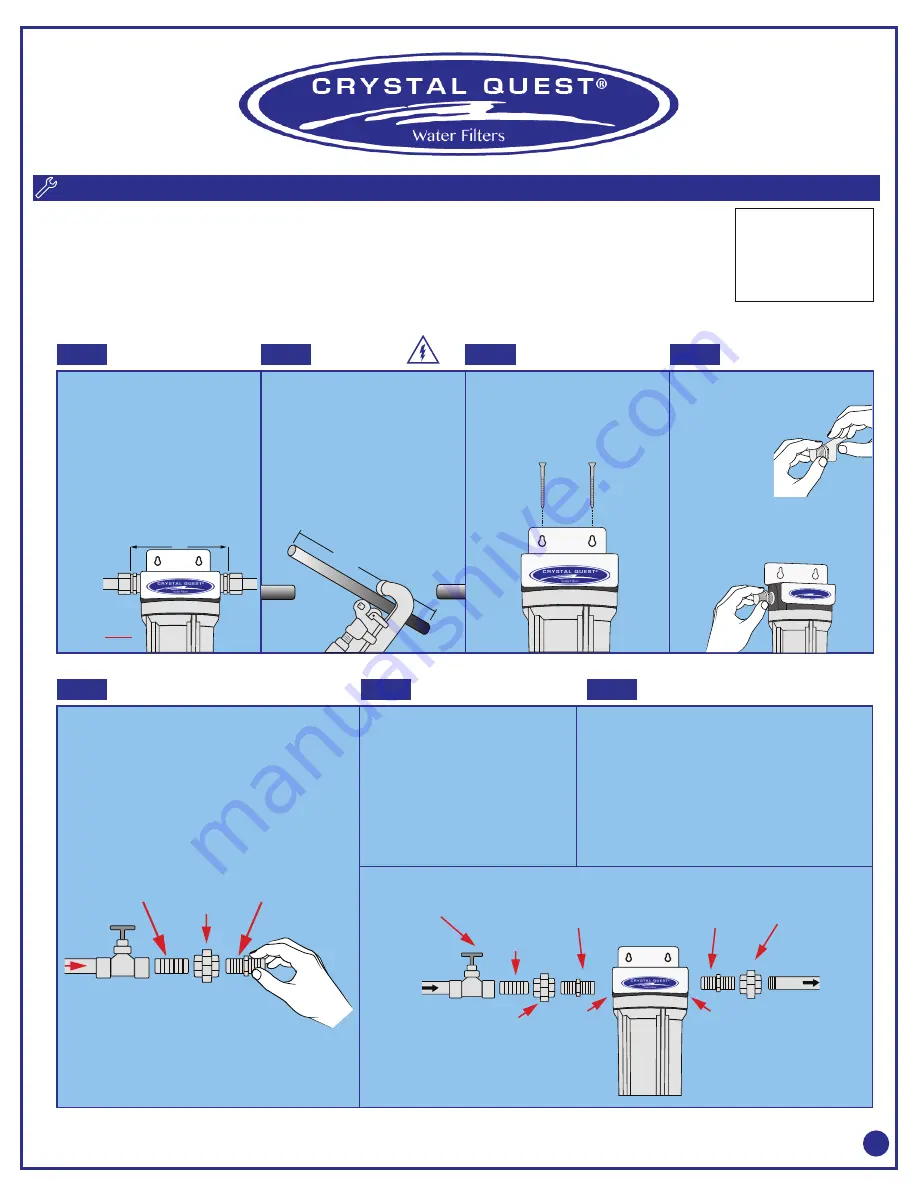
INSTALLATION ON HOUSE MAIN WATER PIPE USING THREADED PIPE FITTINGS
STEP 1
Cutting Water Line
STEP 5
Attaching Union Fittings and Pipe
Nipple Fittings to Water Line
STEP 6
Installing the Unit
STEP 7
Final Check
STEP 2
Cutting the Pipe
STEP 3
Installing the Mounting Bracket
STEP 4
Attaching Hex Nipple Fittings
to Filter Housing
CAUTION:
Turn off the water supply
and
open a nearby faucet to drain the water out
of pipes.
• Using a tape measure or ruler, measure
the distance “X”.
NOTE:
Have a bucket and towel available to
collect excess water. Remove the nut and
brass ferrule from both compression fittings
and set aside. Using a tape measurer or
ruler, measure the distance “X”.* Mark these
dimensions so you do not forget.
• Use pipe joint compound on all external threads.
• Do not turn pipe or fittings too tightly into the filter head. This
may cause the head to crack.
• Fit the pipe nipple into the union fitting, being careful not to
cross-thread.
• Fit the union and nipple assembly into the shut-off valve.
• It is important to have some linear movement in the house main
water pipe. This will allow you to tighten union fittings without
damaging the filter head if pipe lengths are not exact.
• Align filter assembly with pipe ends.
• With the inlet side of the water filter facing
incoming water, spread the pipes apart and
fit both hex nipple adapters into the union
fitting.
• Turn into union fitting and tighten.
• Using two adjustable wrenches, hold
incoming fitting securely with one wrench
and tighten nut with second wrench.
• Repeat the procedure on the other side for
the outgoing fitting.
• Slowly turn on water supply.
• Check entire system for leaks.
• If the system leaks from the fittings, shut off the water
flow and tighten or reseal the fittings. If the system leaks
from the filter housing, tighten the housing with a wrench.
• After installation, flush the cartridge for 10 minutes. Wait
one hour, then flush again for 10 minutes before use.
Refer to
Installing the Ground Wire
section
before cutting the pipe.
• Select a secure location surface to install
filter and mounting bracket. The location
should align the filter system with inlet
and outlet pipe and should not cause
the pipes to bend or become damaged.
Mark the distance “X” on the pipe.
• Using a pipe cutter, cut pipe. Sand (file)
cut ends of pipe to ensure that they are
square and smooth.
• The bracket can be used as a template
for marking the location of the mounting
screws.
• Use four hex washer-head screws to
mount bracket to the wall firmly. Use
proper anchors on wall. Anchors are
NOT included.
• Apply several wraps of thread seal tape
to the threads of both hex nipple
fittings.
• CAREFULLY turn the hex nipple fittings
into the water filter head inlet and outlet
and tighten. DO NOT cross-thread or
overtighten. This will damage the
threads and crack the head.
X
X= “
In
Out
X
C R Y S T A L Q U E S T ®
Water Filters
Pipe Nipple
Fitting
Union
Fitting
Hex Nipple
Fitting
In
Out
Union
Adapter
Hex Nipple
Adapter
Hex Nipple
Adapter
Nipple
Fitting
Shut-Off Valve
(Optional)
Cold Water
Line
Outlet
Inlet
Union
Fitting
Cold Water
Line
In
Out
Please note all drawings, pictures, colors and sizes are approximate for illustrative purposes only and may not exactly
resemble the end product.
5


