background image

Service Instruction Sheet

Introduction

These instructions are intended for use with comparator rebuild kit (

PN 

3143). Rebuild kit 3143 con-

tains all of the parts and tools required to rebuild the 

GaugeCal

XP

 pressure comparator. Rebuilds 

should be performed only by qualifi ed personnel.

Service Instructions

1

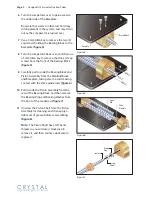
  Remove all gauges from the 

GaugeCal

XP


pressure comparator 

(fi gure 1)

.

2

  Tip the comparator on its end to completely 

drain the water, oil, or isopropyl alcohol from 
the system. Always dispose of fl uids in a 
responsible manner.

3

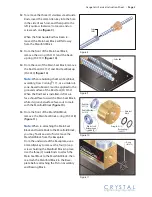
  Use a 3mm Allen key to remove the two (2) 

cap screws securing the Reservoir to the 
Main Seal Block, then lift to remove the Res-
ervoir and Reservoir o-ring (

PN 

2018)

(fi gure 2)

.

4

  Remove the press-fi t Reservoir Vessel,

and replace the lower seal o-ring (

PN 

3303

or 

PN 

3376) 

(fi gure 2)

.

*

 Note:

The 

GaugeCal

XP

 is assembled with 

a Reservoir o-ring in one of two sizes. Com-
pare your o-ring to the illustrated parts list 
on page 6, to determine the appropriate 
replacement size for your unit. 

5

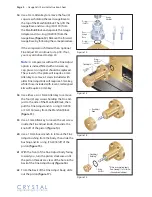
  Use a 5mm Allen key to remove the Handle 

Assembly cap screw and washer, then pull to 
slide the Handle Assembly from the Piston 
Assembly 

(fi gure 3)

. Be sure to also remove 

the Key from the Piston Assembly Leadscrew 

(fi gure 3)

.

PRESSURE COMPARATOR

10000PSI–700bar

Gau

G

eCa

L

XP

XP

Figure 1

Figure 2

Figure 3

C R Y S T A L


engineering cor po ra tion

PSI

50

0

300

Gauge

Base

R

ese

rvoir 

O-rin

g


(

PN 

2018) 

O-rin

g

(

PN 

3303)

(

PN 

3376)

or 

Ha

n

dle

Key

Leadsc

r

ew

Summary of Contents for GauGeCaLXP

Page 1: ...al Block then lift to remove the Res ervoir and Reservoir o ring PN 2018 figure 2 4 Remove the press fit Reservoir Vessel and replace the lower seal o ring PN 3303 or PN 3376 figure 2 Note The GaugeCa...

Page 2: ...5 9 Carefully pull to slide the Bearing Block and Piston Assembly from the Manifold Block and Baseplate taking care to avoid making contact with the three guide rods figure 6 10 Pull to slide the Pist...

Page 3: ...Rod Seal PN 3152 When the Rod Seal is installed its flat sur face should face toward the Main Seal Block while its grooved surface faces out to mate with the Manifold Block figure 10 15 From the front...

Page 4: ...ts will require a 4mm key 18 Use either a 4 or 5mm Allen key to remove the four 4 cap screws holding the Fine Ad just to the side of the Manifold Block then pull the Fine Adjust and its o ring PN 2018...

Page 5: ...24 26 Clean all of the parts Crystal recommends you use an ultrasonic bath and an appropri ate cleaning solution In addition we recommend that you use a round brush to clean the piston hole in the Man...

Page 6: ...1 3152 Rod Seal QTY 1 3178 Allen key 5mm QTY 1 3177 Allen key 4mm QTY 1 3434 Rod Seal Backup QTY 1 3176 Allen key 3mm QTY 1 QTY 1ea O ring 3376 35mm x 2 5mm 1 378in x 0 098in 2018 O ring 9 25mm x 1 78...

Page 7: ...r 2 To completely open the reservoir wind the handle counter clockwise until you feel it stop 3 Securely grip the front of the Baseplate near the bearing block and lift to tip the GaugeCalXP on its en...

Page 8: ...C R Y S T A L engineering corporation 2006 Crystal Engineering Corporation 708 Fiero Lane Suite 9 San Luis Obispo California 93401 8701 PN 3175 Rev D...

Reviews: