18
M
4. Use
4.3
Setting the clock
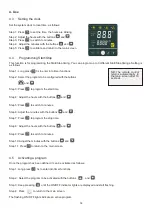
Set the system clock to local time, as follows:
Step 1: Press
to set the time, the hours are blinking.
Step 2: Adjust the hours with the buttons
and
Step 3: Press
to switch to minutes.
Step 4: Adjust the minutes with the buttons
and
.
Step 5: Press
to validate and return to the main screen.
4.4
Programming Start/Stop
This function is for programming the Start/Stop timing. You can program up to 3 different Start/Stop timings. Setting is
as follows:
Step 1: Long press
3s to enter into timer functions
Step 2: Select the program to be configured with
M
thebuttons
and
.
Step 3: Press
to program the start time.
Step 4: Adjust the hours with the buttons
and
.
Step 5: Press
to switch to minutes.
Step 6: Adjust the minutes with the buttons
and
.
Step 7: Press
to program the stop time.
Step 8: Adjust the hours with the buttons
and
.
Step 9: Press
to switch to minutes.
Step 10: Adjust the minutes with the buttons
and
.
Step 11: Press
to return to the main screen.
4.5
Activating a program
Once the program has been defined, it can be activated as follows:
Step 1: Long press
3s to enter into timer functions
Step 2: Select the program to be activated with the buttons
and
.
Step 3: Keep pressing
until the ON/OFF indicator lights are displayed and start flashing.
Step 4:
M
Press
to return to the main screen.
The flashing ON/OFF lights indicate an active program.
NB: The remote control
returns automatically to
the main screen after 10
seconds.

