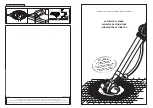
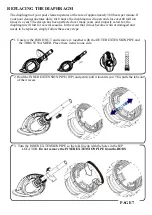
background image

PAGE 7 

REPLACING THE DIAPHRAGM


The diaphragm of your pool cleaner operates at the rate of approximately 360 beats per minute. If 
your pool cleaner operates daily for 8 hours, the diaphragm will open and close over60 million 
times in a year! The design has been perfected over many years and, properly cared for; the 
diaphragm will last for several seasons. In the event that it does become worn or damaged and 
needs to be replaced, simply follow these easy steps:


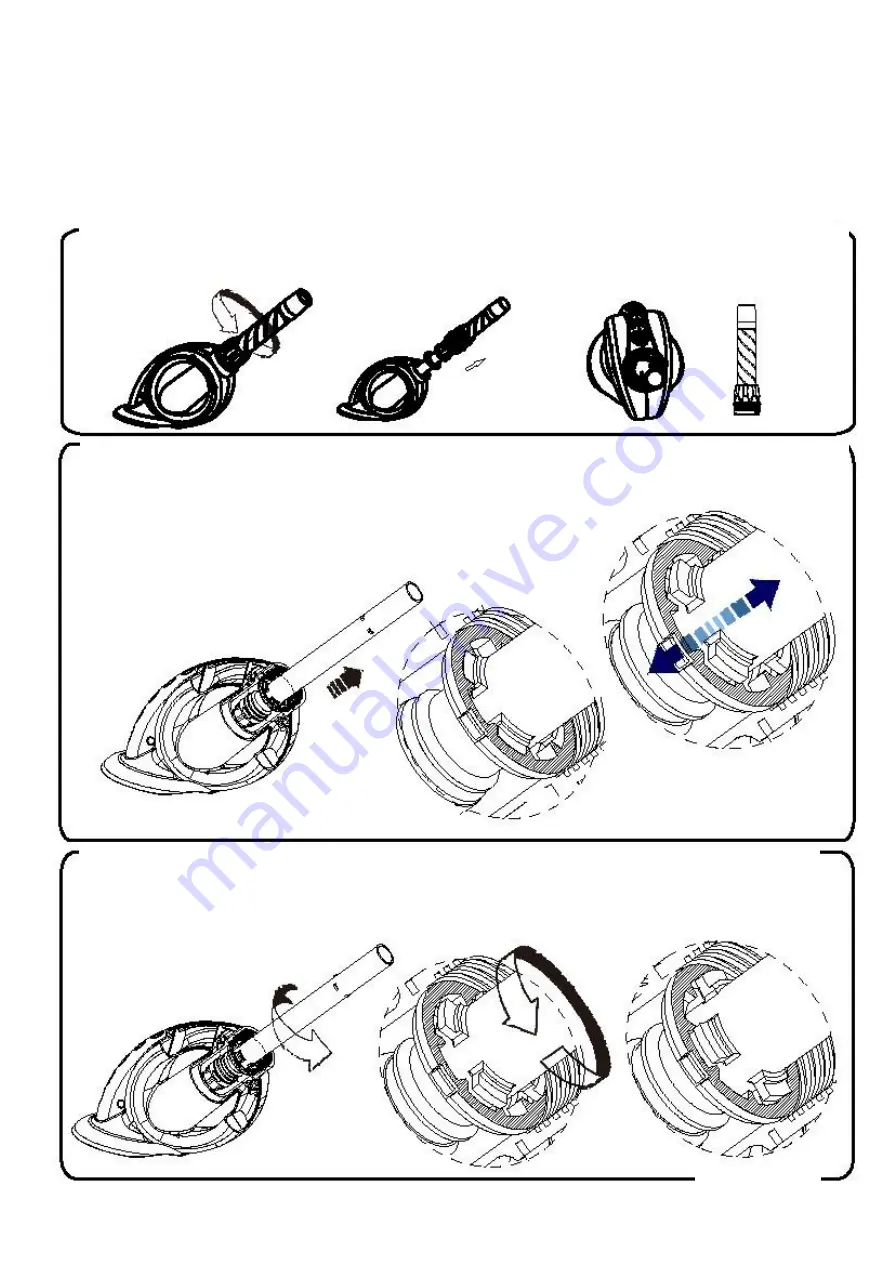
1. Unscrew the HAND NUT and remove it, together with the OUTER EXTENSION PIPE and 

the THRUST WASHER. Place these items to one side.  


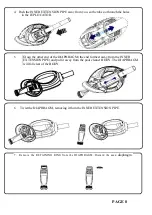
2. Hold the INNER EXTENSION PIPE (IEP) and gently pull it towards you. This pulls the tabs out 

of their recess.


3.  Turn the INNER EXTENSION PIPE so the tabs line up with the holes in the IEP 

LOCATOR. 

Do not remove the INNER EXTENSION PIPE from the BODY


Summary of Contents for CC3272

Page 1: ...PERATING MANUAL CC3272 Model Cleans pool floor Minimum Horse Power Pump Combo min Filter Pump Pool Type Min Operating Flow Rate CC3272 Yes 0 25Hp CC2013 Above In Ground 4m H Fast Start up Safely Opera...

Page 2: ...basket 5 Close the pool main drain If your pool has one 6 Adjust the pool return lines so the water flow is directed downward to ensure complete cleaning of your pool The flow of water from the retur...

Page 3: ...el 1 5 Hose Weight 3 6 Flow Control Valve 1 7 Control Valve Adaptor 1 8 Return Line Diverter 1 9 Agile Adaptor 1 STEP2 ASSEMBLETHEPOOLCLEANER To assemble simply fit your pool cleaner disc to the body...

Page 4: ...om the pool skimmer or vacuum point to the farthest point of your pool plus one length See Fig 4 The Female large hose cuff is fitted to the pool cleaner Opt agile adapter according to the individual...

Page 5: ...Fig 8 Turn the pool pump ON Your pool cleaner will now begin randomly and automatically vacuuming your pool Figure 7 Attach Male Hose Adaptor smaller end Flow Control Valve Control Valve Adaptor The F...

Page 6: ...position is correct Air bubbles can be seen in the flow from the return line Check the hose to ensure there are no leaks Check the connection of the flow Control Valve to make sure it is underwater at...

Page 7: ...hragm will last for several seasons In the event that it does become worn or damaged and needs to be replaced simply follow these easy steps 1 Unscrew the HAND NUT and remove it together with the OUTE...

Page 8: ...sp the other end of the DIAPHRAGM the end furthest away from the INNER EXTENSION PIPE and pull it away from the pool cleaner BODY The DIAPHRAGM will fall clear of the BODY 6 Twist the DIAPHRAGM removi...

Page 9: ...ugh the holes in the IEP LOCATOR c d e Check that the DIAPHRAGM is correctly located If it has become twisted during installation simply untwist by slightly turning the open end of the DIAPHRAGM f Sli...

Page 10: ...PARTS DIAGRAM ITEM NO DESCRIPTION 1 Main Body 2 Outer Extension Pipe 3 Hand nut 4 Inner Extension Pipe 5 Thrust Washer 6 Deflector Wheel 7 Footpad 8 Disc 9 IEP Locator 10 Retaining Ring 11 Diaphragm...

Reviews: