background image


Operation


Page 20 


FA 550 V1.00


12.1 

Initialization  


12.2  Main menu 

P age-No.

S W V ersion

Mo dbus  ID


Switching to pages 2-3 or back by pressing key 

„ 

“ 


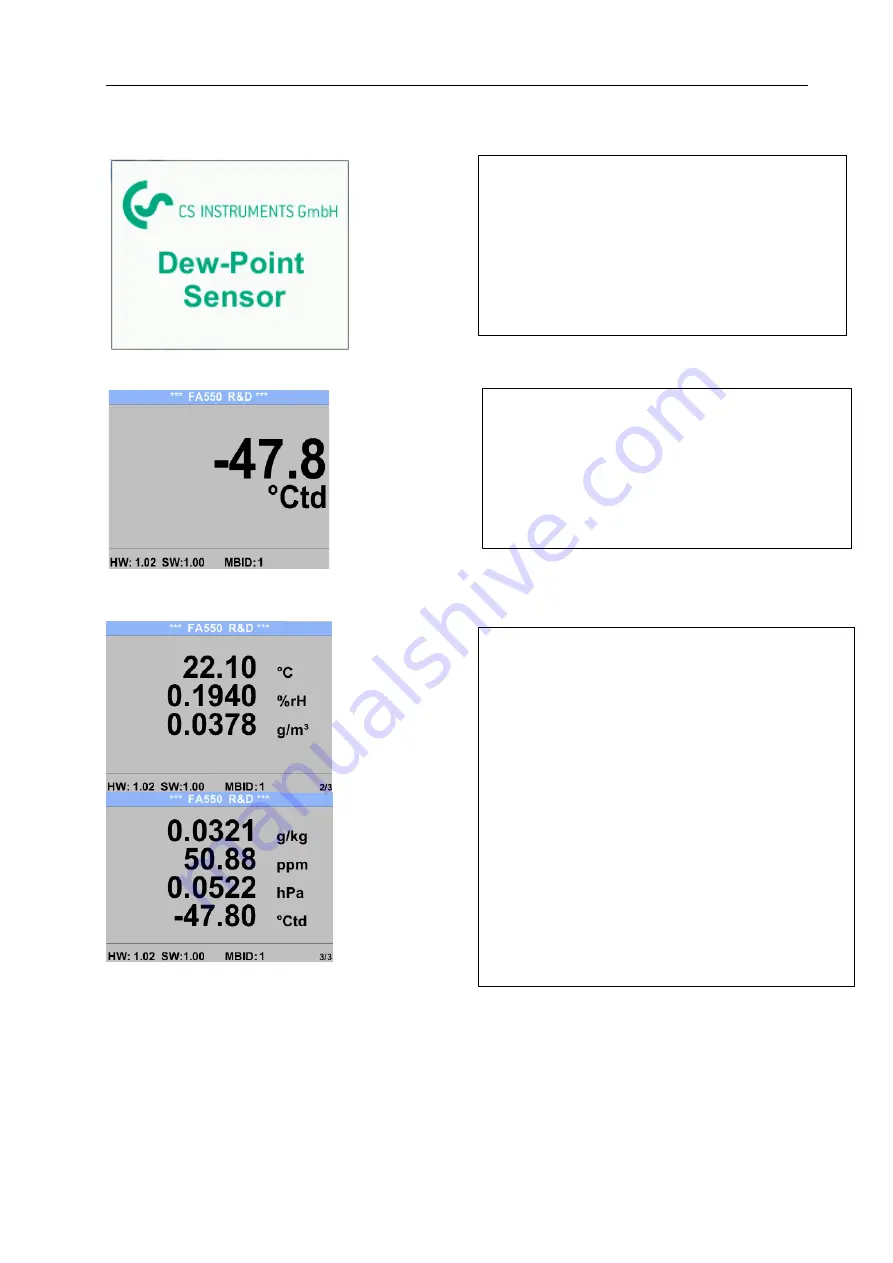
After switching on the FA 550, the initialized screen 
is displayed followed by the main menu.  


Page 1 

Display value is the pressure dew point, here in 
°Ctd. (When measured under pressure) 
The pressure dew point is always based on the 
pressure in the compressed air pipe. 


Page 2 

Value 1: Temperature in °C


Value 2: relative humidity in %


Value 3: vapour humidity in g/m³


Page 3 

Value 1:Absolute humidity in g/kg 

** 

Value 2 Parts per Million 

** 

Value 3:Atmospheric dew point (when the 

reference pressure is set to atmospheric 
pressure 1013,25 hPa) or reference dew 
point based on the reference pressure 
setting. 

**

 For the calculation, the input of the system 

pressure is mandatory. For entering see 
chapter, see 8.3.2. 

Summary of Contents for FA 550

Page 1: ...00 INSTRUCTION MANUAL FA 550 The CS dew point sensor FA 550 with 3 wire technology 4 20 mA and RS 485 Modbus output enables a reliable and long term stable monitoring of the dew point in industrial applications such as in ...

Page 2: ... 13 9 3 3 Modbus RTU 13 9 3 4 Modbus TCP Ethernet Optional PoE 14 9 3 5 Pulse Output 14 10 Installation 15 10 1 Installing directly into the process 15 11 Modbus 17 11 1 Register Mapping measuring values 17 Remark for DS400 DS 500 Handheld devices Modbus Sensor Datatype 17 Data Type R4 32 match with Data Type Float 17 11 2 Modbus Settings 2001 2006 18 11 3 Analog Scaling Settings 2007 2011 18 12 O...

Page 3: ...afe operation can only be ensured if the regulations and instructions described are strictly observed Geschäftsstelle Süd Sales Office South Zindelsteiner Str 15 D 78052 VS Tannheim Tel 49 0 7705 978 99 0 Fax 49 0 7705 978 99 20 Mail info cs instruments com Web http www cs instruments com Geschäftsstelle Nord Sales Office North Am Oxer 28c D 24955 Harrislee Tel 49 0 461 700 20 25 Fax 49 0 461 700 ...

Page 4: ...er As a consequence of incorrect handling serious personal injury or death Warning Possible harzard As a consequence of incorrect handling possible serious injury or death Caution Imminent hazard As a consequence of incorrect handling possible personal injury or damage Note Possible harzard As a consequence of incorrect handling possible personal injury or damage Important Additional notes informa...

Page 5: ...ompressed air It is the responsibility oft he user whether the instrument is suitable for the selected application It must be ensured that the medium is compatible with the wetted parts The technical data listed in the data sheet are binding Improper handling or operation outside the technical specifications is not permitted Claims of any kind based on improper use are excluded ...

Page 6: ...ch as Oxygen nitrogen argon hydrogen natural gas biogas Advantages Extremely long term stable IP 67 housing grants a reliable protection in extreme industrial conditions Very fast response time Installable in the dryer by means of G 1 2 thread optional UNF 5 8 Analogoutput o 1x 4 20mA glav not isolated Modbus RTU Interaface Optional o 2x 4 20mA galv isolated o Ethernet or Ethernet PoE o MBus Calib...

Page 7: ... applicable safety regulations must be observed All work on the compressed air network must only be carried out in a depressurised state Attention Do not exceed the pressure range 50 bar for the standard version Observe the measuring ranges of the sensor Overheating will destroy the sensors Observe the permissible storage and transport temperature as well as the permissible operating temperature e...

Page 8: ... PoE MBus Protection class IP 67 EMV DIN EN 61326 Operating temperature 20 70 C ideal 0 50 C Storage temperature 40 80 C Load for analogue output 500 Ohm Screw in thread G 1 2 stainless steel Optional UNF 5 8 Material of housing Aluminium die cast Sensor protection sinter filter 50 m stainless steel Connection M12 5 pole Display 2 TFT Colour Display 320 x 240 Alarm relay max 60V 0 5A AC DC NC rela...

Page 9: ...s 7 1 1 Modbus According Standard EIA TIA 485 7 1 2 Current output 7 1 2 1 Aktive Galvanically isolated 4 20 mA RL 500 Ohm 7 1 2 2 Passive Galvanically isolated 4 20 mA RL 500 Ohm Vin 12 36Vdc 7 1 3 Alarm Galvanically isolated dry contact Max 48Vdc 500mA ...

Page 10: ...Dimensions Page 10 FA 550 V1 00 8 Dimension ...

Page 11: ...arm 1 2 I 4 20mA X1 X2 X3 1 2 GND VB 1 2 3 Mod A 1 2 3 4 NC Main Board Mod B X4 NC Alarm Standard version with 1x analogue output not galvanically isolated Alarm 1 2 I 4 20mA 1 2 X1 X2 X4 X6 X5 I 4 20mA 1 2 GND VB 1 2 3 Mod A 1 2 3 4 NC Main Board Mod B Option Board 4 20mA NC Alarm Version with option board 2x analogue outputs galvanically isolated 2 1 X1 X2 X4 K1 MBUS 1 2 GND VB 1 2 3 Mod A 1 2 3...

Page 12: ... B 2 Modbus shield 3 Modbus A X3 urrent output 1 I Active 2 I Active X4 Direction Pulse 1 Alarm 2 Alarm 3 NC 4 NC X5 Current output 1 1 I Active 2 I Active X6 Current output 2 1 I Active 2 I Active K1 MBus 1 MBus 2 MBus Outputs are galvanically isolated The Current outputs X5 and X6 are optional Active and passive version available ...

Page 13: ...s with cross section of 0 25mm 9 3 2 Power supply Alarm X1 X2 X4 1 2 GND VB 1 2 3 Mod A 1 2 3 4 Âlarm NC Main Board Mod B 1 2 I 4 20mA X3 NC 9 3 3 Modbus RTU If the sensor placed at the end oft he Modbus system a termination is required Therfore the enclosed 120R resistor is to be connected at Pin 1 and Pin 3 of connector X2 Alarm X1 X2 X4 1 2 GND VB 1 2 3 Mod A 1 2 3 4 Alarm NC Main Board Mod B 1...

Page 14: ... 4 PoE LINES 5 6 und 7 8 2 8 1 3 5 4 6 7 M12 x 1 Connection cable Cat 6 PoE Power over Ethernet 9 3 5 Pulse Output Pulse X1 X2 X4 1 2 GND VB 1 2 3 Mod A 1 2 3 4 Pulse DIR Main Board Mod B Potentialfreier Schaltkontakt Max 48Vdc 500mA 1 2 I 4 20mA X3 Remark The sensor must be connected only in strain less state ...

Page 15: ... governing opening and repair of the device have to be applied The device fulfills the general safety requirements in accordance with EN 61010 1 the EMC requirements of IEC EN 61326 and NAMUR recommendation NE 43 10 1 Installing directly into the process If installing directly in the process must be done in the depressurized state of the line e g by using a stop valve should at both sides of the i...

Page 16: ...ir flows continuously at 7 bar approx 1 l min expanded in the capillary pipe of the measuring chamber The reaction times for the humidity reading are shorter than in case of a direct mounting Directly in the compressed air system Screw in probe with G 1 2 thread pressure tight in the center or at the top of the compressed air pipe Take care that measurement is effected close to the compressed air ...

Page 17: ... multiple Register For parameter settings changing see chapter 12 Operation Modbus Settings 11 1 Register Mapping measuring values Modbus Register Modbus Address No of Byte Data Type Description Default Setting Read Write Unit Comment 1001 1000 4 Float Temperature R C 1003 1002 4 Float Temperature R F 1005 1004 4 Float Relative Humidity R 1007 1006 4 Float Dew Point R Ctd 1009 1008 4 Float Dew Poi...

Page 18: ... 0 Modbus disabled 1 Modbus Enabled 11 3 Analog Scaling Settings 2007 2011 Modbus Register Modbus Address No of Byte Data Type Description Default Setting Read Write Unit Comment 2007 2006 4 UInt32 Output Value 4 R W 0 4 20mA disabled 1 Temperature C 2 Temperature F 3 relative Humidity 4 DewPoint C 5 DewPoint F 6 Absolute Humidity g m3 7 Absolute Humidity mg m3 8 Humidity Grade g kg 9 Vapor Ratio ...

Page 19: ...rch Taste OK Bei allen weiß hinterlegten Feldern können Angaben oder Änderungen gemacht werden Auswahl zur Eingabe wird durch gelbe Hintergrundfarbe angezeigt Wörter in grüner Schrift verweisen hauptsächlich auf die Abbildung en in dem Kapitelabschnitt Aber auch wichtige Menüpfade oder Menüpunkte die damit im Zusammenhang stehen sind in grüner Schrift gekennzeichnet Die Menüführung ist generell in...

Page 20: ... pressure The pressure dew point is always based on the pressure in the compressed air pipe Page 2 Value 1 Temperature in C Value 2 relative humidity in Value 3 vapour humidity in g m Page 3 Value 1 Absolute humidity in g kg Value 2 Parts per Million Value 3 Atmospheric dew point when the reference pressure is set to atmospheric pressure 1013 25 hPa or reference dew point based on the reference pr...

Page 21: ... is password protected Selection of a menu item or to change a value is done with the key a final move to the chosen menu item or takeover of the value change needs the confirmation by pressing the key OK Factory settings for password at the time of delivery 0000 4 times zero If required the password could be changed at Setup User setup Password ...

Page 22: ...hen confirm it with OK To make changes to the unit for the respective measurement value first select by pressing the field of the measurement value and activate it with OK Selection of the new unit with In case the quantity of units selectable are not presentable on one page pleas move to next page by pressing Confirm selection by pressing 2x OK Procedure for all 3 measurements variables is analog...

Page 23: ...the calculation of the atmospheric dew point if the gas would be expanded to ambient pressure or the dew point at reduced pressure it is necessary to define the reference pressure and the system pressure Example The sensor is used in a compressed air line after a compressed air refrigeration dryer Pressure in the line 6 bar overpressure Measured pressure dew point 3 Ctd To calculate the atmospheri...

Page 24: ... select by pressing key the field Units and then key OK Select with the key the correct unit and then confirm selection by pressing 2x OK Input change of the value by selecting the respective position with button and entering by pressing button OK By pressing the position value is incremented by 1 Complete input change with OK and activate next number position Inputs changes to be confirmed with b...

Page 25: ...ation select with button the menu Reference Val and open the input menu with OK Input change of the value by selecting the respective position with button and entering by pressing button OK By pressing the button Calibrate the new reference value will be taken over A calibration could be set back to out of factory settings with button Reset Leaving the menu with back ...

Page 26: ... resistor is to be connected at Pin 1 and Pin 3 of connector X2 correctly For changes e g the sensor ID first select by pressing key the field ID and then key OK Select the desired position by pressing the and select with OK button Change values by pressing the values takeover by pressing OK Inputs for remaining information is analogous With Format the word order of transmission could be changed b...

Page 27: ...5 Specification and description of the Modbus protocol is free to download on www modbus org Supported Modbus commands functions Command Code Description Function Code 3 Read holding register Function code 16 Write multiple registers For more details please see VA 5xx Modbus RTU_TCP Installation V1 05 Settings Network Setup 12 3 4 1 1 Network Setup DHCP Settings Network Setup Settings IP Address H...

Page 28: ...net and Gateway selection keys must be selected and activated with OK The first data field of the selection in this case the IP address is then marked red Confirm with OK the corresponding input menu is opened By means of the next data field is changed Select the desired position with the key and activate it with the OK key Change the values with the key and accept the values with the OK key Proce...

Page 29: ...d then key OK Select the desired position by pressing the and select with OK button Change values by pressing the values takeover by pressing OK Input for the port is done analogue By means of the button Byte Format it is possible to change the data format Word Order Possible formats are ABCD Little Endian and CDAB Middle Endian Saving the changes by pressing Save therefore select it with key and ...

Page 30: ...with and change it with button OK deactivated activated The alarm could be set to one of the values units see picture Unit Alarm Value defines the alarm value here 60 Ctd Hysterese defines the hysteresis value With button overrun or underrun the way how the alarm is triggered Overrun Value is exceeding the Value Underrun Value is going below Value ...

Page 31: ...to be inserted twice Confirmation of input password by pressing OK With button Brightness could the display brightness adapted changed Therefore move with either to the or button and change the brightness with OK With Dimming after a display dimming could be activated The dimming starts after the time period defined in time field Trigger is last keypress Rotate Screen will rotate the display conte...

Page 32: ... selection by pressing OK The 4 20 mA Analogue output of the Sensor FA 500 can be individually adjusted Activation on or deactivation off of the alarm by selecting button State und and confirming with OK To select a measurement value a corresponding appropriate unit needs to be defined Select Unit with and open the menu with OK Select required unit with and takeover it by pressing OK ...

Page 33: ...mA and Scale 20mA allows defining the desired scaling With button select the menu Scale 4mA or Scale 20mA and open it with OK Input is analogous to that described above using the CLR the complete entry will be deleted Takeover the inputs changes with Save or discard the changes with Cancel Leaving menu with back ...

Page 34: ...m error 22 mA Sensor error System error None Output according Namur 3 8mA 20 5 mA 4mA to 3 8 mA Measuring range under range 20mA to 20 5 mA Measuring range exceeding To make changes first select a menu item Current Error with button and then select by pressing the OK the desired mode With back change to the settings menu Here you get a brief description of the sensor data incl some production data...

Page 35: ...lso cancelled once the measuring instrument has been opened provided this is not described in the instruction manual for maintenance purposes This is also the case if the serial number has been changed damaged or removed The warranty time for FA 550 is 12 months for the instrument and 6 months for accessories if no other terms have been agreed Warranty services do not extend the warranty time If i...

Page 36: ...0553 0105 Connection cable length 10 m 0699 3390 Standard measuring chamber for compressed air up to 16 bar 0699 3290 Bypass Measuring chamber Stainless steel 1 4305 0699 3590 High pressure measuring chamber up to 350 bar 0699 3396 Precision calibration at 40 Ctd or 3 Ctd incl ISO certificate 0554 2007 CS Service Software for FA VA sensors incl PC connection set USB connection and interface adapte...

Page 37: ...Page 37 FA 550 V1 00 ...

Reviews: