background image


25  


V5-02-2010 

ORDERING DATA


Order no.


Description


0695.4001 

VA 400 consumption sensor without display including plug 

Z695.4000 Display 

Z695.4003 

Max. version 185 m/s 

Z695.4002 

High speed version 224 m/s 

0553.0104 

Connection cable for VA/FA Series 400, 5 m with M12 plug 

0553.0105 

Connection cable for VA/FA Series 400, 10 m with M12 plug 

ZSL.0120 

Length 120 mm 

ZSL.0160 

Length 160 mm 

ZSL.0220 

Length 220 mm 

ZSL.0300 

Length 300 mm 

ZSL.0400 

Length 400 mm 

0500.3000 

DS 300 display for wall mounting 

Options:  

WARRANTY


If you have reason for complaint we will of course repair any faults free of charge if it can be 
proven that they are manufacturing faults. The fault should be reported immediately after it 
has been found and within the warranty time guaranteed by us. Excluded from this warranty 
is damage caused by improper use and non adherence to the instruction manual. 
 
The warranty is also cancelled once the instrument has been opened - as far as this has not 
been mentioned in the instruction manual for maintenance purposes - or if the serial number 
in the instrument has been changed, damaged or removed.   
 
The warranty time for the VA 400 is 12 months. If no other definitions are given the  
accessory parts have a warranty time of 6 months. Warranty services do not extend the 
warranty time. 
 
If in addition to the warranty service necessary repairs, adjustments or similar are carried 
out the warranty services are free of charge but there is a charge for other services such as 
transport and packaging costs. Other claims, especially those for damage occurring outside 
the instrument, are not included unless responsibility is legally binding. 
 

After sales service after the warranty time has elapsed


We are of course there for you even after the warranty time has elapsed. In case of mal-
functions please send us the instrument with a short-form description of the fault. Please do 
not forget to indicate your telephone number so that we can call you in case of any  
questions. 

CALIBRATION


According to DIN ISO certification of the measuring instruments we recommend to calibrate 
and if applicable to adjust the instruments regularly from the manufacturer. The calibration 
intervals should comply with your internal specificaton. According to DIN ISO we recom-
mend a calibration interval of one year for the instrument VA 400. 

Summary of Contents for VA 400

Page 1: ...and mobile flow and consumption measurement for compressed air and gases VA 400 VA 400 consumption sensor consumption sensor Optionen VA 400 with display VA 400 Max VA 400 HighSpeed Operation menu for...

Page 2: ...24 Calibration adjustment 25 Warranty 25 Ordering data 25 Accessories Measuring sections 26 EC conformity declaration 27 28 Contact 32 INTRODUCTION Dear customer thousands of customers buy our high st...

Page 3: ...ted in the display Actual value in m h m min etc Counter in m resp l as well as pulse output 1 pulse per m resp l are calculated according to the set diameter Please take the analogue value for flow r...

Page 4: ...nd outlet sections must not fall below the specified minimum values as this causes increased deviations in the measuring results The manufacturer cannot be held liable for any damage which occurs as a...

Page 5: ...r Gas and Water admission however it can be used for natural gas A DVGW admission is not mandatory The consumption sensor VA 400 corresponds with the latest state of technology and can generally be us...

Page 6: ...tables on pages 10 15 Accuracy 0 06 mA Pulse output see pages 18 to 19 Power supply 12 to 30 VDC Power input max 80 mA at 24 VDC Accuracy 3 m v with meas section 2 m v option via 5 point ISO precision...

Page 7: ...n l min l s cfm m s Reading out the service data Determining the point of installation In order to maintain the accuracy stipulated in the data sheets the sensor must be inserted in the centre of a st...

Page 8: ...let and outlet sections The respective minimum values required are indicated here If it is not possible to observe the stipulated equalising sections considerable deviations in measuring results must...

Page 9: ...rque SW 17 Attention Alignment of the sensor must not be modified when tightening the connection thread and adapter sleeve In this case please check the immersion depth and alignment again and correct...

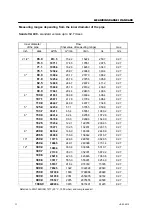
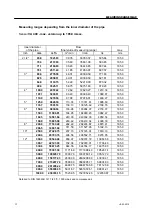
Page 10: ...m h m min l min l s m s 1 4 6 0 4 7 0 08 78 7 1 31 92 7 10 0 15 1 0 25 251 1 4 19 92 7 15 0 38 9 0 65 648 6 10 81 92 7 1 2 16 1 45 6 0 76 760 8 12 68 92 7 3 4 21 7 89 1 1 48 1484 9 24 75 92 7 1 25 0 1...

Page 11: ...0 0 2644 7 44 08 44077 734 6 92 7 5 125 0 3423 3 57 1 57055 950 9 92 7 133 7 3921 1 65 4 65351 1089 2 92 7 6 150 0 4941 4 82 4 82356 1372 6 92 7 159 3 5579 8 93 0 92996 1549 9 92 7 182 5 7323 4 122 1...

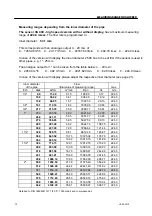
Page 12: ...42 0 16 156 92 2 62 185 0 10 0 30 08 0 50 501 28 8 35 185 0 15 0 77 68 1 29 1294 61 21 58 185 0 1 2 16 1 90 98 1 52 1516 31 25 27 185 0 3 4 21 7 177 84 2 96 2963 94 49 40 185 0 1 25 0 243 88 4 06 406...

Page 13: ...53 130 13 130125 42 2168 76 185 0 6 150 0 9839 04 163 98 163984 07 2733 07 185 0 159 3 11096 91 184 95 184948 45 3082 47 185 0 182 5 14581 94 243 03 243032 33 4050 54 185 0 190 0 15805 08 263 42 26341...

Page 14: ...0 11 40 0 19 190 00 3 17 224 0 10 0 36 42 0 61 606 96 10 12 224 0 15 0 94 05 1 57 1567 53 26 13 224 0 1 2 16 1 110 16 1 84 1835 96 30 60 224 0 3 4 21 7 215 33 3 59 3588 77 59 81 224 0 1 25 0 295 30 4...

Page 15: ...7 9453 44 157 56 157557 27 2625 95 224 0 6 150 0 11913 22 198 55 198553 68 3309 23 224 0 159 3 13436 25 223 94 223937 58 3732 29 224 0 182 5 17655 97 294 27 294266 18 4904 44 224 0 190 0 19136 96 318...

Page 16: ...4 132 5 Maximum velocities of VA 400 for different gases and reference standards Please note The consumption sensor VA 400 corresponds with the latest state of technology and can generally be used for...

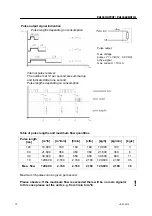
Page 17: ...cally isolated Pulse P VB 12 30 VDC max current I 10 mA to connector plug A If VA 400 is connected to a multifunction measuring instrument DS 300 DS 300 will convert the active pulse signal into a gal...

Page 18: ...OUTPUT PULSE LENGTHS Table of pulse lengths and maximum flow quantities Pulse length ms m h m min l min 120 10 800 180 180 60 21 600 360 360 30 39 600 660 660 cfm 180 360 660 kg h 10 800 21 600 39 60...

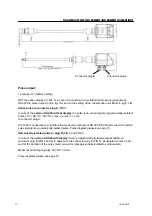
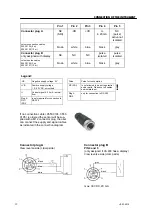
Page 19: ...5 m 0553 0105 10 m brown white blue black grey colours pulse cables 0553 0106 5 m 0553 0107 10 m brown white blue black grey VB Negative supply voltage 0 V VB Positive supply voltage 12 30 VDC smoothe...

Page 20: ...If soiling cannot be removed service and maintenance must be carried out by the manufacturer Re calibration If no customer specifications are given then we recommend to carry out calibration every 12...

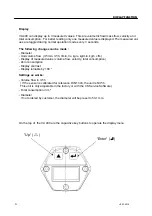
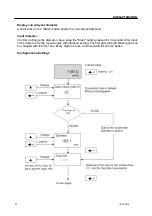
Page 21: ...w m min m h l min l s kg s kg min kg h cfm Display of measured value volume flow velocity total consumption Zero consumption Display contrast Display turnable by 180 Settings ex works Volume flow in m...

Page 22: ...power on the display will go through an initialisation procedure and will finally show the ac tual online values Slave mode Changing the settings only with DS 300 Master mode Changing the settings wit...

Page 23: ...set diameter Input diameter In order to change the diameter value keep the Enter button pressed for 3 seconds After input of the unlock code the menu begins with diameter setting The first digit will...

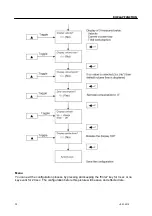
Page 24: ...2010 DISPLAY FUNCTION Menu You can exit the configuration process by pressing and keeping the Enter key for 3 sec or no key event for 20 sec The configuration before this picture will be save and effe...

Page 25: ...nstrument has been changed damaged or removed The warranty time for the VA 400 is 12 months If no other definitions are given the accessory parts have a warranty time of 6 months Warranty services do...

Page 26: ...uest CS Instrument will supply the following measuring sections for VA 400 consumption sensors G 1 2 outer screw neck Length L1 LA DA Measurement section for VA 300 probes with flange connection Outer...

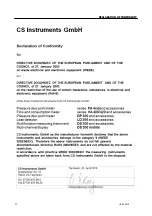
Page 27: ...27 V5 02 2010 DECLARATION OF CONFORMITY...

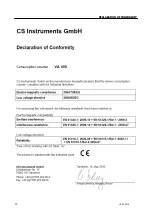
Page 28: ...28 V5 02 2010 DECLARATION OF CONFORMITY...

Page 29: ...29 V5 02 2010 NOTES...

Page 30: ...30 V5 02 2010 NOTES...

Page 31: ...31 V5 02 2010 NOTES...

Page 32: ...52 Villingen Schwenningen Phone 49 0 7705 97 89 9 0 Fax 49 0 7705 97 89 9 20 info cs instruments com www cs instruments com Sales office NORTH Am Oxer 28c 24955 Harrislee Phone 49 0 461 700 20 25 Fax...

Reviews: