background image

FRM220 Chassis Quick Installation Guide 


Introduction 

     There are many chassis options for FRM220 line cards. Not all chassis options apply to every line 
card model. Chassis range from the simplest CH01 standalone chassis which provides only physical 
protection for a one slot line card and includes a 12V@1A (12watt) switching power adapter (wall wart) 
to a 20 slot, 2U rack chassis with dual, swappable fans and AC or DC power modules. 
 
     This guide will give installation details for each chassis option, including card installation, physical 
mounting, power connections and Earth grounding. 
 
     This guide is now only available in electronic (PDF) format. 
 
     Please skip ahead to your exact chassis model. 
 

CH01


CH01-xx


CH01M-xx


CH02M-xx


CH02-NMC-xx


CH02-SMT-xx


CH04A-xx


CH08


CH20


FRM220 NMC Management Quickstart


Summary of Contents for FRM220

Page 1: ...cover FRM220 Chassis QIG sales ctcu com...

Page 2: ...please visit https www ctcu com en download html 2020 CTC Union Technologies Co LTD All trademarks are the property of their respective owners Technical information in this document is subject to cha...

Page 3: ......

Page 4: ...CTION FUNCTION 18 INSTALLATION I 18 RACK MOUNTING OPTION 18 WALL MOUNTING OPTION 18 FRM220 CH02 NMC 19 DESCRIPTION 19 PANELS 20 LED INDICATORS 20 INSTALLATION 20 RACK MOUNTING OPTION I 21 RACK MOUNTIN...

Page 5: ...SSIS PHYSICAL DIMENSIONS 33 CHASSIS SPECIFICATIONS 34 NMC SNMP 34 LINE CARD OPTIONS 35 INSTALLATION 35 SITE PREPARATION 35 MECHANICAL ASSEMBLY 35 RACK MOUNTING 35 FAN UNITS REMOVAL REPLACEMENT 36 ELEC...

Page 6: ...s a 12V 1A 12watt switching power adapter wall wart to a 20 slot 2U rack chassis with dual swappable fans and AC or DC power modules This guide will give installation details for each chassis option i...

Page 7: ...ndalone chassis has the option of adding wall mount capability One wall mount kit is required for installing a single standalone chassis on the wall Each wall mount kit provides a wall mounting bracke...

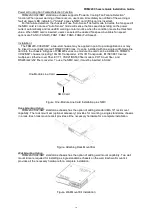
Page 8: ...only hand tight Figure CH01 xx Installation Power Connection The graphic below shows the power connections for the CH01 AD with one DC and one AC power supply When two supplies are connected they are...

Page 9: ...low the screw head to pass through the hole in the bracket The screws in the wall should be screwed in leaving just enough space so the bracket and CH01 xx can be hung securely Figure CH01 xx with Wal...

Page 10: ...ents on the board Align the card with the slots of the CH01M xx chassis and slide the card all the way in Use the thumb screw to secure the card tightening it only hand tight Figure CH01M xx Installat...

Page 11: ...ground will connect to the CH01 xx chassis from the IEC connector Each power supply has a respective toggle switch which then sends the input power to the internal supplies The switch is OFF when set...

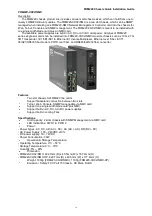
Page 12: ...100i Fast Ethernet In band managed converter E1 T1 fiber modem and V35 X21 RS530 fiber modem Features Two slot chassis for FRM220 line cards Support backplane connection between two slots Support DB9...

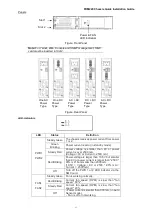
Page 13: ...wer 1 is off PWR 2 LED on off Power 2 is on Power 2 is off Console slot select switch Slot 1 console port for slot 1 upper line card configuration Slot 2 console port for slot 2 lower line card config...

Page 14: ...Module Line Card Installation Installation II The FRM220 CH02M FRM220 CH02M HP a two blade chassis can be installed with one single width blade line card into the chassis The line cards include 10G 2...

Page 15: ...220 CH02M HP standalone chassis have the option of adding standard EIA 19 rack mount capability The rack mount tray provides mounting for two standalone chassis in a rack Each rack mount tray kit prov...

Page 16: ...Ethernet E1 Inverse Multiplexer Ethernet over Fiber E1 T1 35 X21 RS530 fiber modem POTS over fiber and RS485 422 232 fiber converter Features Two slot chassis for FRM220 line cards Support backplane c...

Page 17: ...nt 2500 mA Red Blinking Power voltage is larger than 10 5V but smaller than 9V or power current is larger than 2500 90 mA but smaller than 2500 mA 10 5V Voltage 9V or 2500 90 mA Current 2500 mA Off Tu...

Page 18: ...H20 rack It can be installed with one single width blade line card into the chassis All types of FRM220 series one module line card can be installed in FRM220 CH02 SMT chassis including 10G 3R Transpo...

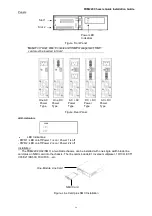
Page 19: ...ltiplexer Ethernet over Fiber E1 T1 35 X21 RS530 fiber modem POTS over fiber and RS485 422 232 fiber converter Features Two slot chassis for FRM220 line cards Support backplane connection between two...

Page 20: ...D on off Power 2 is on Power 2 is off Installation The FRM220 CH02 NMC a two blade chassis can be installed with one single width blade line card plus an NMC card into the chassis The line cards inclu...

Page 21: ...02 NMC standalone chassis have the option of adding standard EIA 19 rack mount capability The rack mount tray provides mounting for two standalone chassis in a rack Each rack mount tray kit provides a...

Page 22: ...card and remote connected stand alone device may be managed through any of the available management interfaces A variety of cards are available that support multi mode or single mode fiber types and c...

Page 23: ...onductors with a minimum cross section area of 0 75 mm2 DC Power Cord Specification wiring must comply with EN 60950 1 2006 standard Conductors with a minimum cross section area of 1mm2 16AWG Protecti...

Page 24: ...mbly CH04A is designed for rack mount installation and will require 1U space in a standard EIA 19 or 23 rack CH04A chassis is delivered completely assembled however power modules and converter cards m...

Page 25: ...ots numbered 2 through 4 may contain any other FRM220 Series In band Managed fiber media converter card Figure 2 4 NMC removal replacement in slot number 1 IMPORTANT In the FRM220 In Band Managed Rack...

Page 26: ...An additional feature allows the Media Chassis to detect the working or failing status either of power module or any fan assembly in the unit and activate relays that can be used to control external a...

Page 27: ...NMC has set Alarm 1 ON relay 1 is closed ALM 2 Red When On NMC has set Alarm 2 ON relay 2 is closed Figure Relays and LEDs Chassis Rear Description The rear panel holds the hot swappable power fan mod...

Page 28: ...assis with random mix of line card types Heat Generation 120 BTU fully loaded chassis with random mix of line card types Compliance European Union EN55022 2006 Class A EN55024 1998 A1 2001 A2 2003 and...

Page 29: ...s screwdriver for the 3mm and the 12 24 rack installation screws Wrist strap or other personal grounding device to prevent ESD occurrences Antistatic mat or antistatic foam to set the equipment on Sit...

Page 30: ...gh a standard IEC C14 3 prong receptacle located on the rear of the module Any national power cord with IEC C13 line plug may be used to connect AC power to the power module With a DC24 or DC48 module...

Page 31: ...er1 must contain an NMC card In a chassis where non managed line cards are employed cards that use DIP switch settings slot number 1 may then be used for a non managed media converter line card Line C...

Page 32: ...slots available for installation of FRM220 Converter Cards in the FRM220 compact rack An SNMP Card is installed in the far left hand or first slot for local and remote management purposes Each FRM Car...

Page 33: ...es The pluggable modules do not require any tools for removal and replacement Figure Chassis Rear View Chassis Physical Dimensions Figure Chassis Dimensions in millimeters Alarm 1 2 Relay Contacts Coo...

Page 34: ...fully loaded chassis with random mix of line card types Compliance European Union EN55022 2006 Class A EN55024 1998 A1 2001 A2 2003 and EN60950 1 2001 FCC part 15 subpart B class A Reliability MTTB 6...

Page 35: ...tatic foam to set the equipment on Site Preparation Install the FRM220 within reach of an easily accessible grounded AC outlet or three wire 48VDC Power return Earth Ground central office power The AC...

Page 36: ...y be used to connect AC power to the power module With a DC module DC 48V is connected to the terminal block located on the rear of the module observing the proper polarity The FRM220 should always be...

Page 37: ...n and another set of FAN Failure contacts normally open contacts for monitoring the power and fans condition of the FRM220 The alarm contacts may also be programmed through the management interface to...

Page 38: ...s to the in of the slave using any standard Ethernet UTP straight cable with RJ 45 connectors Figure Cascade Ports Connections and ID assignment Pin No Signal Definition Direction Master Direction Sla...

Page 39: ...ient temperature volts at frequencies of 50 60 Hertz The DC version supports either a standard 36 to 60VDC input voltage Only one power supply module is required to power a completely full rack When t...

Page 40: ...eplace the card by reversing the procedure align in the slot groove and gently seat the card retightening the captive screw Figure Line card removal replacement NMC Card Installation Slot number 1 of...

Page 41: ...ollow these communication parameters 115200 data rate 8 bits No parity bit 1 Stop bit No Flow Control Terminal Login Connect the console cable to PC and power up the FRM220 Start your favorite termina...

Page 42: ...enters the menu to upgrade line cards in the FRM220 Setup the default gateway subnet mask and IP address as instructed by your network administrator After any TCP IP setting change the NMC must be re...

Page 43: ...management IP address The following is an example of a Telnet screen It is exactly the same as a local serial console screen only it can be accessed remotely Web Based Manager The FRM220 NMC supports...

Page 44: ......

Reviews: