background image


High speed coin counting operation instructions


Technical Specifications 

Counting Speed    ……… 

2300 Coins/Min.(for coins with a diameter of 15 mm   
or .5906 inches) 

Hopper Capacity ………... 

3600  coins  (without the  hopper extender  installed for 
coins diameter of 15 mm and thickness of 1.1 mm.) 
12000 coins (with the hopper extender installed for coins 
diameter of 15 mm and thickness of 1.1 mm.) 

Countable Coin Size …… 
 

Thickness:0.7 to 3.9 mm (.0275 to .154 inches) 
Diameter :14 to 34 mm (.55 to 1.33 inches) 

Max. Counting Display … 

9999999 

Counting Mode ………….. 

Continuous Counting Mode 
Batch Counting Mode 

Accumulation Counting Mode 

Power Consumption  …. 

70 W    (During operation) 

Power Requirements  …. 

AC 120V 

±

 10%, 60Hz 

or    AC 220V 

±

 10%, 50Hz 

Dimension ………………. 

270 (w) x 362 (d) x 240 (h) mm   
10.63 (w) x 14.25 (d) x 9.45 (h) inches 

Net Weight   ……………….


11 kg or 24.2 lbs 

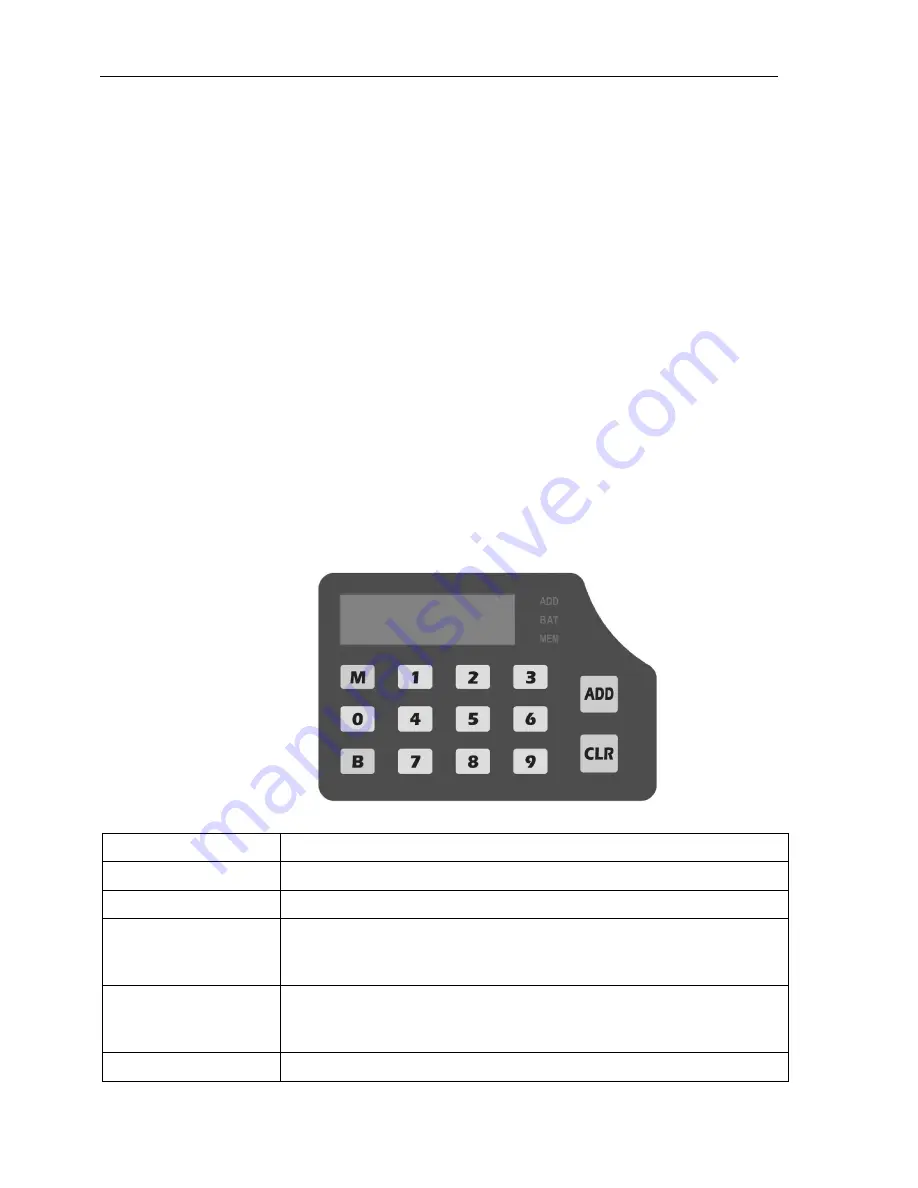
Key Panel 


Key Function 

Key 

                                Function    Description 

NUMERIC KEY 

Press the ten numeric key for inputting the desired batch number. 

Press this key for selecting the default batch number. 

Press this key for adding the present count number into memory. 
Press and hold this key for five seconds, the display will show   
the count number in the memory and clear the memory. 

ADD 

Press this key for selecting the Accumulation Mode on or off. In the 
Accumulation Counting Mode, the “ADD” indicator on the   
right side of the display will be on. 

CLR 

Press this key to clear the present counting number. 

Summary of Contents for Blackbird 3300

Page 1: ...Coin Counter OPERATION INSTRUCTIONS Blackbird 3300 CTcoin A S Helsingborggade 9 DK 5100 Odense C Tel 45 6312 7550 Fax 45 6312 7551 www ctcoin com ctcoin ctcoin com 7519...

Page 2: ...s Content 1 Introduction 3 2 Technical Specifications 4 3 Key Panel 4 4 Precautions 5 5 Operation Procedures 5 6 Reject small coins mixed 8 7 Set up the Coin Tube Holder 9 8 Troubleshooting 10 9 Daily...

Page 3: ...this document Should you have any questions please contact local distributor or sales agent for further advice General Information 1 Diameter Adjusting Knob 2 Extender Hopper 3 Hopper 4 Thickness Adj...

Page 4: ...ing Mode Power Consumption 70 W During operation Power Requirements AC 120V 10 60Hz or AC 220V 10 50Hz Dimension 270 w x 362 d x 240 h mm 10 63 w x 14 25 d x 9 45 h inches Net Weight 11 kg or 24 2 lbs...

Page 5: ...on the floor or on a stand to prevent the machine from tipping over Operation Procedures If you have a large quantity of coins to be counted install the Extended Hopper supplied as right diagram If yo...

Page 6: ...ey Counting will begin The machine will stop automatically reverse for 1 second and continue counting in following conditions There are objects jamming in the passage which caused the counting sensor...

Page 7: ...unting will be accumulated from the previous number on the display Batch Mode First way Press any numeric key the BAT indicator on the right side of the display will be on to input your desired random...

Page 8: ...tch quantities in the memory by pressing M key the previous default batch quantities will be replaced Turn off the power and turn on again check if the default batch quantities have been changed corre...

Page 9: ...t Box or the Reject Coin bag If there are bigger coins mixed with coins to be counted the bigger coins possibly jam in the inlet of the coin passage and cause the reverse or abnormal stop in that case...

Page 10: ...ach paper tube set the batch number in batch counting mode then start counting The machine will stop when the count total reaches the batch quantity All the counted coins will drop into the Paper Tube...

Page 11: ...covered by dust the LED will display JA please remove the V Belt clean the counting sensor using a cotton stick with denatured alcohol Daily Maintenance Be sure to turn the main power off before attem...

Page 12: ...Rear Feed Pulley can be adjusted by adjusting the position of the screwk Then tighten the nutj nutk nutl Remove the Rubber Washer on the Plastic Pedal unscrew the four screws in the Plastic Pedal Uns...

Reviews: