Aerial work platform
ZED 20.3 HV
5
COD. UM0284_GB | REV. 0.0 | ED: 09/17
Chapter 6
GB
PROCEDURES FOR USE
Procedure:
•
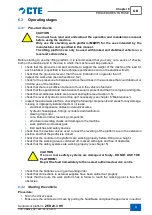
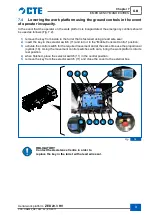
position yourself in front of the “ground control panel”;
•
place the key in the selector switch (Fig. 6.2, 9)
•
turn the selector switch (Fig. 6.2, 9) into the “Stabiliser controls” position;
•
the light (Fig. 6.2, 8) will turn on;
•
make sure that all the stabiliser indicator lights (Fig. 6.2, 1, 2, 3 & 4) are off;
CAUTiOn
if one or more indicator lights are on, it indicates that there is a fault with the
stabiliser limit switches.
DO nOT STABiliSE THE PlATfOrM!
•
Extend the stabiliser beams by operating the levers in turn (Fig. 6.3, 5 & 6). Move the levers
downwards to extend the beams, upwards to retract.
•
Lower the stabilisers by operating the levers in turn (Fig. 6.3, 1, 2, 3 & 4). Move the levers
downwards to extend the stabilisers, upwards to retract. Fully extend the stabilisers to lift up
the vehicle and take the weight off the suspension.
•
Check the spirit level (Fig. 6.3, 7) located under the stabiliser controls and level the vehicle
using the stabiliser control levers. The machine is perfectly level when the bubble in the spirit
level is at the centre (0°).
•
Check that the indicator lights are on (Fig. 6.3, 1, 2, 3 & 4), which indicates that it is possible
to raise the boom.
CAUTiOn
When the indicator light comes on it does not mean that the vehicle has been
properly stabilised. This is only indicated by the spirit level (fig. 6.3, 7).
Before getting onto the platform, make sure that the machine is properly
stabilised: chassis lifted and level, weight taken off the suspensions and all four
stabilisers resting on suitably irm ground.
If the ground is not irm enough to withstand the weight, use planks that are
suitable for the purpose and that have been checked before use.
9
8
5
4
3
2
1
7
6
Fig.
6.2

