MAINTENANCE
Dancer Arm Adjustment
CAUTION: DISCONNECT AIR AND POWER TO THE APPLICATOR
BEFORE PERFORMING THE FOLLOWING PROCEDURES.
INJURY FROM MOVING PARTS AND/OR ELECTRICAL SHOCK
MAY OCCUR.
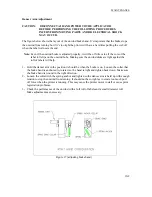
The figure below shows the layout of the unwind brake band. It’s important that the brake stops
the unwind from turning but if it’s too tight the printer will have a hard time pulling the web off
when the label roll nears the end.
Note:
Even if the unwind brake is adjusted properly, it will be of little value if the core of the
label roll slips on the unwind hubs. Making sure the unwind disks are tight against the
roll of labels will help.
1- Hold the dancer arm in the position it should be when the brake is on. Loosen the collar that
the brake band is anchored to, rotate it so the band is tight and tighten back down. Make sure
the brake band is wound in the right direction.
2- Loosen the collar with the spring anchor and tighten so the dancer arm is held up with enough
tension to stop the unwind from turning. It should not be so tight as to create too much pull
off force when the printer is running. This may cause the printer motor to stall or cause print
registration problems.
3- Check the performance of the unwind with a full roll of labels and a small diameter roll.
Make adjustments as necessary.
Figure 17 (adjusting brake band)
10-2
Summary of Contents for 3600-PA
Page 8: ......
Page 9: ......
Page 10: ......
Page 11: ......
Page 12: ......
Page 13: ......
Page 14: ......
Page 15: ......
Page 16: ......
Page 17: ......
Page 66: ......
Page 67: ......
Page 68: ......
Page 69: ......
Page 70: ......
Page 71: ......
Page 72: ......
Page 73: ......
Page 74: ......
Page 75: ......
Page 76: ......
Page 77: ......
Page 78: ......
Page 79: ......
Page 80: ......
Page 81: ......
Page 82: ......
Page 83: ......
Page 84: ......
Page 85: ......
Page 86: ......
Page 87: ......
Page 88: ......
Page 89: ......
Page 90: ......
Page 91: ......
Page 92: ......
Page 93: ......
Page 94: ......
Page 95: ......
Page 96: ......
Page 97: ......
Page 98: ......
Page 99: ......
Page 100: ......
Page 101: ......
Page 102: ......
Page 103: ......
Page 104: ......
Page 105: ......
Page 106: ......
Page 107: ......
Page 108: ......
Page 109: ......
Page 110: ......
Page 111: ......
Page 112: ......
Page 113: ......
Page 114: ......
Page 115: ......
Page 120: ......
Page 121: ......
Page 122: ......
Page 123: ......
Page 143: ......
Page 144: ......
Page 145: ......
Page 146: ......
Page 147: ......
Page 148: ......
Page 149: ......
Page 150: ......
Page 151: ......
Page 152: ......
Page 153: ......
Page 154: ......
Page 155: ......
Page 163: ...APPLY SEQUENCE Figure 28 c3 4 ...
Page 164: ......
Page 165: ......
Page 166: ......
Page 167: ......
Page 168: ......
Page 169: ......
Page 170: ......
Page 177: ......
Page 178: ......
Page 179: ......
Page 180: ......
Page 181: ......
Page 182: ......
Page 183: ......
Page 184: ......
Page 185: ......
Page 186: ......
Page 187: ......


