PRINTER SETTINGS
PRINTER SETTINGS
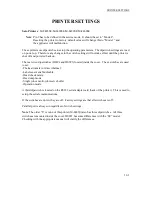
Sato Printers
: M-8485SE/M-8490SE/M-8459SE/M-8460SE
Note
: Pin 9 has to be defined in the service mode. It should be set to “Mode 2”.
Resetting the printer to factory default values will change this to “Mode 1” and
the applicator will malfunction.
These printers use dipswitches to setup the operating parameters. The dipswitch settings are read
on power up. Therefore any changes in the switch settings will not take effect until the printer is
shut off and powered back on.
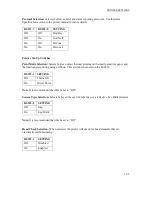
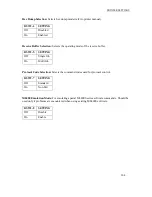
There are two dipswitches (DSW2 and DSW3) located inside the cover. These switches are used
to set:
-Thermal transfer or direct thermal
-Label sensor enable/disable
-Head check mode
-Hex dump mode
-Single job or multi-job receive buffer
-Operation mode
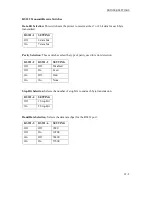
A third dipswitch is located on the RS232 serial adapter card (back of the printer). This is used to
setup the serial communications.
If the switches are down, they are off. Factory settings are that all switches are off.
Parallel port is always on regardless of switch settings.
Note
: The older “S” version of this printer (M-8485S) also has three dipswitches. All three
switches are mounted inside the cover. DSW1 has some differences with the “SE” model.
Checking with the appropriate manual will clarify the differences.
12-1
Summary of Contents for 3600-PA
Page 8: ......
Page 9: ......
Page 10: ......
Page 11: ......
Page 12: ......
Page 13: ......
Page 14: ......
Page 15: ......
Page 16: ......
Page 17: ......
Page 66: ......
Page 67: ......
Page 68: ......
Page 69: ......
Page 70: ......
Page 71: ......
Page 72: ......
Page 73: ......
Page 74: ......
Page 75: ......
Page 76: ......
Page 77: ......
Page 78: ......
Page 79: ......
Page 80: ......
Page 81: ......
Page 82: ......
Page 83: ......
Page 84: ......
Page 85: ......
Page 86: ......
Page 87: ......
Page 88: ......
Page 89: ......
Page 90: ......
Page 91: ......
Page 92: ......
Page 93: ......
Page 94: ......
Page 95: ......
Page 96: ......
Page 97: ......
Page 98: ......
Page 99: ......
Page 100: ......
Page 101: ......
Page 102: ......
Page 103: ......
Page 104: ......
Page 105: ......
Page 106: ......
Page 107: ......
Page 108: ......
Page 109: ......
Page 110: ......
Page 111: ......
Page 112: ......
Page 113: ......
Page 114: ......
Page 115: ......
Page 120: ......
Page 121: ......
Page 122: ......
Page 123: ......
Page 143: ......
Page 144: ......
Page 145: ......
Page 146: ......
Page 147: ......
Page 148: ......
Page 149: ......
Page 150: ......
Page 151: ......
Page 152: ......
Page 153: ......
Page 154: ......
Page 155: ......
Page 163: ...APPLY SEQUENCE Figure 28 c3 4 ...
Page 164: ......
Page 165: ......
Page 166: ......
Page 167: ......
Page 168: ......
Page 169: ......
Page 170: ......
Page 177: ......
Page 178: ......
Page 179: ......
Page 180: ......
Page 181: ......
Page 182: ......
Page 183: ......
Page 184: ......
Page 185: ......
Page 186: ......
Page 187: ......

