background image

Summary of Contents for 1000 Series

Page 1: ...rester meeting applicable local or state laws if any If a spark arrester is used it should be maintained in effective working order by the operator In the State of California the above is required by law Section 4442 of the California Public Resources Code Other states may have similar laws Federal laws apply on federal lands A spark arrester for the muffler is available through your Cub Cadet dea...

Page 2: ...H 44136 DEALER LOCATOR PHONE NUMBER 877_282_8684 Copy the serial number here CUSTOMER SUPPORT Please doNOTreturn the unit to the retailer from whichit waspurchased withoutfirstcontactingCustomerSupport If you have difficulty assembling this product or have any questions regarding the controls operation or maintenance of this unit you can seek help from the experts Choose from the options below Vis...

Page 3: ...rsonal injury 7 Plan your mowing pattern to avoid discharge of material toward roads sidewalks bystanders and the like Also avoid discharging material against a wall or obstruction which may cause discharged material to ricochet back toward the operator 8 Always wear safety glasses or safety goggles during operation and while performing an adjustment or repair to protect your eyes Thrown objects w...

Page 4: ...action on slopes even though the brakes are functioning properly Always keep machine in gear when going down slopes to take advantage of engine braking action 4 Follow the manufacturer s recommendations for wheel weights or counterweights to improve stability 5 Use extra care with grass catchers or other attachments These can change the stability of the machine 6 Keep all movement on the slopes sl...

Page 5: ... complete Do not use a nozzle lock open device e Extinguish all cigarettes cigars pipes and other sources of ignition f Neverfuel machine indoors g Never remove gas cap or add fuel while the engine is hot or running Allow engine to cool at least two minutes before refueling h Never over fill fuel tank Fill tank to no more than Y2inch below bottom of filler neck to allow space for fuel expansion i ...

Page 6: ...own Forsafety protection frequently check components and 12 13 14 replace immediately withoriginal equipment manufacturer s O E M partsonly listedinthis manual Useofparts which donotmeettheoriginal equipment specifications mayleadtoimproper performance andcompromise safety Donotchange theengine governor settings orover speed theengine Thegovernor controls themaximum safeoperating speed oftheengine...

Page 7: ...ILl _L I i Z I I l I Sight and hold this 1even with a verticantree or a corner of a building m _ or a fence post 1 a 15 p ...

Page 8: ...level before operating Refer to Checking the 0il Levelon page 19 for detailed instructions Be careful not to overfill Shipping BraceRemoval WARNING Make sure the riding mower s engine is off set the parking brake and remove the ignition key before removing the shipping brace Locate the shipping brace if present and warning tag found on the right side of the cutting deck While holding the discharge...

Page 9: ...lade Engage Knob B Throttle Control Lever I Brake Pedal C Choke Control J Drive Pedal D Parking Brake Lever K Cruise Control Lever E Fuel Tank Cap L Deck Lift Lever F Seat Adjustment Lever M Cup Holder G Ignition Switch Module NOTE Any reference in this manual to the RIGHT or LEFT side of the tractor is observed from operator s position ...

Page 10: ...er to SeatAdjustment on page 18 of this manual for more detailed instructions IgnitionSwitch Module WARNING Never leave a running machine unattended Always disengage PTO move shift lever into neutral position set parking brake stop engine and remove key to prevent unintended starting To start the engine insert the key into the ignition switch and turn clockwise to the START position Release the ke...

Page 11: ...age Knob To engage the power to the cutting deck or other separately available attachments pull outward on the PTO Blade Engage knob Push the PTO Blade Engage knob inward to disengage the power to the cutting deck l J i Z I 1t NOTE The PTO Blade Engage knob must be in the disengaged OFF position when starting the engine CruiseControl Lever The cruise control lever is located on the tractor dash pa...

Page 12: ...ll automatically shut off if the PTO Blade Engage knob is moved into the engaged ON position with the shift lever in Reverse i_ WARNING Do not operate the tractor if the interlock system is malfunctioning This system was designed for your safety and protection Reverse CautionMode The REVERSE CAUTION MODE position of the key switch module allows the tractor to be operated in reverse with the blades...

Page 13: ...he engine starts release the key It will return to the NORMAL MOWING position IMPORTANT Do NOT hold the key in the START position for longer than ten seconds at a time Doing so may cause damage to your engine s electric starter After the engine starts deactivate the choke control Figure 5 If the wheels contact the surface adjust as follows a Raise the deck lift handle to its highest setting b Remo...

Page 14: ...ore pivoting the drive pedal from forward to reverse or vice versa DrivingOnSlopes Refer to the SLOPE GAUGE on page 7 to help determine slopes where you may operate the tractor safely _ WARNING Do not mow on inclines with a slope in excess of 15 degrees a rise of approximately 2 1 2 feet every 10 feet The tractor could overturn and cause serious injury Mow up and down slopes NEVER across Exercise ...

Page 15: ...od to its normal position prior to operating the tractor IMPORTANT Never attempt to move the tractor manually without first opening the hydrostatic relief valve Doing so will result in serious damage to the tractor s transmission Engaging the PTO Engaging the PTO transfers power to the cutting deck or other separately available attachments To engage the PTO proceed as follows Move the throttle con...

Page 16: ... best results when mulching Never attempt to mulch if the lawn is damp Wet grass tends to stick to the underside of the cutting deck preventing proper mulching of the clippings Do NOT attempt to mulch more than 1 3 the total height of the grass or approximately 1 1 2 inches Doing so will cause the clippings to clump up beneath the deck and not be mulched effectively Maintain a slow ground speed to...

Page 17: ...ed with a 42 inch deck have only one jam nut washer and lock nut Loosen Tighten to lowerdeck to raisedeck Figure 10 Locate the two lock nuts on the opposite side of the stabilizer bracket See Figure 10 Tighten the lock nuts to raise the front of the deck loosen the lock nuts to lower the front of the deck Retighten the two jam nuts loosened earlier when proper adjustment is achieved Sideto Side If...

Page 18: ... side Loosen the jam nut found on the drag link at the rear of the ball joint See Figure 13 Remove the hex nut and lock washer on the top of ball joint See Figure 13 HexNutand LockWasher PivotBar J JamNut BallJoint Figure 13 Thread the ball joint toward the jam nut to shorten the drag link Thread the ball joint away from the jam nut to lengthen the drag link Replace hex nut and lock washer and ret...

Page 19: ...ith new motor oil IMPORTANT Refer to the Kohler Owner s Manual packed with your unit for information regarding the quantity and proper weight of motor oil Air Cleaner Service the pre cleaner and cartridge air cleaner element as instructed in the Kohler Owner s Manual packed with your unit Spark Plug s The spark plug s should be cleaned and the gap reset once a season Refer to the Kohler Owner s Ma...

Page 20: ... starting Refer to Engine on page 19 for instruction regarding all engine related lubrication Pivot Points Linkage Lubricate all the pivot points on the drive system parking brake and lift linkage at least once a season with light oil DeckWheels Each of the tractor deck s front gauge wheels is equipped with a grease fitting Lubricate with a grease gun after every 25 hours of tractor operation Deck...

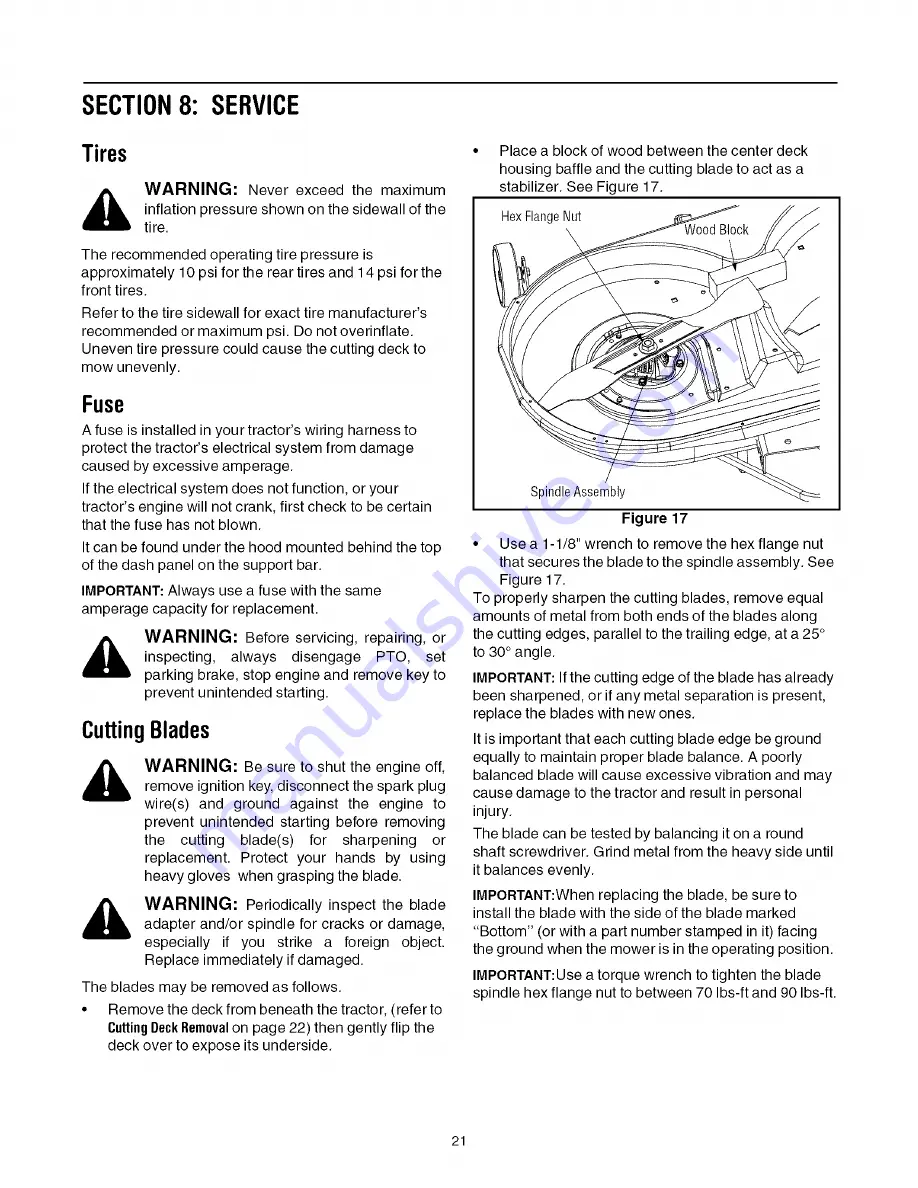
Page 21: ...adapter and or spindle for cracks or damage especially if you strike a foreign object Replace immediately if damaged The blades may be removed as follows Remove the deck from beneath the tractor refer to CuttingDeckRemoval on page 22 then gently flip the deck over to expose its underside Place a block of wood between the center deck housing baffle and the cutting blade to act as a stabilizer See F...

Page 22: ...tractor s engine to run for 15 minutes before shutting it off to allow the alternating system time to charge the discharged battery Charging If the unit has not been put into use for an extended period of time charge the battery with an automotive type 12 volt charger for a minimum of one hour at six amps _ WARNING Batteries give off an explosive gas while charging Charge battery in a well ventila...

Page 23: ...ended starting before removing the belt s WARNING Avoid the possibility of a pinching injury Do not place your fingers on the idler spring or between the belt and a pulley while removing the belt All belts on your tractor are subject to wear and should be replaced if any signs of wear are present IMPORTANT The V belts found on you r tractor are specially designed to engage and disengage safely A s...

Page 24: ...e Figure 22 Pivotin_ IdlerBracket Spriog i IdlerPulley BeltGuard _ Square Hole Figure 22 Insert a 3 8 drive ratchet wrench set to tighten into the square hole found in the idler bracket on the left side of the deck s surface See Figure 22 Grasp the ratchet s handle and pivot it toward the tractor s right side to relieve tension on the belt With belt tension relieved carefully remove the belt from ...

Page 25: ...LT1842 LT1845 LT1846 LT1858 25 ...

Page 26: ...RNING Drain fuel only into an approved container outdoors away from an open flame Allow engine to cool Extinguish cigarettes cigars pipes and other sources of ignition prior to draining fuel Remove the spark plug Add one tablespoon of engine oil into the spark plug hole Install the plug but do not reconnect the plug wire Crank the engine two or three revolutions Store the engine in a clean dry pla...

Page 27: ...ower will not mulch grass Engine speed too low Place throttle in FAST rabbit position Wet grass Do not mow when grass is wet wait until later to cut Excessively high grass Mow once at a high cutting height then mow again at desired height or make a narrower cutting swath Dull blade Sharpen or replace blade Uneven cut Deck not balanced properly Perform side to side deck adjustment Dull blade Sharpe...

Page 28: ...oard plow Use of this type of equipment WILL void the tractor s warranty CC 190 670 100 CC 190 678 100 CC 190 671 100 CC 190 672 100 CC 190 673 100 CC 190 674 100 CC 190 675 100 Attachments Twin Bagger Grass Collector For 42 inch Decks Twin Bagger Grass Collector For 46 inch Decks Rear Tire Chain Set 20 x 9 Front Bumper Kit 42 inch Two stage Snow Thrower 46 inch Front Dozer Blade Rear Wheel Weight...

Page 29: ...ters 3 5 gallons 2 0 liters 67 6 oz 2 25 liters 76 oz Hydro Gear 311 0510 22 2 1 0 m p h 5 2 m p h O m p h 2 3 m p h Kohler Command 1500 RPM _ 75 RPM 030 in 76 mm 12 volt Negative Ground 190 CCA sealed 16 Amp Regulated 20 Amp Incandescent Single Disc Dry 15x6x6 20xlOx8 42 in 106 7 cm 46in 116 8 cm 68 in 172 7 cm 45in 114 3 cm 43 in 109 2 cm 4 5 in 11 4 cm 18 in 46 cm 498 lb 225 9 kg SV600 Single 9...

Page 30: ...d in 1995 or later are warranted for to years in California For 1997 and later model years EPA requires manufacturers to warrant engines for two years in all other states These warranty periods will be begin on the date the engine is purchased by the initial purchaser If any emission related part on the engine is defective the part will be replaced by Kohler Co at no cost to the owner Kohler Co is...

Page 31: ...rider deck wheels seats snow thrower skid shoes shave plates and tires CUB CADET does not extend any warranty for products sold or exported outside of the United States of America its pos sessions and territories except those sold through CUB CADET S authorized channels of export distribution No implied warranty including any implied warranty of merchantability or fitness for a particular purpose ...

Page 32: ...OBTAIN SERVICE Warranty service is available WITH PROOF OF PURCHASE THROUGH YOUR LOCAL AUTHORIZED CUB CADET DEALER To locate the dealer in your area please check for a listing at www cubcadet com or in the Yellow Pages or contact CUB CADET by calling 1 877 CUB TOUGH 1 877 282 8684 or writing to P O Box 361131 Cleveland Ohio 44136 0019 This limited warranty does not provide coverage in the followin...

Reviews: