background image

29

Part #:R1083

Engage/Disengage Label

ROTATE HANDLE

ENGAGE

ENGAGE

DISENGAGE

DISENGAGE

Part #: R1057

Red Reflector Label

Part #: R4008

Caution: Rotating Blades Label

Part #: R1054

Important: Check Hoses Label

Part #: R4015

Danger: Rotating Blades Label

Part #: R1052

Small Warning: Turn Off Blower Label 

Part #: R1069

Warning: Turn Off Blower Label

SAFETY DECALS

To promote safe operation, PECO supplies safety decals on all products manufactured. Damage can occur to
safety decals either through shipment, use or reconditioning. Contact your local Service Center for replacement decals.

Part #: R0006 - Cub Cadet Label

Part #: R2008

Danger: Rotating Blades Label

Part #: R4037

Warning: Hot Surface Label

Part #: R2007

Danger: Never Use Hands Label

Part #: R1051

Warning: Hearing Protection Label

Part #: R1065

Made In America Label

MADE IN

AMERICA

MADE IN

AMERICA

Summary of Contents for 21131508

Page 1: ...ON OF ADDED WEIGHT KIT P 59A30037150 A1149 FOR SAFE OPERATION 53AI2PTC050 53BI2PTD050 53YI2PTC050 53YI2PTD050 53BH2PTD330 53YI2PUC050 53RE2PUD050 53BI2PUD050 53AI2PUD330 53YI2PUD050 53AI2PUC050 L 48 54 60 DECKS MODEL Tank SZ Models Tank LZ Models 53AN2RTD009 53AI2RTD050 53YI2RTD050 53AN2RTD050 53AI2RTC050 53AN2RTB050 Tank L Models MODEL YEAR ALTERNATE MODEL 54 60 DECKS SZ LZ 54 60 DECKS S 60 DECKS...

Page 2: ...e To Blower Cone Installation 15 Exploded Part Views and Assemblies 19 25 Safety Interlock Harness Wiring Schematic 26 SAFETY 13 Wear eye protection to prevent debris from getting into your eyes 12 Wear hearing protection 11 Inspect your lawn and remove any foreign objects before mowing Never deliberately run the mower across any foreign object removing clogs removing or replacing hose boot blower...

Page 3: ...OME TO A COMPLETE STOP Set the parking brake Always remove the ignition key before beginning maintenance Safety Alert Symbol This Safety Alert Symbol means ATTENTION BECOME WARNING NEVER operate the mower unless the discharge guard and either the deflector assembly or the vacuum collector adapter are fastened securely in place WARNING Do not work around the mower deck boot or the blower area until...

Page 4: ...tive in material or workmanship as delivered to the purchaser will be repaired or replaced as PECO elects without charge for parts or labor if the defect appears within 12 months from the date of delivery of the product to the original purchaser ALL DEFECTIVE PARTS MUST BE RETURNED TO PECO FOR INSPECTION TO DETERMINE VALIDITY OF WARRANTY CLAIMS Freight and mailing will be borne by the customer B S...

Page 5: ... mower cuts the turf It is also used for picking up leaves and in pre season and post season clean up The blower mounted on the right side of the unit uses a belt and gearbox system from the engine PTO shaft Drive train protection comes through belt slippage The blower draws grass clippings from the discharge area of the cutter deck back to the 3 4 cubic foot collection bags P G0003 at the rear po...

Page 6: ...talled using an arbor press or equivalent During installation opposite bearing inner race must be supported or bearing damage may occur Refer to Figure 2 1c Figure 2 1d for reference NOTE Replace the mower deck PTO belt removed at the beginning of this section Remove the rear bumper and hardware from the mower as shown in Figure 2 1e To assemble and fasten the Engine Pulley align Pulley hole to th...

Page 7: ...are from Sections 2 2 and 2 3 at this time Refer to Figure 2 3 2 3 Lower Main Frame Installation 2 2 PTO Mount Plate Assembly Installation Secure the PTO mount plate assembly P A1108 to the chassis of the mower using 4 3 8 16 x 1 carriage bolts P K1182 and 4 3 8 16 nylon flange locknuts P K2038 Leave the hardware loose until the lower mount assembly is installed in the next section Refer to Figure...

Page 8: ...d hardware in preparation for the belt installation Refer to Figure 2 4a 2 4 PTO Assembly Installation Attach the PTO handle P A1142 to the PTO assembly using 3 1 4 20 x 3 4 HHCS P K1222 and 3 1 4 20 nylon flange locknuts P K2014 Attach the handle grip P J0522 to the PTO handle Refer to Figure 2 4b Insert the PTO assembly P A1821 into the slots on the PTO mount plate assembly Secure the PTO assemb...

Page 9: ... turn the adjustment bolt clockwise Figure 2 5e until there is 1 of deflection with 10 11 lbs of pressure at the center of the belt between the engine pulley and the gear box pulley Once the correct tension of the belt is achieved tighten the 4 bolts that secure the gear box assembly Refer to Figures 2 5f and 2 5g Replace the belt guard and hardware that was removed in Section 2 4 Loosen Bolts Fig...

Page 10: ...aded Boss Blower Cone Tab Figure 2 7c 1st Tighten Bolt 2nd Tighten Jam Nut Figure 2 7d Blower Cone The cam assembly P A0422 which controls the A30K blower belt P M0250 tension comes from the factory pre adjusted If the belt is too tight or becomes too loose remove the hair pin clip P K0099 from the belt tension rod P K0326 and pull the L end of the rod out of it s hole in the cam assembly The tens...

Page 11: ...the harness Use Figure 2 8c and 2 8d for clarification on the location of the mower s existing safety interlock switch and where the collection system s safety interlock harness should be connected A wiring schematic for the P P0208 safety interlock harness is located on page 24 for reference Disconnect the mower s safety interlock switch See mower s Owner s Manual for location Plug the male end o...

Page 12: ...e Assembly Installation Position the upper frame assembly P A1058 above the lower mount tubes as shown in Figure 2 10 Slide the upper frame assembly down onto the lower mount tubes and secure using 2 clevis pins P K0133 and 2 hair pin clips P K0088 Figure 2 10 Upper Frame Assembly Lower Mount Tube Lower Main Frame 2 5 16 18 U Bolts PER TUBE 4 5 16 18 Locknuts PER TUBE Lower Mount Tube Clevis Pin H...

Page 13: ...d rest on the middle joint of the hinge allowing it to remain up 2 11 Top Assembly To Upper Frame Assembly Installation Position the top assembly P A1139 above the upper frame assembly as shown in Figure 2 11 Fasten the top assembly to the upper frame assembly using 2 5 16 18 x 2 1 2 HHCS P K0125 and 2 5 16 18 nylon flange locknuts P K2516 Leave the locknuts slightly loose to allow the top assembl...

Page 14: ...plate assembly with the mounting holes in the deck plate assembly and insert 1 boot rod P B0288 into the mounting holes Secure the boot rod with 1 hair pin clip P K0099 Refer to Figure 2 13b Secure the boot plate assembly P A1961 to the aluminum boot P E0026 using 2 3 8 16 x 1 carriage bolts P K1182 and 2 3 8 16 nylon flange locknuts P K2038 Insert the carriage bolts from the inside of the boot so...

Page 15: ...s 2 15 and 2 16 Do not cut the adjust for the blower assembly s movement as well as end of the 6 hose onto the inlet Make sure there is 2 14 Length Of Hose Adjustment Slide a 6 hose clamp P J0060 onto both container inlet Proceed to slide the opposite end of the 2 16 Lower Hose To Blower Cone Installation Slide a 8 hose clamp P J0080 over both ends of the lower hose Then proceed to slide the lower...

Page 16: ... the blower housing 1 Try carefully hitting the base of the impeller blade 1 between each vein 12 with a rubber mallet to loosen the taper lock bushing hold Tips on removing impeller blade To gain impeller blade 1 access first remove the blower cone 2 from the blower housing located on the PTO assembly P A1821 by removing two blower cone bolts and nuts 3 Next remove the blower housing front 4 by r...

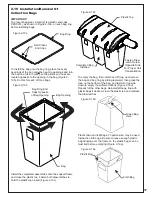
Page 17: ...s shown in Figure 2 19a on each bag ring before installing bags To install the bag onto the bag ring place the seam openings of the bag onto the bag ring openings and turn the bag one full turn 360 so the plastic end caps are located opposite to the opening in the bag Figure 2 19b Do this for each of three bags 2 19 Installation Removal Of Collection Bags IMPORTANT Install the completed assemblies...

Page 18: ...K1222 and 2 1 4 20 nylon flange locknuts P K2014 Insert the bolts from the bottom of the weight bracket so that the nuts fasten to the top of the bracket as shown in to Figure 2 20c 2 U Bolts w Flange Nuts Weight Bracket 2 3 8 16 Nylon Flange Locknuts per U Bolt Remove Pulley Access Cover Figure 2 20b Figure 2 20a One at a time add 1 large weight bar P B0704 to the weight bracket then 2 small weig...

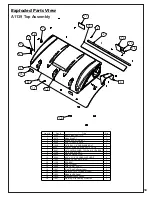
Page 19: ... K0037 1 4 FLAT WASHER 75 OD x 314 ID x 060 T 2 8 K1128 1 4 20 NYLOC NUT 2 9 C0026 GRASS DEFLECTOR 1 10 K0062 3 16 x 1 1 2 FENDER WASHER Z 4 11 K1265 BLACK PANEL RETAINER 3 12 V1120 SCREEN 1 13 V1118 DUST GUARD 1 14 R0006 CUB CADET LOGO 1 15 R1057 2 x 4 Red Reflector Label 2 16 R1069 Warning Turn Off Blower Label 1 17 R1065 Made In USA Label 1 18 R1054 Important Check Hoses 1 19 R1051 Warning Use ...

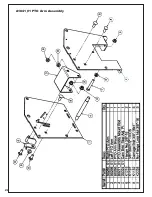
Page 20: ...20 A1841_01 PTO Arm Assembly ...

Page 21: ...21 A1941_01 PTO Base Assembly Exploded Parts View ...

Page 22: ...22 A1941_01 PTO Base Assembly Exploded Parts List ...

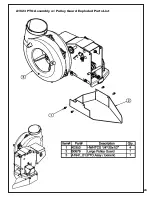
Page 23: ...23 A1623 PTO Assembly w Pulley Guard Exploded Parts List ...

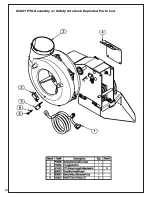
Page 24: ...24 A1821 PTO Assembly w Safety Interlock Exploded Parts List ...

Page 25: ...25 ...

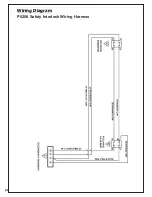
Page 26: ...26 Wiring Diagram P0208 Safety Interlock Wiring Harness ...

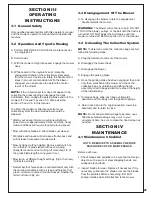
Page 27: ...re than 2 of grass length with each mowing Experts recommend not cutting off more than 1 3 of terrain is flat or hilly etc Remember that horsepower requirements will vary with MAINTENANCE 3 4 Unloading The Collection System 2 Inspect blades for wear Replace if necessary If it is wrapped around them Before each use A To disengage the blower rotate the engagement SECTION IV C Disengage the blower ob...

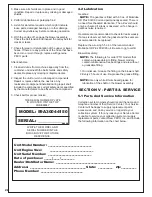
Page 28: ...__________________________________ Unit Serial Number _____________________________ Unit Engine Size _____________________________ Date of purchase _____ _____ _________ Phone Number ____________________________ a greasable fitting Operators are recommended to check for leaks weekly If a leak is observed both the gasket and the seals are recommended to be replaced NOTE The gearbox is filled with 6...

Page 29: ...rn Off Blower Label SAFETY DECALS To promote safe operation PECO supplies safety decals on all products manufactured Damage can occur to safety decals either through shipment use or reconditioning Contact your local Service Center for replacement decals Part R0006 Cub Cadet Label Part R2008 Danger Rotating Blades Label Part R4037 Warning Hot Surface Label Part R2007 Danger Never Use Hands Label Pa...

Page 30: ...30 ...

Page 31: ...31 NOTES ...

Page 32: ...32 Cub Cadet LLC Cleveland Ohio 44136 0019 MTD Products Limited Phone 1 877 282 8684 P O Box 361131 Kitchener ON N2G 4J1 1 800 668 1238 ...

Reviews: