6
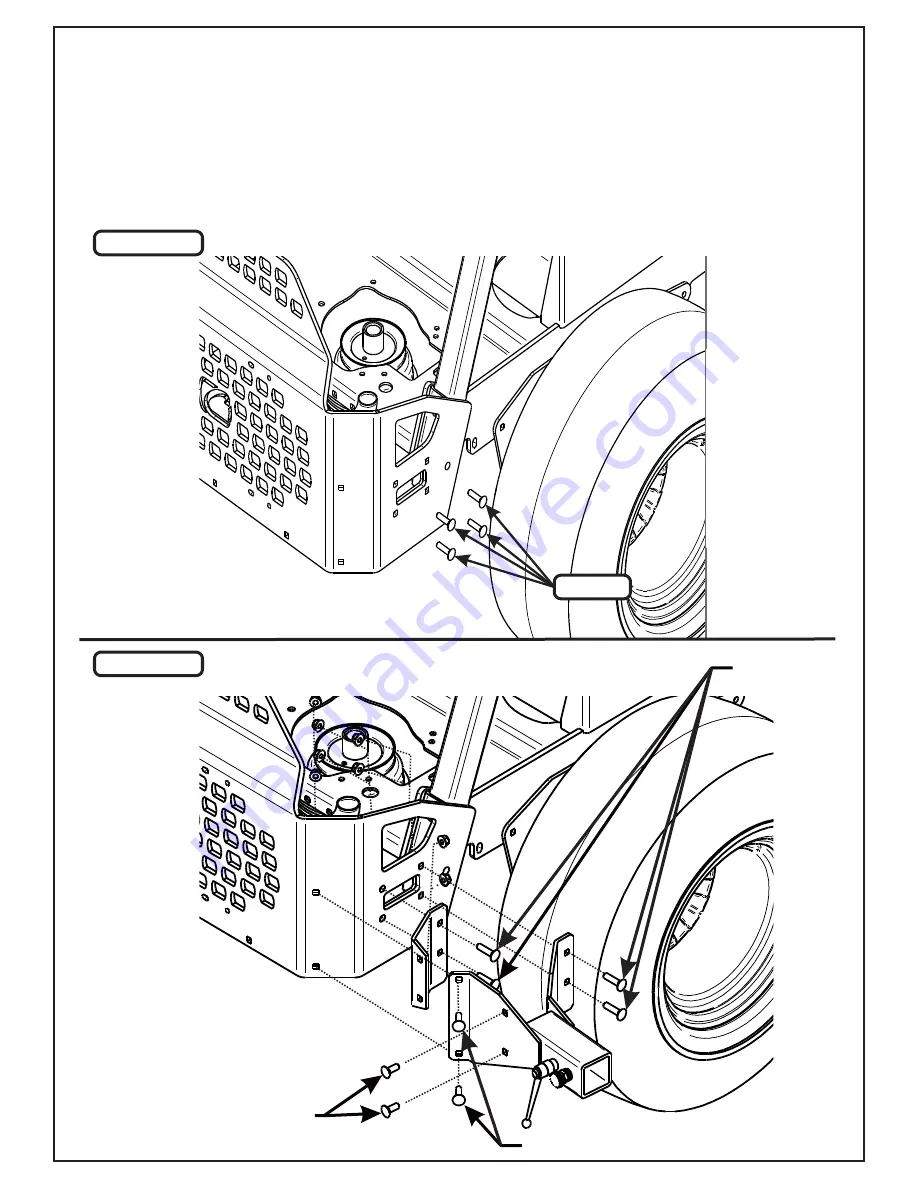
Figure 2-2a
Figure 2-2b
Remove
3/8”-16 x 1” Carriage Bolt
3/8”-16 x 1-1/4” Carriage Bolt
3/8”-16 x 1-1/2”
Carriage Bolt
2-2 Mount Arm Preparation and Installation
Remove the (4) 3/8”-16 x 1-1/4” existing Carriage Bolts and (4) 3/8”-16 Ny-Flange Lock Nuts from the right-rear of the
mower and discard. Refer to Figure 2-2a.
First, loosely attach the Mount Arm Brace P#(B0953) to the Mount Arm Assy. P#(A2071) using (2) 3/8”-16 x 1”
Carriage Bolts P#(K1182) and (2) 3/8”-16 Ny-Flange Lock Nuts P#(K2038). Next, attach both parts to the right rear
of the mower using (4) 3/8”-16 x 1-1/2” Carriage Bolts P#(K1337), (2) 3/8”-16 x 1-1/4” Carriage Bolts P#(K1183) and
(6) 3/8”-16 Ny-Flange Lock Nuts P#(K2038). Once in place tighten all bolts to suggested torque. Refer to Figure 2-
2b.
Summary of Contents for 21131509
Page 17: ...17 P0274 Rev 1 2 17 Safety Interlock Harness Installation Continued Wiring Schematic...
Page 24: ...24 24 A2058 Gearbox Sub Assembly...
Page 25: ...25 A2059_01 Clutch Sub Assembly A2059_01 Clutch Sub Assembly...
Page 26: ...26 26 A2057_01 Drive Assembly Exploded Parts View...
Page 27: ...27 A2060_01 Mounted Drive Assembly...
Page 28: ...28 28 A2039_02 Base Drive Assembly...
Page 29: ...29 A2072_01 Drive Assembly 5 Blade Impeller...
Page 31: ...31...
Page 35: ...35...
Page 37: ...37 Notes...


