background image

22

Check the oil level of the transmission
case before each use to see that it is
filled to the correct level. Before
checking the transmission oil level,
clean the area around the Transmis-
sion Oil Fill/Dipstick to prevent debris
from entering the transmission case.
Always keep the oil level between the
“FULL” and the “ADD” marks on the
dipstick. When checking the oil level,
the dipstick must be withdrawn and
wiped clean, then reinserted all the
way before being withdrawn again for
a true reading.

Adding Transmission Oil

WARNING: Never overfill the
transmission case. Damage
may result if the oil level in
the transmission case is
below the “ADD” mark or
over the “FULL” mark of the
dipstick.

For best results, fill to the “FULL” mark
on the dipstick as opposed to adding a
given quantity of oil. Always check the
level on the dipstick before adding
more oil. See Figure 18.
Refer to the Lubrication Illustration for
information regarding the proper type
of oil to add to the transmission case.
See the Specifications Chart for the
quantity required.
• Place the tractor on a level surface

and engage the parking brake. Stop
the tractor engine and remove the
ignition key.

• Clean the area around the

Transmission Oil Fill /Dipstick to
prevent debris from entering the
transmission case.

• Remove the dipstick from the oil fill

tube and SLOWLY pour oil into the
oil fill tube. Fill the transmission
case until the oil level reaches the
“FULL” mark on the dipstick.

• Reinstall the dipstick securely into

the oil fill tube.

WARNING: The oil fill plug/

dipstick must be installed

securely into the fill tube at
all times when the engine is
operating.

Changing Transmission Oil

Refer to the maintenance chart for
information regarding the frequency of
service.

Refer to the Lubrication Illustration for
information regarding the proper type
of oil to add to the transmission case.
See the Specifications Chart for the
quantity required.

• Place the tractor on a level surface

and engage the parking brake. Stop
the tractor’s engine and remove the
ignition key.

• Remove any center mounted

attachments.

• Clean the area around the transmis-

sion drain plug to prevent debris
from entering the transmission case.
Remove the drain plug and allow
the transmission oil to drain into a
clean container having a capacity of
more than 5 quarts. Reinstall the
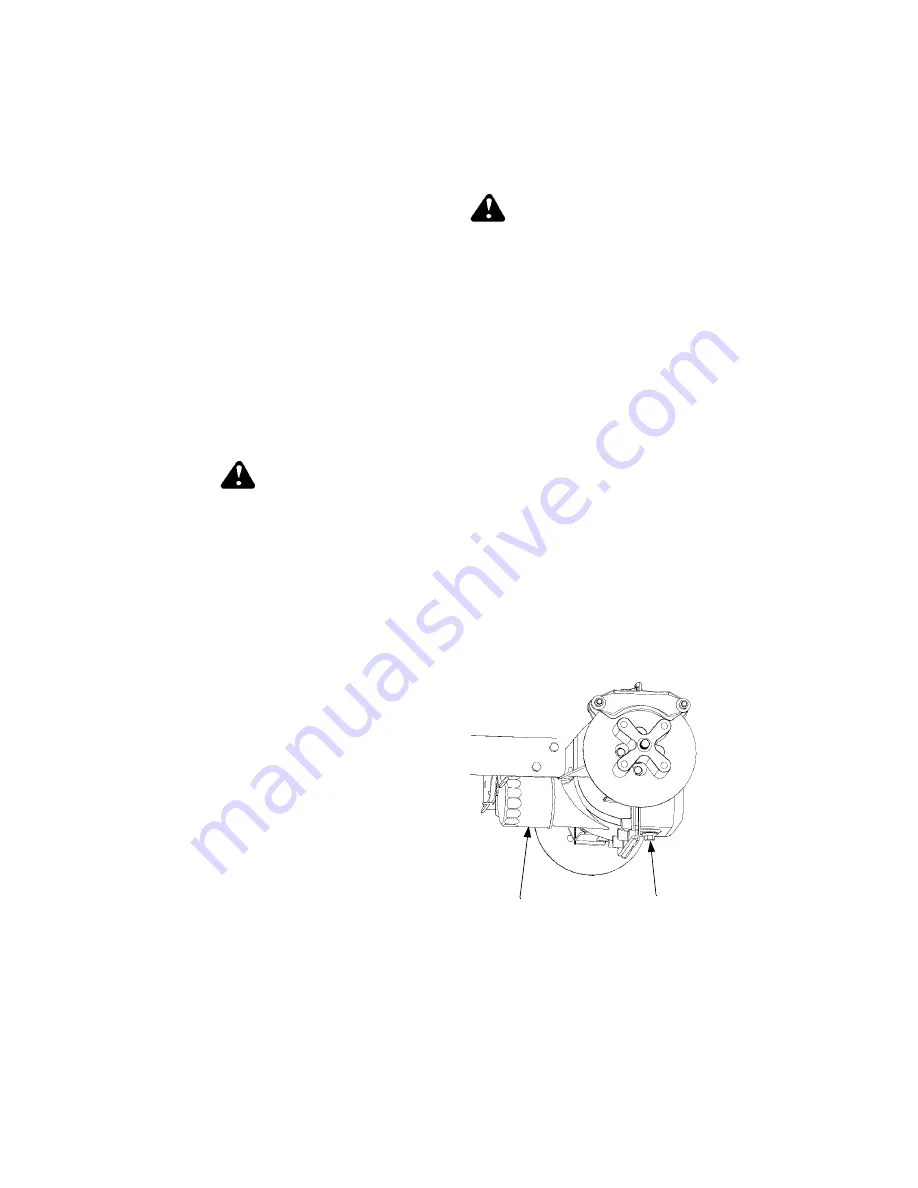
drain plug. See Figure 19.

Figure 19  

Transmission

Oil Filter

Transmission

Drain Plug

Summary of Contents for 3185

Page 1: ...ester is used it should be maintained in effective working order by the operator In the State of California the above is required by law Section 4442 of the California Public Resources Code Other states may have similar laws Federal laws apply on federal lands A spark arrester for the muffler is available through your nearest engine authorized service dealer or contact the service department P O B...

Page 2: ...YMBOL HEED ITS WARNING WARNING The Engine Exhaust from this product contains chemicals known to the State of California to cause cancer birth defects or other reproductive harm DANGER Your lawn mower was built to be operated according to the rules for safe operation in this manual As with any type of power equipment carelessness or error on the part of the operator can result in serious injury Thi...

Page 3: ...g or removing any grass or debris Mow only in daylight or good artificial light Do not operate the machine while under the influence of alcohol or drugs Watch for traffic when operating near or crossing roadways Use extra care when loading or unloading the machine into a trailer or truck This unit should not be driven up or down a ramp onto a trailer or truck under power because the unit could tip...

Page 4: ...over backwards which could cause serious injury Avoid starting or stopping on a slope If tires lose traction disengage the blade s and proceed slowly straight down the slope DO NOT Do not turn on slopes unless necessary then turn slowly and gradually downhill if possible Do not mow near drop offs ditches or embankments The mower could suddenly turn over if a wheel is over the edge of a cliff or di...

Page 5: ...age e g excessive wear bent cracked Replace with blade which meets original equipment specifications Keep all nuts bolts and screws tight to be sure the equipment is in safe working condition Never tamper with safety devices Check their proper operation regularly Use all guards as instructed in this manual After striking a foreign object stop the engine remove the wire from the spark plug and thor...

Page 6: ...our area contact the Customer Dealer Referral Line by calling 1 800 528 1009 Before calling your local dealer make sure that you have your model and serial numbers ready SECTION 4 FINDING YOUR MODEL SERIAL NUMBER This Operator s Manual is an important part of your new tractor It will help you prepare maintain and safely operate your tractor Please read and understand what it says Before you start ...

Page 7: ... ACH I N E STO P S G O I N G UPHILL STOP PTO A N D B AC K D OW N H I L L SLOWLY DO NOT MOW WHEN C H I L D R E N O R OT H E R S A R E A RO UN D NEVER CARRY CHILDREN L O O K D OW N A N D B E H I N D B E F O R E A N D W H I L E B AC KI N G K E EP SA FE TY DE V I CE S G UA R D S S H I E L D S A N D S W I T C H E S I N P L AC E A N D W O R K I N G REMOVE OBJECTS THAT C O U L D BE TH ROW N BY T HE B L A...

Page 8: ...witch Center Lift Height Indicator Transmission Release Rod Transmission Oil Fill Dipstick Fuel Fill Cap Cup Holder Hydraulic Lift Lever Steering Wheel Tilt Lock Cruise Control Lever Choke Lever Throttle Lever Seat Adjustment Lever Not Shown Steering Wheel and Seat Removed For Clarity A B C D E F G H I J K L M N O P Q R Not Shown R Indicator Light Pod ...

Page 9: ...ake pedal is located at the front of the right running board above the forward and reverse pedals Press down to stop the tractor and disengage the cruise control The brake pedal must be fully depressed to activate the safety interlock switch when starting the tractor Reverse Pedal Figure 6 NOTE Check behind the tractor to be sure the area is clear of people pets or obstacles and use a slower speed...

Page 10: ... Transmission Oil Fill Dipstick The transmission oil fill dipstick is located at the back of the tractor in the rear draw bar The handle of the trans mission oil dipstick serves as the fill tube plug and should fit snugly in the fill tube Fuel Fill Cap The fuel fill cap is located on the fender to the left of the seat Cup Holder The cup holder is located on the fender to the left of the seat Hydra...

Page 11: ...he actual hours of trac tor operation to ensure all maintenance procedures are completed according to the schedule in this manual Oil Pressure Indicator WARNING Operating the tractor with low oil level or pressure could result in severe engine damage The oil pressure indicator is part of the indicator light pod on the dash panel This indicator will illuminate when the engine oil pressure is low If...

Page 12: ...leaded gasoline Fill the fuel tank with only clean fresh unleaded gaso line with a minimum of 85 octane Do not mix oil with gasoline Purchase fuel in a quantity that can be used within 30 days to assure fuel fresh ness In countries other than the U S A leaded gasoline may be used if it is commercially available and unleaded is not available The fuel fill point is located on the fender to the left ...

Page 13: ...ture can only be operated in the forward direction Slowly depress the forward control pedal until the desired speed is achieved Lightly push the cruise control lever downward While continuing to hold the cruise lever down lift your foot from the forward control pedal you should feel the cruise latch engage If properly engaged the cruise lever and forward control pedal should lock in the down posit...

Page 14: ...sh the hydraulic lift lever forward to lower an attachment or pull the hydraulic lift lever back to raise an attachment Opening Tool Box A convenient tool box and manual pouch is located under the seat To access this area pivot the seat forward Engaging The PTO Move the throttle control lever to approximately the mid throttle position Pull the PTO switch to the RUN position Advance the throttle le...

Page 15: ... certain times of the year and under some conditions the mower may leave streaks of uncut grass Streaking may occur when attempting to mow heavy weeds and tall grass Under these conditions it may be necessary to go back over the cut area a second time to get a clean cut The following practices will help eliminate streaking Mow the area more often so the grass doesn t get too tall and heavy Operate...

Page 16: ...e approximately 1 8 inch less than B See Figure 13 Figure 13 To adjust toe in loosen left and right ball joint jam nuts See Figure 14 Turn the tie rod in or out of ball joints as required Tighten the jam nuts against the ball joints Check for proper adjustment and readjust as necessary Figure 14 Brake Inspection and Adjustment During the normal operation of the tractor the brakes are subject to we...

Page 17: ...the above procedure to check and adjust the other brake assembly as necessary Turning Radius Adjustment This tractor is equipped with power assisted steering which is set at the factory The turning radius should be equal for both left and right hand turns If adjustment is necessary please con tact your authorized Cub Cadet dealer SECTION 9 MAINTENANCE Maintenance Chart Change oil and filter after ...

Page 18: ... Grease or equivalent No 2 lithium grease Engine Oil See Figure 24 on page 28 Transmission Oil See your Cub Cadet Oil Can High quality lubricating oil Dealer Engine Front Pivot Axle L R Steering Knuckle L R Front Wheels Foot Control Pivot Points Transmission ...

Page 19: ...the skin rinse the affected area immediately with clean cold water If there is any further discomfort seek prompt medical attention If acid spills on clothing first dilute it with clean water then neutralize with a solution of ammonia water or baking soda water Since battery acid is corrosive do not pour it into any sink or drain Before discarding an empty electrolyte con tainer rinse it thoroughl...

Page 20: ...nals and exposed wire with a battery terminal sealer orcoat the terminals with a thin coat of grease or petroleum jelly to protect against corrosion The battery should be kept clean Any deposits of acid should be neutralized with baking soda and water Be careful not to get this solution in the cells Avoid tipping the battery Even a sealed battery will leak electrolyte when tipped Battery Storage W...

Page 21: ...bulb To replace a light bulb Turn the light bulb socket counterclockwise to align the tabs on the socket with the notches in the tail light reflector Once aligned pull light socket out of the tail light reflector Pull the light bulb from the socket Replace light bulbs with like part Align the tabs of the socket with the notches in the reflector and carefully insert the socket Turn socket clockwise...

Page 22: ...king brake Stop the tractor engine and remove the ignition key Clean the area around the Transmission Oil Fill Dipstick to prevent debris from entering the transmission case Remove the dipstick from the oil fill tube and SLOWLY pour oil into the oil fill tube Fill the transmission case until the oil level reaches the FULL mark on the dipstick Reinstall the dipstick securely into the oil fill tube ...

Page 23: ...aintenance is preferable Using the lubrication illustration as a guide make certain that all lubrication fittings are installed and functioning Be sure all fittings are free from dirt and paint so the lubricant is certain to enter the bearing Using a pressure lubricating gun always force the lubricant through the full length of each bearing until it emerges at the end carrying with it the worn lub...

Page 24: ... WARNING Fuel left in the fuel tank during warm weather deteriorates and will cause serious starting problems To prevent gum deposits from forming inside the engine s carburetor and causing possible malfunction of the engine remove all gasoline from thefuel tank as follows Towards end of the season monitor fuel consumption with the goal of running the fuel tank to empty Remove the fuel cap and sip...

Page 25: ...ipment engines are warranted relative to emission control parts defects for a period of two years subject to provisions set forth below If any covered part on your engine is defective the part will be repaired or replaced by your authorized dealer or a Briggs Stratton service dealer OWNER S WARRANTY RESPONSIBILITIES As the utility or lawn and garden equipment owner you are responsible for the perf...

Page 26: ...or replacement as required maintenance shall be warranted as to defects only for the period of time up to the first scheduled replacement for that part Any replacement part that is equivalent in performance and durability may be used in the performance of any maintenance or repairs The owner is responsible for the performance of all required maintenance as defined in the Operator s Manual 6 Conseq...

Page 27: ...age the parking brake Stop the tractor engine and remove the ignition key Clean the area around the oil filler cap to prevent debris from entering the crankcase See Figure 23 Remove the oil filler cap from the left valve cover and SLOWLY pour in oil Fill the crankcase until the oil level reaches the FULL mark on the dipstick See Figure 22 Reinstall the oil filler cap by screwing it securely into t...

Page 28: ... drain valve Place an appropriate container below the open end of the tubing to collect the old oil To open the drain valve push it slightly inward and turn it counterclockwise until it stops then pull it outward Remove the filter by turning it counterclockwise using an automotive type filter wrench to loosen Allow the old oil to completely drain from the engine crankcase into the container below ...

Page 29: ...r components will allow unfiltered air into the carburetor causing extensive wear and eventual failure of the engine Servicing The Precleaner Wash and re oil the foam precleaner more often under extremely dusty or dirty conditions See Figure 26 Loosen the aircleaner cover clips and remove the cover Remove the foam precleaner by sliding it up off the paper element Wash the precleaner in warm water ...

Page 30: ...g surfaces are bent or damaged When servicing the air cleaner check the air cleaner body Make sure it is secured and not bent or damaged Also check the element cover plate for damage or improper fit Replace all damaged air cleaner components Reinstall the paper element foam precleaner cover plate and element cover nut Reinstall the air cleaner cover and reattach the cover IMPORTANT Properly cleane...

Page 31: ... to ADJUSTMENTS Poor grade fuel or water in fuel Drain and use a good grade of clean fuel Engine overheating Refer to MAINTENANCE Engine valves at fault See your authorized dealer Engine smokes See your authorized dealer Oil level rises due to fuel in the crankcase See your authorized dealer Air filter becomes oil and fuel soaked See your authorized dealer Engine leaks oil See your authorized deal...

Page 32: ... Remove obstruction from the vent in the fuel tank cap Air leakage between carburetor and engine Remove air cleaner Tighten the carburetor and manifold mounting hardware Replace any damaged parts as indicated in MAIN TENANCE Incorrect timing or faulty ignition See your authorized dealer Brake dragging Adjust the brakes Refer to ADJUST MENTS Insufficient cooling air dirt or debris clog ging the air...

Page 33: ...F 435 Ignition Battery Fuses auto type 25 amp Battery Voltage 12 Volts Fuel System Fuel Tank Capacity gallons 4 5 Type of Fuel Unleaded Fuel Filter In line Drive Train Transmission Hydrostatic Transmission Oil See your local Cub Cadet Dealer Transmission Oil Capacity 4 5 Qts Tires Front inches 16 x 7 5 8 Rear inches 24 x 10 5 12 Dimensions and Weight Wheelbase 49 5 in Overall Length 72 25 in Overa...

Page 34: ... 272490 Engine Oil Filter BS 492932 Spark Plug 759 3336 Transmission Oil Drive System Plus See your local Cub Cadet dealer Transmission Oil Filter 923 3014 Mower Deck Blades 48 Mower Deck 759 3826 3 54 Mower Deck 759 3820 3 Mower Deck Belts PTO Belt set of 2 48 Mower Deck 954 3053 1 54 Mower Deck 954 0197 954 3084 CARTRIDGE FOAM PRE CLEANER ...

Page 35: ... to maintain your footing and you could slip resulting in serious injury Operate RIDING mowers up and down slopes never across the face of slopes Operate WALK BEHIND mowers across the face of slopes never up and down slopes USE THIS PAGE AS A GUIDE TO DETERMINE SLOPES WHERE YOU MAY NOT OPERATE SAFELY SIGHT AND HOLD THIS LEVEL WITH A VERTICAL TREE A POWER POLE A CORNER OF A BUILDING OR A FENCE POST...

Page 36: ...pment used commercially is warranted for one year only Commercial use is defined as either having hired operators or used for income producing purposes Items not covered The warranty does not cover routine maintenance items such as lubricants filters oil fuel air and hydraulic cleaning tune ups brake and or clutch inspection adjustments made as part of normal maintenance blade sharpening set up ab...

Reviews: