background image

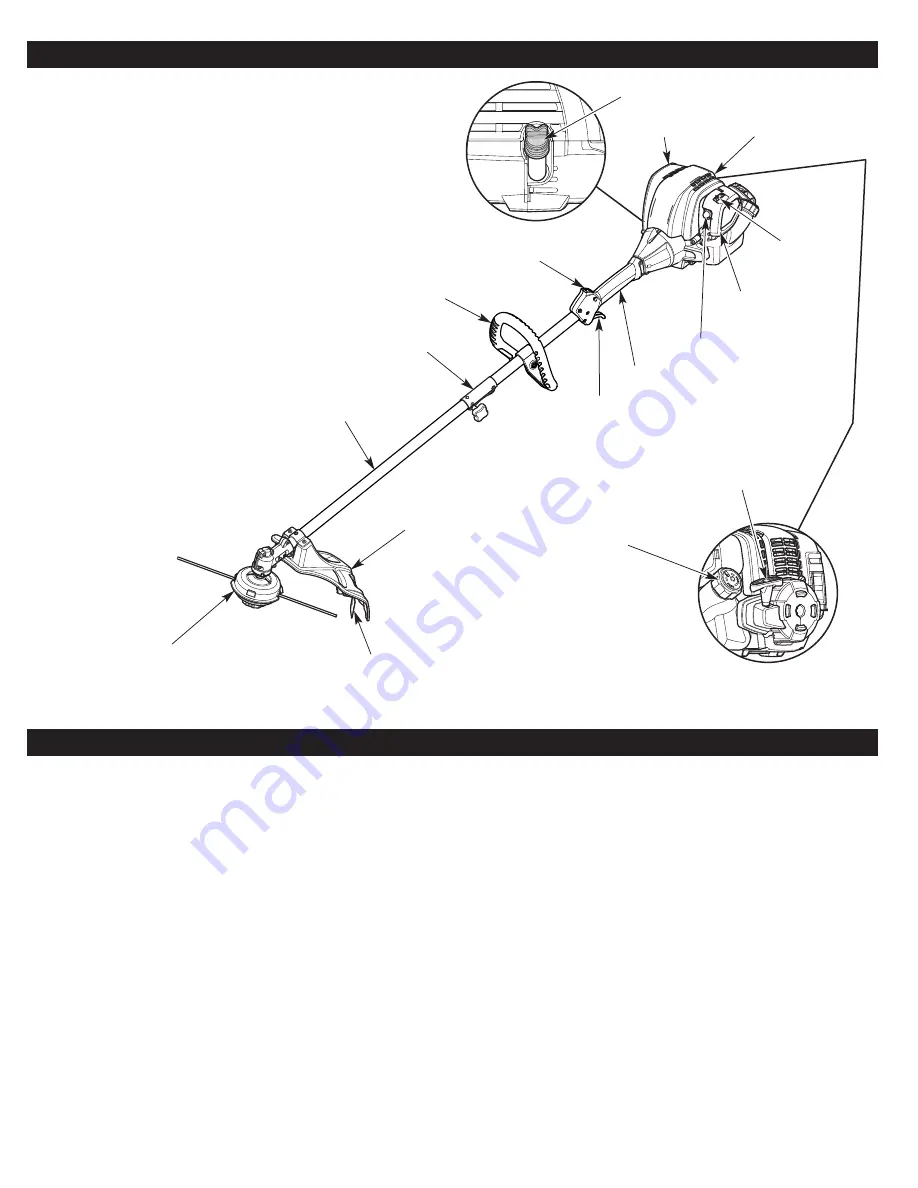
Cutting Head

Shield

Fuel Cap

Handle

Cutting Head

Shaft Grip

Shaft Housing

Starter Rope Grip

Throttle

Control

Spark Plug

Muffler

On/Off Switch

Primer Bulb

Line Cutting Blade

Choke

Lever

Air Filter

Cover

Coupler

Oil Fill Plug

5

KNOW YOUR UNIT

APPLICATIONS

As a trimmer:

Cutting grass and light weeds.

Edging

Decorative trimming around trees, fences, etc.

Other optional accessories may be used with this unit.

SPECIFICATIONS*

* All specifications are based on the latest product information available at the time of printing. We reserve the right to make changes at any
time without notice.

Engine Type. . . . . . . . . . . . . . . . . . . . . . . . . . . . . . . . . . . . . . . . . . . . . . . . . . . . . . . . . . . . . . . . . . . . . . . . . . . . . . . . . . . . . . . . Air-Cooled, 4-Cycle
Displacement . . . . . . . . . . . . . . . . . . . . . . . . . . . . . . . . . . . . . . . . . . . . . . . . . . . . . . . . . . . . . . . . . . . . . . . . . . . . . . . . . . . . . . . .  25 cc (1.5 cu. in.) 
Spark Plug Gap . . . . . . . . . . . . . . . . . . . . . . . . . . . . . . . . . . . . . . . . . . . . . . . . . . . . . . . . . . . . . . . . . . . . . . . . . . . . . . . . . . . . 0.025 in. (0.635 mm)
Spark Plug . . . . . . . . . . . . . . . . . . . . . . . . . . . . . . . . . . . . . . . . . . . . . . . . . . . . . . . . . . . . . . . . . . . . . . . . . Champion® RDZ4H or equivalent plug
Lubrication. . . . . . . . . . . . . . . . . . . . . . . . . . . . . . . . . . . . . . . . . . . . . . . . . . . . . . . . . . . . . . . . . . . . . . . . . . . . . . . . . . . . . . . . . . . . . . . . SAE 30 Oil
Crankcase Oil Capacity . . . . . . . . . . . . . . . . . . . . . . . . . . . . . . . . . . . . . . . . . . . . . . . . . . . . . . . . . . . . . . . . . . . . . . . . . . . . . . . . .  2.03 oz. (60 ml)
Fuel Tank Capacity . . . . . . . . . . . . . . . . . . . . . . . . . . . . . . . . . . . . . . . . . . . . . . . . . . . . . . . . . . . . . . . . . . . . . . . . . . . . . . . . . . . . . . 12 oz. (355 ml)
Approximate Unit Weight (No fuel) . . . . . . . . . . . . . . . . . . . . . . . . . . . . . . . . . . . . . . . . . . . . . . . . . . . . . . . . . . . . . . . . . . 14 - 15 lbs. (6.4 - 6.8 kg)
Trimmer Mechanism . . . . . . . . . . . . . . . . . . . . . . . . . . . . . . . . . . . . . . . . . . . . . . . . . . . . . . . . . . . . . . . . . . . . . . . . . . . . . . . . . . . . . . . Bump Head
Trimming Line Diameter . . . . . . . . . . . . . . . . . . . . . . . . . . . . . . . . . . . . . . . . . . . . . . . . . . . . . . . . . . . . . . . . . . . . . . . . . . . 0.095 inches (2.41 mm)
Cutting Path Diameter . . . . . . . . . . . . . . . . . . . . . . . . . . . . . . . . . . . . . . . . . . . . . . . . . . . . . . . . . . . . . . . . . . . . . . . . . . . . . . . . . . . 17 in. (43.2 cm)

ASSEMBLY TOOLS REQUIRED:

#2 Phillips screwdriver

3/8” Socket

Summary of Contents for 41ADZ47C912

Page 1: ...AILER PROOF OF PURCHASE WILL BE REQUIRED FOR WARRANTY SERVICE For assistance regarding the assembly controls operation or maintenance of the unit please call the Customer Support Department at 1 877 282 8684 in the United States or 1 800 668 1238 in Canada Additional information about the unit can be found on our website www cubcadet com U S or www cubcadet ca Canada For service please call the Cu...

Page 2: ...LIFORNIA PROPOSITION 65 WARNING Engine exhaust some of its constituents and certain finished components contain or emit chemicals known to the State of California to cause cancer and birth defects or other reproductive harm Wash hands after handling 2 READ ALL INSTRUCTIONS BEFORE OPERATING Read the instructions carefully Be familiar with the controls and proper use of the unit Do not operate this ...

Page 3: ...or inclines To avoid serious injury do not operate the unit while on a ladder or a roof Keep hands face and feet away from all moving parts Do not touch or try to stop moving parts Do not touch the engine gear housing or muffler These parts get extremely hot from operation even after the unit is turned off Do not operate the unit faster than the speed needed to do the job Do not run the unit at hi...

Page 4: ...ADED FUEL Always use clean fresh unleaded fuel OIL Refer to operator s manual for the proper type of oil DO NOT USE E85 FUEL IN THIS UNIT WARNING It has been proven that fuel containing greater than 10 ethanol will likely damage this engine and void the warranty ON OFF STOP CONTROL ON START RUN ON OFF STOP CONTROL OFF or STOP PRIMER BULB Push primer bulb fully and slowly 10 times CHOKE CONTROL 1 F...

Page 5: ...IONS All specifications are based on the latest product information available at the time of printing We reserve the right to make changes at any time without notice Engine Type Air Cooled 4 Cycle Displacement 25 cc 1 5 cu in Spark Plug Gap 0 025 in 0 635 mm Spark Plug Champion RDZ4H or equivalent plug Lubrication SAE 30 Oil Crankcase Oil Capacity 2 03 oz 60 ml Fuel Tank Capacity 12 oz 355 ml Appr...

Page 6: ...cket Fig 2 2 While holding the unit in the operating position Fig 11 move the handle to the location that provides the best grip Place it a minimum of 6 inches 15 24 cm from the end of the shaft grip Fig 2 3 Tighten the bolt with a 3 8 socket until the handle is secure INSTALLING THE CUTTING HEAD SHIELD 1 Place the cutting head shield onto the mount bracket Align the holes in the cutting head shie...

Page 7: ...into the 90 hole Fig 4 Removing the Attachment 1 Set the unit on a flat level surface 2 Turn the knob counterclockwise to loosen the coupler Fig 4 3 Press and hold the release button Fig 5 4 Pull the attachment straight out of the coupler Fig 3 CAUTION Before operating the unit make sure the release button is fully snapped into the primary hole and the knob is securely tightened CAUTION Unless spe...

Page 8: ...Unscrew the oil fill plug Fig 7 5 Pour the entire bottle into the oil fill hole Fig 7 DO NOT overfill Refer to Checking the Oil Level NOTE Never add oil directly to the fuel tank This unit has a four cycle engine DO NOT mix oil with gasoline 6 Wipe up any oil that may have spilled 7 Reinstall the oil fill plug NOTE Make sure the O ring is in place on the oil fill plug Fig 7 NOTE Save the empty oil...

Page 9: ...ng a blended fuel Always use fresh unleaded gasoline Use the fuel additive STA BIL or an equivalent Drain the tank and run the engine dry before storing the unit Using Fuel Additives Use a fuel additive such as STA BIL Fuel Stabilizer or an equivalent to inhibit corrosion and minimize gum deposits Add 0 8 oz 23 ml of fuel additive per gallon of fuel according to the instructions on the container N...

Page 10: ...onds 10 Continue to squeeze the throttle control Move the choke lever to Position 3 Fig 9 and continue warming the engine for an additional 60 seconds The unit may be used during this time IF the engine does not start begin the starting procedure with step 3 IF the engine fails to start after a few attempts move the choke lever to Position 3 and squeeze the throttle control Pull the starter rope w...

Page 11: ...part and firmly planted Hold the shaft grip with the right hand Keep the right arm slightly bent Hold the handle with the left hand Keep the left arm straight Hold the unit at waist level Position the cutting head a few inches above the ground WARNING Always wear eye hearing hand foot and body protection to reduce the risk of injury when operating this unit CAUTION Do not remove or alter the line ...

Page 12: ... the rocker arm clearance checked by an authorized service dealer Check the spark plug condition and gap Refer to Maintaining the Spark Plug REPLACING THE TRIMMING LINE Only use the trimming line described in the Specifications section Other types of trimming line may cause the unit to overheat or fail NOTE Always use the correct line length when installing trimming line The line may not release p...

Page 13: ... hang over the edge so that the engine is level Fig 17 NOTE Failure to keep the engine level may cause the oil to overfill 3 Clean the area around the oil fill plug Fig 18 to prevent debris from entering the oil fill hole 4 Unscrew the oil fill plug 5 Look into the oil fill hole use a flashlight if necessary The oil level should just touch the bottom thread of the oil fill hole Fig 19 If the oil l...

Page 14: ... MAINTAINING THE AIR FILTER Failure to maintain the air filter can result in poor performance or can cause permanent damage to the engine Engine failure due to improper air filter maintenance is not covered by the product warranty Cleaning the Air Filter 1 Open the air filter cover press in the lock tab and swing the air filter cover to the left Fig 22 2 Remove the air filter Fig 23 3 Wash the air...

Page 15: ... WARNING The cutting head may spin during idle speed adjustments Wear protective clothing and observe all safety instructions to prevent serious personal injury Fig 26 0 025 in 0 635 mm MAINTAINING THE SPARK PLUG 1 Stop the engine and allow it to cool 2 Remove the three 3 screws from the engine cover with a flat head screwdriver or T 25 Torx screwdriver Fig 25 Remove the engine cover 3 Grasp the s...

Page 16: ...ly with the engine at the top Long term Storage 1 Remove the fuel cap tip the unit and drain the fuel into an approved container Reinstall the fuel cap 2 Start the engine and allow it to run until it stalls This ensures that all fuel has been drained from the carburetor 3 Allow the engine to cool Remove the spark plug and put 5 drops of any high quality motor oil into the cylinder Pull the starter...

Page 17: ... spark plug is fouled Replace the spark plug The engine is hot Refer to the IF THE ENGINE IS HOT instructions in the Starting and Stopping section TROUBLESHOOTING The fuel is old over 30 days Drain the fuel tank and add fresh fuel The cutting head is bound with grass Stop the engine and clean the cutting head The air filter is dirty Clean or replace the air filter PROBLEM SOLUTION The air filter i...

Page 18: ...18 NOTES ...

Page 19: ...19 NOTES ...

Page 20: ... possessions and territories except those sold through Cub Cadet s authorized channels of export distribution Cub Cadet reserves the right to change or improve the design of any Cub Cadet Product without assuming any obligation to modify any product previously manufactured No implied warranty including any implied warranty of merchantability or fitness for a particular purpose applies after the ap...

Page 21: ...AT SERA EXIGÉE POUR AVOIR RECOURS À LA GARANTIE Pour obtenir de l aide concernant l assemblage les commandes l utilisation ou l entretien de cet appareil veuillez contacter le service à la clientèle au 1 877 282 8684 États Unis ou au 1 800 668 1238 Canada Pour obtenir des informations supplémentaires sur cet appareil visitez le site Internet www cubcadet com É U ou www cubcadet ca Canada Pour prof...

Page 22: ...s produits chimiques reconnus par l État de Californie comme étant à l origine de cancers ou de malformations congénitales ou autres dangers pour la reproduction Lavez vous les mains après avoir manipulé l appareil VEUILLEZ LIRE TOUTES LES INSTRUCTIONS AVANT Veuillez lire soigneusement ces instructions Familiarisez vous avec les commandes et l utilisation correcte de l appareil N utilisez pas cet ...

Page 23: ...on stable et un bon équilibre Redoublez de prudence lorsque vous travaillez dans des escaliers des pentes ou des rampes abruptes Pour éviter les blessures graves n utilisez pas l appareil lorsque vous vous trouvez sur une échelle ou un toit Éloignez vos mains votre visage et vos pieds des pièces mobiles Ne touchez pas ou n essayez pas d arrêter des pièces en mouvement Ne touchez pas le moteur le c...

Page 24: ...utiliser N UTILISEZ PAS UN CARBURANT E85 DANS CET APPAREIL AVERTISSEMENT il a été prouvé qu un carburant contenant plus de 10 d éthanol est susceptible d endommager ce moteur et d annuler la garantie COMMANDE DE MARCHE ARRÊT ALLUMAGE DÉMARRAGE MARCHE COMMANDE DE MARCHE ARRÊT ARRÊT POIRE D AMORÇAGE Poussez complètement et lentement la poire d amorçage à 10 reprises COMMANDE DE L ÉTRANGLEUR 1 Positi...

Page 25: ...t appareil CARACTÉRISTIQUES Toutes les caractéristiques reposent sur les dernières informations disponibles sur le produit au moment de l impression de ce manuel Nous nous réservons le droit d apporter à tout instant des modifications sans préavis Type de moteur Refroidi par air 4 temps Cylindrée 25 cc 1 5 po cube Écartement des électrodes 0 635 mm 0 025 po Bougie Champion RDZ4H ou équivalent Lubr...

Page 26: ...d utilisation Fig 11 déplacez la poignée à la hauteur vous assurant la meilleure prise en main Placez la à 15 24 cm 6 po au moins de l extrémité de la poignée d arbre Fig 2 3 Serrez le boulon avec une douille de 9 50 mm 3 8 po jusqu à ce que la poignée soit parfaitement fixée INSTALLATION DU CARTER DE PROTECTION DE LA TÊTE DE COUPE 1 Placez le carter de protection de la tête de coupe sur le suppor...

Page 27: ... bordures verrouillez le bouton de déclenchement dans l orifice à 90 Fig 4 Démontage de l accessoire 1 Réglez l appareil sur une surface plane 2 Tournez le bouton dans le sens contraire des aiguilles d une montre pour desserrer le coupleur Fig 4 3 Appuyez et maintenez enfoncé le bouton de déclenchement Fig 5 4 Retirez l accessoire du coupleur Fig 3 ATTENTION Sauf indication contraire le bouton de ...

Page 28: ... vous que le joint torique est en place sur le bouchon de remplissage d huile Fig 7 REMARQUE Conservez la bouteille d huile vide Utilisez la pour mesurer la quantité adéquate d huile lors des prochaines vidanges d huile Fig 6 Goulot en forme d entonnoir AVERTISSEMENT UN REMPLISSAGE EXCESSIF DU CARTER PEUT PROVOQUER DES BLESSURES GRAVES Vérifiez le niveau d huile avant chaque utilisation On ne saur...

Page 29: ...éservoir de carburant n est pas correctement vissé AVERTISSEMENT ajoutez l essence dans une zone extérieure propre et bien aérée Essuyez immédiatement tout carburant déversé Évitez de créer une source d inflammation en présence d un déversement de carburant Ne démarrez pas le moteur avant que les vapeurs d essence ne se soient dissipées Utilisation des carburants mélangés Si vous utilisez un carbu...

Page 30: ...es 10 Continuez d appuyer sur la manette des gaz Déplacez le levier d étrangleur à la Position 3 Fig 9 et laissez le moteur chauffer pendant 60 secondes supplémentaires L appareil peut être utilisé pendant ce laps de temps SI le moteur ne démarre pas reprenez la procédure de démarrage à l étape 3 SI le moteur ne démarre pas après plusieurs tentatives déplacez le levier d étrangleur à la Position 3...

Page 31: ...er légèrement plié Tenez la poignée avec la main gauche Le bras gauche doit rester tendu Tenez l appareil au niveau de votre taille Placez la tête de coupe à quelques centimètres au dessus du sol AVERTISSEMENT portez toujours une protection pour les yeux les oreilles les mains les pieds et le corps afin de limiter les risques de blessure pendant l utilisation de cet appareil ATTENTION n enlevez pa...

Page 32: ...r Après les 10 premières heures et à 38 heures Vidangez l huile Reportez vous à Vidange de l huile Faites vérifier le dégagement du culbuteur par un technicien agréé Vérifiez l état de la bougie et l écartement des électrodes Consultez la section Entretien de la bougie REMPLACEMENT DU FIL DE COUPE Utilisez uniquement le fil de coupe décrit dans la section Caractéristiques D autres types de fil de ...

Page 33: ... comme un établi ou une table Le bouclier de la tête de coupe devrait pendre sur le bord de sorte que le moteur est de niveau Fig 17 REMARQUE Négliger de garder le moteur de niveau peut provoquer le débordement de l huile 3 Nettoyez la zone autour du bouchon de remplissage Fig 18 pour empêcher des débris d entrer dans l orifice de remplissage d huile 4 Dévissez le bouchon de remplissage d huile 5 ...

Page 34: ... AIR Le non entretien du filtre à air peut entraîner une mauvaise performance ou des dommages permanents du moteur Une panne de moteur découlant d un mauvais entretien du filtre à air n est pas couverte par la garantie du produit Nettoyage du filtre à air 1 Ouvrez le couvercle du filtre à air appuyez sur la languette de verrouillage et faites pivoter le couvercle du filtre à air vers la gauche Fig...

Page 35: ...ation le moteur perd de sa puissance AVERTISSEMENT la tête de coupe peut tourner pendant le réglage du ralenti Portez des vêtements de protection et respectez toutes les consignes de sécurité pour éviter toute blessure grave Fig 26 0 635 mm 0 025 po ENTRETIEN DE LA BOUGIE 1 Arrêtez le moteur et laissez le refroidir 2 Retirez les trois 3 vis du capot moteur avec un tournevis à tête plate ou un tour...

Page 36: ...z l appareil à la verticale le moteur étant au sommet Entreposage de longue durée 1 Retirez le bouchon du réservoir d essence basculez l appareil et vidangez le carburant dans un bidon approprié Revissez le bouchon du réservoir 2 Démarrez le moteur et laissez le tourner jusqu à ce qu il cale Ainsi le carburateur sera totalement vidé de tout carburant 3 Laissez le moteur refroidir Retirez la bougie...

Page 37: ... est encrassée Remplacez la bougie Le moteur est chaud Reportez vous aux instructions SI LE MOTEUR EST CHAUD de la section Mise en Marche et Arrêt DÉPANNAGE Le carburant est vieux plus de 30 jours Vidangez le réservoir de carburant et ajoutez du carburant neuf La tête de coupe est engorgée d herbe Arrêtez le moteur et nettoyez la tête de coupe Le filtre à air est sale Nettoyez ou remplacez le filt...

Page 38: ...ais du réseau agréé de distribution à l exportation de Cub Cadet Cub Cadet se réserve le droit de modifier ou d améliorer la conception de ses produits sans pour autant assumer l obligation de modifier tout produit de fabrication plus ancienne Aucune garantie implicite y compris toute garantie de qualité marchande ou d adéquation à un usage particulier n est valable après la période applicable de ...

Page 39: ... LAS REPARACIONES Y EL MANTENIMIENTO QUE CUBRE LA GARANTÍA Por ayuda en relación con el montaje los controles el funcionamiento o el mantenimiento de la unidad llame al Departamento de Asistencia al Cliente al 1 877 282 8684 en los Estados Unidos o al 1 800 668 1238 en Canadá Se puede encontrar información adicional sobre la unidad en nuestro sitio web www cubcadet com EE UU o www cubcadet ca Cana...

Page 40: ...nos de sus componentes y algunos componentes terminados contienen o liberan sustancias químicas que el estado de California considera que pueden producir cáncer defectos de nacimiento u otros problemas reproductivos Lávese las manos después de estar en contacto con estos componentes LEA TODAS LAS INSTRUCCIONES ANTES DE USAR LA UNIDAD Lea las instrucciones con atención Debe familiarizarse con los c...

Page 41: ...ientes Para evitar lesiones graves no haga funcionar la unidad desde una escalera de mano o un techo Mantenga las manos el rostro y los pies alejados de todas las piezas móviles No toque ni intente detener las piezas móviles No toque el motor el alojamiento del engranaje ni el silenciador Estas partes se ponen extremadamente calientes por el funcionamiento incluso después de que se apaga la unidad...

Page 42: ...adecuado de aceite NO UTILICE COMBUSTIBLE E85 EN ESTA UNIDAD ADVERTENCIA Se ha demostrado que el combustible que contiene más de un 10 de etanol es probable que dañe este motor y anule la garantía APAGADO ENCENDIDO DE CONTROL DE PARADA ENCENDIDO ARRANQUE MARCHA APAGADO ENCENDIDO DE CONTROL DE PARADA APAGADO o PARADA BULBO DEL CEBADOR Presione por completo el bulbo del cebador lentamente 10 veces C...

Page 43: ...n basadas se basan en la información más reciente sobre el producto disponible al momento de la impresión Nos reservamos el derecho a realizar cambios en cualquier momento sin previo aviso Tipo de motor Refrigerado por aire de 4 ciclos Desplazamiento 25 cc 1 5 pulgadas cúbicas Separación de las bujías 0 025 pulgadas 0 635 mm Bujía de encendido Champion RDZ4H o bujía equivalente Lubricación Aceite ...

Page 44: ...11 desplace la manija hasta la ubicación que le ofrece el mejor agarre Ubíquela como mínimo a 6 pulgadas 15 24 cm del extremo de la empuñadura del eje Fig 2 3 Apriete el perno con una llave tubular de 3 8 hasta que la manija esté segura INSTALACIÓN DEL PROTECTOR DEL CABEZAL DE CORTE 1 Ubique el protector del cabezal de corte sobre el soporte de montaje Se deben alinear los orificios del protector ...

Page 45: ... Extracción del accesorio 1 Coloque la unidad en una superficie plana y nivelada 2 Gire la perilla en el sentido contrario a las agujas del reloj para aflojar el acoplador Fig 4 3 Oprima y mantenga apretado el botón de liberación Fig 5 4 Tire del accesorio directamente hacia fuera del acoplador Fig 3 PRECAUCIÓN Este botón de liberación debe colocarse a presión solamente en el orificio principal a ...

Page 46: ... que la junta tórica esté en su lugar en el tapón de llenado de aceite Fig 7 NOTA Guarde la botella de aceite vacía Utilice la botella para medir la cantidad correcta de aceite en cargas de aceite futuras Fig 6 Pico del embudo ADVERTENCIA SI SE LLENA EXCESIVAMENTE EL CÁRTER SE PUEDEN PRODUCIR LESIONES PERSONALES GRAVES Controle el nivel de aceite antes de cada uso No está de más insistir en la imp...

Page 47: ... tapa del combustible no está bien sujeta en su lugar ADVERTENCIA Agregue combustible en una zona al aire libre limpia y bien ventilada Limpie de inmediato la gasolina que se haya derramado Evite que se genere una fuente de encendido para el combustible derramado No arranque el motor hasta que se hayan disipado los vapores del combustible Uso de combustibles mezclados Si utiliza un combustible mez...

Page 48: ...apretando el control del acelerador Pase la palanca del estrangulador a la Posición 3 Fig 9 y siga calentando el motor durante 60 segundos más Se puede usar la unidad durante este período SI el motor no arranca comience el procedimiento de arranque con el paso 3 SI el motor no arranca al cabo de unos pocos intentos pase la palanca del estrangulador a la Posición 3 y apriete el control del acelerad...

Page 49: ...elo Sujete la empuñadura del eje con la mano derecha Mantenga el brazo derecho ligeramente doblado Sostenga la manija con la mano izquierda Mantenga el brazo izquierdo bien derecho Mantenga la unidad al nivel de la cintura Coloque el cabezal de corte a algunas pulgadas del suelo ADVERTENCIA Utilice siempre protección ocular auditiva de manos pies y corporal para reducir el riesgo de sufrir lesione...

Page 50: ...de aire Después de las primeras 10 horas y a las 38 horas Cambie el aceite Consulte Cambio de aceite Solicite a un distribuidor de servicio que controle la holgura del balancín Controle el estado y la separación de la bujía de encendido Consulte Mantenimiento de la bujía de encendido REEMPLAZO DEL HILO DE RECORTE Use únicamente el hilo de recorte que se describe en la sección Especificaciones Otro...

Page 51: ...a como un banco de trabajo o una mesa El protector del cabezal de corte debe quedar colgando del borde de manera que el motor quede nivelado Fig 17 NOTA Si no se mantiene nivelado el motor se puede cargar aceite en exceso 3 Limpie la zona que rodea el tapón de llenado de aceite Fig 18 a fin de evitar que ingresen residuos en el orificio de carga de aceite 4 Desenrosque el tapón de llenado de aceit...

Page 52: ...8 MANTENIMIENTO DEL FILTRO DE AIRE Si no se mantiene el filtro de aire se puede obtener un rendimiento insuficiente o se pude dañar el motor de manera permanente Las averías del motor ocasionadas por un mantenimiento inadecuado del filtro de aire no están cubiertas por la garantía del producto Limpieza del filtro de aire 1 Abra la cubierta del filtro de aire oprima la lengüeta de fijación y gire l...

Page 53: ...celerar existe una pérdida de potencia del motor ADVERTENCIA El cabezal de corte puede girar durante los ajustes de la velocidad de ralentí Utilice vestimenta de protección y respete todas las instrucciones de seguridad para evitar que se produzcan lesiones personales graves Fig 26 0 025 pulgadas 0 635 mm MANTENIMIENTO DE LA BUJÍA 1 Detenga el motor y deje que se enfríe 2 Extraiga los tres 3 torni...

Page 54: ... posible almacene la unidad de manera vertical con el motor arriba Almacenamiento a largo plazo 1 Retire la tapa de combustible incline la unidad y drene el combustible en un recipiente aprobado Vuelva a colocar la tapa del combustible 2 Arranque el motor y déjelo correr hasta que se detenga Esto asegura que todo el combustible se haya drenado del carburador 3 Deje que el motor se enfríe Retire la...

Page 55: ... averiada Vuelva a colocar la bujía El motor está caliente Consulte las instrucciones relacionadas con SI EL MOTOR ESTÁ CALIENTE en la sección de Arranque y Parada SOLUCIÓN DE PROBLEMAS El combustible está viejo más de 30 días Drene el depósito de combustible y agregue combustible nuevo El cabezal de corte tiene césped atascado Pare el motor y limpie el cabezal de corte El filtro de aire está suci...

Page 56: ...erritorios excepto para aquellos vendidos a través de los canales autorizados de distribución de exportaciones de Cub Cadet Cub Cadet se reserva el derecho a cambiar o mejorar el diseño de cualquier Producto Cub Cadet sin asumir ningún tipo de obligación de modificar ningún producto fabricado previamente No se otorgan garantías implícitas incluidas las garantías implícitas de comerciabilidad o de ...

Reviews: