background image

2

TABLE OF CONTENTS

Content

Page

Important Safe Operation Practices................................................................... 3

Loose Parts ....................................................................................................... 5

Assembling Your Snow Thrower ....................................................................... 5

Know Your Snow Thrower ................................................................................. 7

Operating Your Snow Thrower .......................................................................... 9

Making Adjustments .......................................................................................... 11

Maintaining Your Snow Thrower........................................................................ 12

Servicing Your Snow Thrower ........................................................................... 13

Troubleshooting................................................................................................. 16

Parts List............................................................................................................ 17

FINDING MODEL NUMBER

This Operator’s Manual is an important part of your new Snow Thrower. It will help you assemble, prepare 
and maintain the unit for best performance. Please read and understand what it says. 

Before you start assembling your new equipment, please locate the model plate on the 
equipment and copy the information from it in the space provided below. The information on 
the model plate is very important if you need help from your local authorized Cub Cadet 
dealer.

You can locate the model number by looking at the lower frame cover on the rear of your snow thrower. A 
sample model plate is explained below. For future reference, please copy the model number and the serial 
number of the equipment in the space below.

CALLING CUSTOMER SUPPORT

If you have difficulty assembling this product or have any questions regarding the controls, operation or 
maintenance of this unit, please call the Customer Dealer Referral Line. 

Call 1- (800)-528-1009 to reach the Customer Dealer Referral Line. Please have your unit’s 
model number and serial number ready when you call. See previous section to locate this 
information.

Copy the model number here:

Copy the serial number here:

CUB CADET CORP.

CLEVELAND, OHIO  44136

P.O. BOX 368023

Summary of Contents for 724 STE

Page 1: ...pped with a spark arrester meeting applicable local or state laws if any If a spark arrester is used it should be maintained in effective working order by the operator In the State of California the above is required by law Section 4442 of the California Public Resources Code Other states may have similar laws Federal laws apply on federal lands A spark arrester for the muffler is available throug...

Page 2: ...he information on the model plate is very important if you need help from your local authorized Cub Cadet dealer You can locate the model number by looking at the lower frame cover on the rear of your snow thrower A sample model plate is explained below For future reference please copy the model number and the serial number of the equipment in the space below CALLING CUSTOMER SUPPORT If you have d...

Page 3: ...s or eye shields during operation and while performing an adjustment or repair to protect your eyes Thrown objects which ricochet can cause serious injury to the eyes 3 Do not operate without wearing adequate winter outer garments Do not wear jewelry long scarves or other loose clothing which could become entangled in moving parts Wear footwear which will improve footing on slippery surfaces 4 Use...

Page 4: ...ich are not covered in this manual use care and good judgment Contact your dealer or telephone 1 800 528 1009 for assistance and the name of your nearest servicing dealer Maintenance And Storage 1 Never tamper with safety devices Check their proper operation regularly 2 Disengage all clutch levers and stop engine Wait until the auger impeller come to a complete stop Disconnect the spark plug wire ...

Page 5: ...er the lower handle See Figure 3 Look at the lower rear of the snow thrower frame to be sure all the cables are aligned with the cable roller guides Model 926 STE Secure the upper handle and lower handle with the two plastic wing nuts cupped washers and carriage bolts previously removed and tighten the upper two plastic wing nuts Model 724 STE Secure the upper handle and lower handle with the two ...

Page 6: ...essary See Figure 5 Recheck the adjustment before retightening the jam nut against the cable Traction Control and Shift Lever Adjustment NOTE It is easier to maneuver a non running snow thrower with both track steering controls held in simultaneously To check the adjustment of the traction control and shift lever proceed as follows Move the shift lever into the sixth 6 position a With the traction...

Page 7: ...ch fasten the skid shoe to the auger housing Move the skid shoe to the desired position NOTE Make certain the entire bottom surface of the skidshoe is against the ground to avoid uneven wear on the skid shoes Retighten the hex nuts loosened earlier Repeat this adjustment on the skid shoe found on the opposite side of the snow thrower NOTE The skid shoes are reversible on this machine When one side...

Page 8: ...urning left Operate your snow thrower in open areas until you become familiar with these controls NOTE It is easier to maneuver a non running snow thrower with both track steering controls held in simultaneously Heated Handles Switch Model 926 STE The heated handles switch is located on the right side of the snow thrower handle panel See Figure 7 To activate the heated handles toggle the switch to...

Page 9: ... cord and plug and is designed to operate on 120 volt AC household current It must be properly grounded at all times to avoid the possibility of electric shock which may cause injury to the operator Follow all instructions carefully Determine that your house wiring is a three wire grounded system Ask a licensed electrician if you are not certain If your house wiring system is not a three wire grou...

Page 10: ...ment is unattended NOTE Do not lose the ignition key Keep it in a safe place The engine will not start without the ignition key Wipe all snow and moisture from the carburetor cover in the area of the control levers Also move the control levers back and forth several times Leave the throttle control lever in the STOP or OFF position Leave the choke control in the FULL choke position See Figure 9 To...

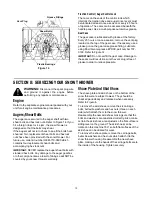
Page 11: ...raction Control Adjustment Refer to the information found under the heading Final Adjustments in Section 3 of this manual to adjust the traction control If you are uncertain that you have reached the correct adjustment proceed as follows WARNING Drain the gasoline out of your snow thrower s engine or place a piece of plastic film under the gas cap to avoid spillage before making this adjustment Ti...

Page 12: ... instructions WARNING When following instructions in the separate engine manual for draining oil be sure to protect the frame to avoid oil dripping onto transmission parts Electric Chute Rotation Motor Model 926 STE The gear on the electric chute rotation motor and the base of the discharge chute itself should be lubed with multi purpose automotive grease once a season See Figure 13 Auger Shaft At...

Page 13: ... If the augers will not turn check to see if the bolts have sheared Two replacement shear bolts and hex lock nuts have been provided with the snow thrower For future use order kit number OEM 710 0890 which contains four replacement shear bolts and accompanying hex lock nuts IMPORTANT NEVER replace the auger shear bolts with standard hex bolts Any damage to the auger gearbox or other components as ...

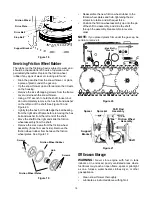
Page 14: ...d slip the belt between the support bracket and the auger pulley See Figure 17 Repeat this step for the front auger belt Replace both auger drive belts by following instructions in reverse order Figure 16 NOTE If you placed plastic film under the gas cap be certain to remove it before operating the snow thrower Drive Belt Follow the first four steps of the instructions for servicing the auger belt...

Page 15: ...he six screws from the friction wheel assembly three from each side Remove the friction wheel rubber from between the friction wheel plates See Figure 18 Figure 19 Reassemble the new friction wheel rubber to the friction wheel plates and hub tightening the six screws in rotation and with equal force Position the friction wheel assembly up onto the pin of the shift rod assembly and slide the shaft ...

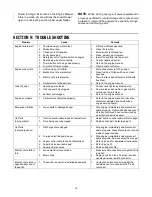
Page 16: ...park plug wire 2 Remove ice and snow from gas cap Be certain vent hole is clear 3 Refer to the engine manual Engine overheats 1 Carburetor not adjusted properly 1 Refer to the engine manual or have the carburetor adjusted by an authorized engine service dealer Excessive vibration 1 Loose parts or damaged auger 1 Stop engine immediately and disconnect spark plug wire Tighten all bolts and nuts If v...

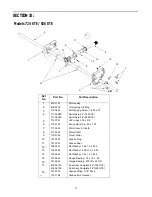
Page 17: ...715 0143 Spring Spiral Pin 25 x 1 25 7 717 0528 Worm Gear 20 tooth 8 717 0526 Worm Shaft 9 718 0186 Thrust Collar 10 721 0325 Grease Plug 11 721 0327 Grease Seal 12 736 0351 Flat Washer 76 x 1 5 x 030 13 736 0369 Flat Washer 508 x 1 0 x 020 14 736 0445 Flat Washer 76 x 1 5 x 060 15 741 0662 Flange Bearing 75 x 1 0 x 59 16 741 0663 Flange Bearing 503 ID x 75 OD 17 618 0414A 618 0415A Gear Assy Comp...

Page 18: ... 11 22 5 21 18 4 11 15 19 52 7 14 9 6 49 42 27 36 For reference only 44 30 28 32 44 48 10 23 38 35 35 39 9 43 26 25 31 40 41 9 50 24 37 For reference only 31 45 9 51 40 46 47 53 59 29 68 69 69 27 82 70 72 72 73 27 68 71 74 27 56 64 76 77 78 79 11 15 75 81 27 57 92 7 1 87 86 83 10 85 84 88 11 10 14 90 89 91 80 ...

Page 19: ...736 0159 5 16 Washer 44 736 0242 Belleville Washer 45 736 0506 Special Washer 46 746 0896 Control Cable 47 746 0901 Control Cable 48 750 1232 Spacer 49 782 0599 Motor Bracket 50 784 5594 Cable Bracket 51 784 5604 Handle Chute Tilt 52 629 0936 629 0938A Harness Assembly Upper Harness Assembly Light 53 684 0036 Handle Assembly RH 54 684 0037A Handle Assembly LH 55 710 1003 Special Hex Screw 56 712 0...

Page 20: ...20 Models 724 STE 926 STE 1 2 3 4 5 6 7 8 9 10 11 12 14 15 13 16 10 21 22 23 25 23 22 26 18 27 28 13 30 31 32 33 16 18 35 34 36 37 38 39 41 40 42 17 40 39 29 24 20 9 19 ...

Page 21: ...25 710 0703 Carriage Screw 1 4 20 x 75 26 710 0604 Hex Screw 5 16 18 27 736 0169 Lock Washer 3 8 28 712 0798 Hex Nut 3 8 16 29 741 0245 Hex Flange Bearing 30 784 5038B Skid Shoe 31 736 0242 Bell Washer 32 712 3010 Hex Nut 5 16 18 33 784 5581A 784 5579A Shave Plate 724 STE Shave Plate 926 STE 34 710 0260 Carriage Bolt 5 16 18 x 62 35 684 0065 Impeller Assembly 36 715 0114 Pin 37 618 0414A 618 0415A...

Page 22: ...16 17 18 19 19 16 16 16 20 21 22 23 24 25 26 27 28 29 30 IMPORTANT For a proper working machine use Factory Approved Parts V BELTS are specially designed to engage and disengage safely A substitute non OEM V Belt can be dangerous by not disengaging completely ...

Page 23: ...asher 12 710 0230 Hex Cap Screw 1 4 28 x 50 13 756 0313 Flat Idler 14 710 1245 Lock Hex Cap Screw 5 16 24 15 712 0181 Lock Jam Nut 3 8 16 16 756 0569 Pulley Half 17 736 0242 Bell Washer 18 736 0505 Flat Washer 19 754 0430A Belt 20 756 0967 Auger Pulley 21 736 0247 Flat Washer 3 8 x 1 25 OD 22 736 0331 Bell Washer 23 710 0696 Hex Cap Screw 3 8 24 24 748 0360 Adapter Pulley 25 710 0654A Hex Screw 3 ...

Page 24: ... 26 22 27 3 12 1 8 4 25 19 3 11 20 1 2 IMPORTANT For a proper working machine use Factory Approved Parts V BELTS are specially designed to engage and disengage safely A substitute non OEM V Belt can be dangerous by not disengaging completely 28 32 29 30 31 ...

Page 25: ...over 11 732 0339 Extension Spring 12 736 0159 Washer 5 16 13 736 0242 Bell Washer 14 736 0247 Flat Washer 15 736 0270 Bell Washer 16 736 0331 Bell Washer 17 736 0505 Flat Washer 18 736 0507 Special Washer 19 748 0360 Adapter Pulley 20 750 1053 Spacer 21 754 0430A Belt 22 754 0456 V Belt 23 756 0313 Flat Idler 24 756 0569 Pulley Half 25 756 0967 Auger Pulley 26 756 0984 Pulley Half 27 756 0985 Pull...

Page 26: ...26 25 19 26 27 24 23 22 21 16 17 18 19 20 29 30 31 2 32 32 34 28 30 2 27 26 19 25 36 21 24 23 22 12 2 30 10 18 19 20 2 1 13 11 14 15 9 3 7 6 5 4 32 40 39 38 32 37 Models 724 STE 926 STE ...

Page 27: ...Washer 265 x 75 x 062 23 736 0176 Flat Washer 1 4 ID x 93 OD x 12 24 741 1111 Hex Flange Bearing 25 710 0643 Hex Cap Screw 5 16 18 x 1 26 748 0234 Shoulder Spacer 27 710 0604 Tap Screw 5 16 18 x 625 28 684 0031 Frame Assembly 29 738 0924 Spacer 30 756 0625 Cable Roller 31 784 5688 Drive Cable Guide Bracket 32 710 0599 Tap Screw 1 4 20 x 5 33 784 5590 Shift Frame Bracket 34 684 0014B Shift Rod Asse...

Page 28: ...6 STE 1 2 6 3 10 12 7 8 5 4 9 13 15 14 17 16 19 20 22 22 20 19 28 21 18 21 18 15 13 14 29 31 32 30 30 32 34 37 38 36 23 35 27 39 11 40 41 42 44 43 45 51 46 47 48 52 46 53 51 54 55 54 50 16 17 49 37 56 56 24 25 26 26 33 33 ...

Page 29: ...Shaft Assy 30 684 0154 Track Hub Assy w Fitting 31 713 0437 Chain 32 741 0339 Flange Bearing 33 736 0287 Flat Washer 793 x 1 24 x 06 34 611 0053 Axle Assembly 35 750 0904 Spacer 514 x 630 x 1 59 36 618 0043 RH Dogg Assembly 37 750 0903 Spacer 514 x 630 x 2 44 38 732 0209 Ext Spring 39 710 0602 Tap Screw 5 16 18 x 1 40 719 0295A Track Housing 41 746 0948 Steering Cable 42 746 0950 Steering Trigger ...

Page 30: ...adet equipment used commercially is warranted for one year only Commercial use is defined as either having hired operators or used for income producing purposes Items not covered The warranty does not cover routine maintenance items such as lubricants filters oil fuel air and hydraulic cleaning tune ups brake and or clutch inspection adjustments made as part of normal maintenance blade sharpening ...

Reviews: