S
ection
3 — A
SSembly
& S
et
-U
p
7
Required Tools
•
Phillips Head Screwdriver (1)
•
Adjustable Wrench (1)
•
7/16” Wrench (1)
•
3/8” Wrench (1)
WARNING!
Disengage the PTO,
engage the brake lock, and stop the
tractor engine before performing
any preparation procedures. Place
the tractor on a firm and level
surface before beginning installation
procedures.
WARNING!
The exhaust system
and surrounding areas are HOT. To
avoid personal injury, allow the
tractor to cool before beginning
any sprayer installation or removal
procedures.
Cargo Carrier Installation
1.
Following the installation instructions
included in the box, install the cargo
carrier (819-010534) to the frame of the
tractor.
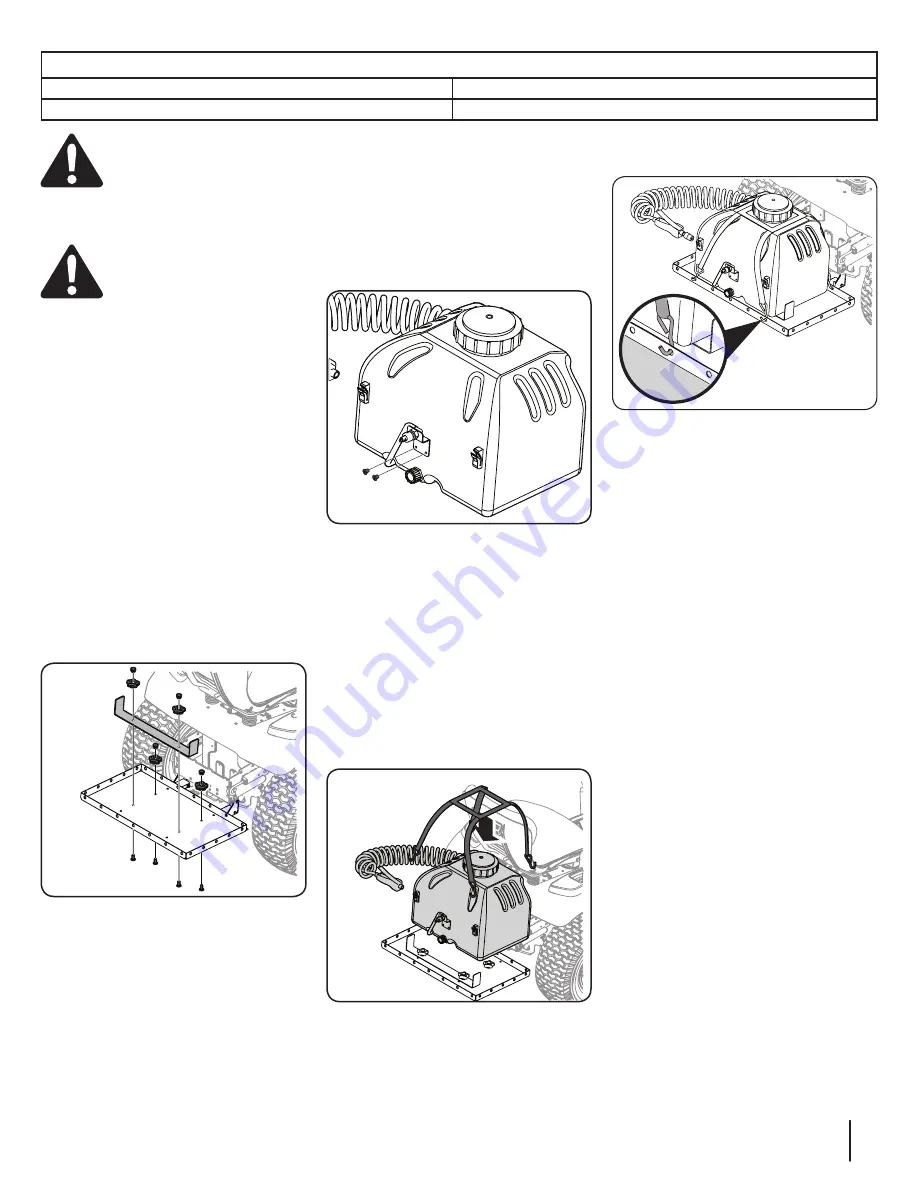
Sprayer Support Bracket Installation
1.
Install sprayer support bracket (789-
00578) to cargo carrier with two star
knobs (720-04072A) and two 5/16” bolts
(710-3105). See Figure 3-1.
2.
Install two star knobs (720-04072A)
and two 5/16” bolts (710-3105) into the
mounting holes shown in Figure 3-1.
3.
Install four rubber plugs (721-04271)
into the tops of the four star knobs (720-
04072A). See Figure 3-1.
Figure 3-1
Install Broadcast Sprayer Assembly
1.
Route the clear hose under sprayer tank
making sure that it is secured in the
grooves of the sprayer tank.
2.
Fasten broadcast nozzle mounting
bracket to sprayer tank with the two
screws included with the sprayer tank
assembly. See Figure 3-2.
Figure 3-2
Note:
Do not overtighten screws.
Attach Sprayer Tank Assembly To
Cargo Carrier
1.
Place sprayer assembly on cargo carrier,
ensuring that it sits firmly atop star
knobs (720-04072A) and between
sprayer support bracket (789-00578). See
Figure 3-3.
2.
Install sprayer tie down strap (VA-TDS-
9GSS). See Figure 3-3.
Figure 3-3
3.
Fasten securely using the mounting
holes shown in Figure 3-4.
Figure 3-4
Note:
The sprayer tie down strap is
adjustable. Tighten straps until the
sprayer tank is securely mounted to
cargo carrier.


