background image

10

s

ectiOn

 2— a

sseMbly

 & s

et

-u

p

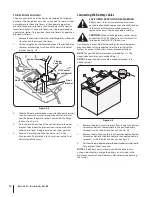
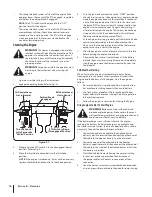
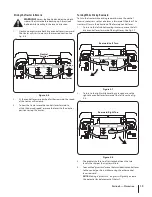
Position Drive Control levers

The drive control levers of the tractor are lowered for shipping 

purposes. The flange lock nuts, hex screws, and flat washers that 

normally secure the control levers in their operating position 

are unfastened and installed in the slotted holes of the control 

levers for shipment. The control levers must be repositioned to 

operate the tractor. To reposition the control levers for operation, 

proceed as follows:

Remove the hex screw, flat washer, and flange lock nut from the 

1. 

slot of one of the drive control levers.
Lift and swing that control lever upward until the slotted hole in 

2. 

the lever bracket aligns with one of the holes in the pivot 

bracket. See Fig. 3-4.

Slide the flat washer onto the hex screw. From the outside, insert 

3. 

the hex screw with washer through the control lever slot 

and the hole of the pivot bracket. Secure with the flange 

lock nut. See Fig. 3-4.

Note the relative position of the control lever to the pivot 

4. 

bracket, then repeat the previous steps to reposition the 

other control lever in approximately the same  position. 

Refer to “Adjusting the Drive Control Levers” in the 

5. 

Maintenance & Adjustments for instructions on the final 

adjustment of the levers.


Control Lever

Flange

Lock Nut

Slotted Hole

Washer

Hex Screw

Lift Control

Lever Upward

Pivot

Bracket

Figure 3-4

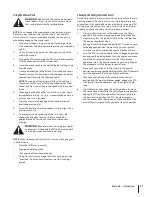
Connecting the Battery Cables

CALIFORNIA PROPOSITION 65 WARNING

Battery posts, terminals, and related accessories 

contain lead and lead compounds, chemicals known 

to the State of California to cause cancer and 

reproductive harm. Wash hands after handling.

CAUTION: 

When attaching battery cables, always 

connect the POSITIVE (Red) wire to its terminal first, 

followed by the NEGATIVE (Black) wire.

For shipping reasons, both battery cables on your equipment 

may have been left disconnected from the terminals at the 

factory. To connect the battery cables, proceed as follows:

NOTE: 

The positive battery terminal is marked Pos. (+). The 

negative battery terminal is marked Neg. (–).

NOTE: 

If the positive battery cable is already attached, skip 

ahead to step 2.

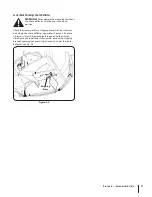
Remove the plastic cover, if present, from the positive battery 

1. 

terminal and attach the red cable to the positive battery 

terminal (+) with the bolt and hex nut. See Fig. 3-5.

Remove the plastic cover, if present, from the negative battery 

2. 

terminal and attach the black cable to the negative battery 

terminal (–) with the bolt and hex nut. See Fig. 3-5.
Position the red rubber boot over the positive battery terminal to 

3. 

help protect it from corrosion.

NOTE: 

If the battery is put into service after the date shown 

on top/side of battery, charge the battery as instructed in the 

Maintenance section your Operator’s Manual prior to operating 

the tractor.

Figure 3-5

Summary of Contents for RZT50VT

Page 1: ...Set Up Operation Maintenance Service Troubleshooting Warranty WARNING READ AND FOLLOW ALL SAFETY RULES AND INSTRUCTIONS IN THIS MANUAL BEFORE ATTEMPTING TO OPERATE THIS MACHINE FAILURE TO COMPLY WITH THESE INSTRUCTIONS MAY RESULT IN PERSONAL INJURY RZT Series Tractor Model RZT50VT Form No 769 05592 December 7 2009 ...

Page 2: ...ange of product specifications for various models Characteristics and features discussed and or illustrated in this manual may not be applicable to all models Cub Cadet LLC reserves the right to change product specifications designs and equipment without notice and without incurring obligation If you have any problems or questions concerning the machine phone your local Cub Cadet dealer or contact...

Page 3: ...jects which ricochet can cause serious injury to the eyes Wear sturdy rough soled work shoes and close fitting 9 slacks and shirts Loose fitting clothes and jewelry can be caught in movable parts Never operate this machine in bare feet or sandals Be aware of the mower and attachment discharge direction 10 and do not point it at anyone Do not operate the mower without the discharge cover or entire ...

Page 4: ... with the approved accessory or attachment Data indicates that operators age 60 years and above are 28 involved in a large percentage of riding mower related injuries These operators should evaluate their ability to operate the riding mower safely enough to protect themselves and others from serious injury If situations occur which are not covered in this manual use 29 care and good judgment Conta...

Page 5: ... a Never fill containers inside a vehicle or on a truck b or trailer bed with a plastic liner Always place containers on the ground away from your vehicle before filling When practical remove gas powered equipment c from the truck or trailer and refuel it on the ground If this is not possible then refuel such equipment on a trailer with a portable container rather than from a gasoline dispenser no...

Page 6: ...y Observe proper disposal laws and regulations for gas oil 14 etc to protect the environment According to the Consumer Products Safety Commission 15 CPSC and the U S Environmental Protection Agency EPA this product has an Average Useful Life of seven 7 years or 270 hours of operation At the end of the Average Useful Life have the machine inspected annually by an authorized service dealer to ensure...

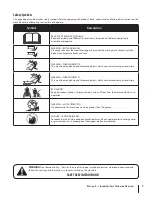
Page 7: ...semble and operate WARNING ROTATING BLADES Do not put hands or feet near rotating parts or under the cutting deck Contact with the blade s can amputate hands and feet WARNING THROWN OBJECTS This machine may pick up and throw and objects which can cause serious personal injury WARNING THROWN OBJECTS This machine may pick up and throw and objects which can cause serious personal injury BYSTANDERS Ke...

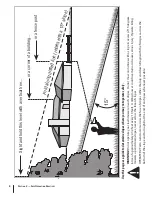
Page 8: ...RNING Do not operate your lawn mower on such slopes Do not mow on inclines with a slope in excess of 15 degrees a rise of approximately 2 1 2 feet every 10 feet A riding mower could overturn and cause serious injury Operate riding mowers up and down slopes never across the face of slopes Operate RZT zero turn tractors across the face of slopes rather than up and down Begin with the first pass acro...

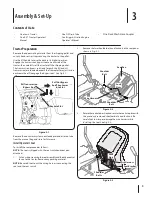
Page 9: ...h system nozzle adapter and oil drain tube from the manual bag and store for future use Install Operator s Seat To install the seat proceed as follows NOTE The seat is shipped with the seat switch and seat pan attached Cutanystrapssecuringtheseatassemblyandthedrivecontrol 1 levers to the tractor Remove any packing material NOTE Be careful not to cut the wiring harness connecting the seat and the s...

Page 10: ...otted Hole Washer Hex Screw Lift Control Lever Upward Pivot Bracket Figure 3 4 Connecting the Battery Cables California Proposition 65 Warning Battery posts terminals and related accessories contain lead and lead compounds chemicals known to the State of California to cause cancer and reproductive harm Wash hands after handling Caution When attaching battery cables always connect the POSITIVE Red ...

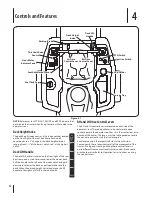
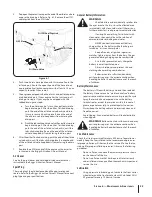
Page 11: ...osition Check the mower deck for a shipping brace with tag that may be holding the chute deflector upward for shipment If a brace is present it must be removed before operating the tractor Holding the chute deflector fully upward remove the shipping brace by grasping it and rotating it clockwise Lower the chute deflector See Fig 3 6 Shipping Brace Figure 3 6 ...

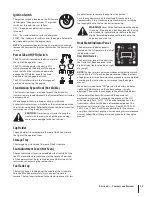
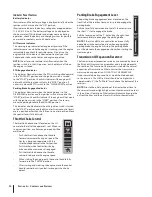
Page 12: ...frame and is used to raise and lower the mower deck Pull the handle to the left out of the index notch and push downward to lower the deck or pull upward to raise the deck When the desired height is attained move the lift handle to the right until fully in the index notch CUTTING HEIGHT RH and LH Drive Control Levers The RH and LH control levers are located on each side of the operator s seat Thes...

Page 13: ...he RH console to the right of the operator s seat The ignition switch has three positions as follows OFF The engine and electrical system is turned off ON The tractor electrical system is energized START The starter motor will turn over the engine Release the key immediately when the engine starts NOTE To prevent accidental starting and or battery discharge remove the key from the ignition switch ...

Page 14: ...ol is located on the LH console to the left of the operator s seat When set in a given position a uniform engine speed will be maintained Push the throttle choke control handle forward to increase the engine speed The tractor is designed to operate with the throttle choke control in the fast position full throttle when the tractor is being driven and the mower deck is engaged Pull the throttle cho...

Page 15: ...inutes to cool before refueling Tighten the fuel cap securely Before Operating Your Tractor Before you operate the tractor study this manual carefully to familiarize yourself with the operation of all the instruments and controls It has been prepared to help you operate and maintain your tractor efficiently This engine is certified to operate only on clean fresh unleaded regular gasoline For best ...

Page 16: ...xcept as necessary to start the engine Allow the engine to run for a few minutes at mid throttle 7 before putting the engine under load Observe the hour meter indicator panel If the battery 8 indicator light or oil pressure light come on immediately stop the engine Have the tractor inspected by your Cub Cadet dealer Cold Weather Starting When starting the engine at temperatures near or below freez...

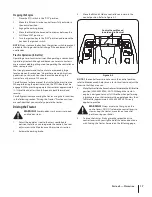
Page 17: ...reverse Carefully practice maneuvering the tractor using the instructions in the following section Driving the Tractor Practice until you are confident that you can safely operate the tractor Driving the Tractor Warning Avoid sudden starts excessive speed and sudden stops Adjust the operator s seat to the most comfortable 1 position that allows you to operate the controls See seat adjustment in th...

Page 18: ...irection of travel we recommend performing gradual U turns where possible Sharper turns increase the possibility of turf defacement and could affect control of the tractor ALWAYS slow the tractor before making sharp turns To turn the tractor while driving forward move the control levers as necessary so that one lever is rearward of the other The tractor will turn in the direction of the rearward c...

Page 19: ...ng rearward move the control levers as necessary so that one lever is forward of the other The tractor will turn in the direction of the forward control lever To turn to the left while traveling in reverse move the left 1 drive control lever forward of the right lever See Fig 5 7 To turn to the right while traveling in reverse move the 2 right drive control lever forward of the left lever See Fig ...

Page 20: ... ignition key off and remove key Driving On Slopes Refer to the slope gauge in the Safe Operation Section to help determine slopes where you may not operate safely Warning Do not operate on inclines with a slope in excess of 15 degrees a rise of approximately 2 1 2 feet every 10 feet The tractor could overturn and cause serious injury Always drive across slopes never up and down Control 1 the spee...

Page 21: ...the tractor for any reason while on a grass surface always Place the shift lever in neutral Engage the parking brake Shut engine off and remove the key Doing so will minimize the possibility of having your lawn browned by hot exhaust from your tractor s running engine Checking the Safety Interlock Circuits Periodically check the safety interlock circuits to ensure they are working properly If a sa...

Page 22: ... in the neutral position engage the parking brake stop the engine and remove the key to prevent unintended starting Engine Refer to the Briggs Stratton Owner s Manual for all engine maintenance intervals procedures specifications and instructions Hydrostatic Transmission The zero turn tractor is equipped with dual integrated hydrostatic pumps transaxles that are sealed and are maintenance free Flu...

Page 23: ...discomfort seek prompt medical attention If acid spills on clothing first dilute it with clean water then neutralize with a solution of ammonia water or baking soda water NEVER connect or disconnect battery charger clips to the battery while the charger is turned on as it can cause sparks Keep all sources of ignition cigarettes matches lighters away from the battery The gas generated during chargi...

Page 24: ...e Spindle Pulleys Once a month remove the belt covers to remove any accumulation of grass clippings from around the spindle pulleys and V belt Clean more often when mowing tall dry grass Using the Transmission Bypass Rods If for any reason the tractor will not drive or you wish to move the tractor the two hydrostatic transmissions are equipped with a bypass rod that will allow you to manually move...

Page 25: ...er to prevent deterioration Warning Fuel left in the fuel tank deteriorates and will cause serious starting problems Using a fuel stabilizer b Read the product manufacturer s instructions and recommendations Add to clean fresh gasoline the correct amount of stabilizer for the capacity approximately 3 gallons of the fuel system Fill the fuel tank with treated fuel and run the engine for 2 3 minutes...

Page 26: ...d shoulder screw from the bottom of the control lever and pivot bracket Refer to Fig 6 5 Reposition the control lever to align with the other set of 3 holes in the pivot bracket and insert the shoulder screw removed earlier Fasten with the hex insert flange lock nut and tighten until snug Insertthehexscrewwithwasherthroughthecontrolleverslot 4 and the pivot bracket Thread the flange lock nut onto ...

Page 27: ...eved Front to Back Leveling The front of the deck should be approximately 1 1 4 lower than the rear of the deck Adjust if necessary as follows With the deck raised off of the ground rotate the outer 2 blades so that they are parallel to the frame of the tractor If the side to side leveling was done correctly measuring 3 just the right blade should be acceptable to attain the correct back to front ...

Page 28: ...uge wheel distance from the ground below If necessary adjust as follows Visually check the distance between the front gauge 1 wheels and the ground If the gauge wheels are near or touching the ground they should be raised If more than 1 2 above the ground they should be lowered Remove the lock nut securing one of the front gauge wheel 2 shoulder screws to the deck Remove the gauge wheel and should...

Page 29: ... connecting the negative lead This will prevent sparking or possible injury from an electrical short caused by contacting the tractor body with tools being used to connect the cables Charging the Battery Test and if necessary recharge the battery after the tractor has been stored for a period of time A voltmeter or load tester should read 12 6 volts DC or higher across the battery terminals See Fi...

Page 30: ...rking from the middle of the tractor pivot the idler 2 bracket and movable idler pulley rearward away from the backside of the V belt just far enough to lift the belt up and over the idler pulley See Fig 7 4 From beneath the rear of the tractor slide the belt off of 3 the PTO pulley on the bottom of the engine V Belt Pull Idler Pulley Rearward Movable Idler Pulley Fixed Idler Pulley Idler Bracket ...

Page 31: ...the deck lift arms of the tractor Refer to Fig 7 6 Use the tractor deck lift handle to lower the deck lift arms 5 into the slots of the rear deck hanger brackets Pull the deck support pins outward and maneuver the deck 6 as necessary to align the holes in the deck lift arms with the pins Refer to Fig 7 6 When aligned push each pin fully inward through the lift 7 arms to secure the arms in the rear...

Page 32: ...einstall the belt covers Route the belt rearward between the two idler pulleys and 4 reinstall the deck following the instructions in Deck Installation on page 30 Hex Tap Screw Hex Tap Screw Belt Cover Belt Cover Spindle Pulleys Belt Figure 7 7 Mower Blade Care Warning Before performing any maintenance place the PTO switch in the OFF position engage the parking brake lever turn the ignition key to...

Page 33: ...elt and tensions the drive belt Reinstall the deck drive belt 9 Transmission Drive Pulley Square Hole Idler Bracket Idler Bracket Spring Engine Pulley PTO Pulley Drive Belt Idler Pulley Figure 7 9 Tractor Creeping Creeping is the slight forward or backward movement of the tractor when the engine is running at high idle and the drive control levers are opened out in the neutral position If after op...

Page 34: ...ote which direction the tractor 4 is tracking If the tractor tracks to the right adjust the control a lever stop bolt on the left side If the tractor tracks to the left adjust the control b lever stop bolt on the right side Locatetheapplicablestopboltontheleftorrightconsole See 5 Fig 7 11 Loosen the jam nut on the stop bolt then turn the stop 6 bolt counterclockwise to make it longer Recheck the t...

Page 35: ... to choke position 5 Push throttle choke control lever to choke 6 position Fill tank with clean fresh less than 30 days 7 old gas Clean fuel line and replace fuel filter 8 Clean adjust gap or replace plug s 9 Crank engine with throttle in FAST position 10 Engine runs erratic Tractor running with CHOKE activated 1 Spark plug wire s loose 2 Blocked fuel line or stale fuel 3 Vent in gas cap plugged 4...

Page 36: ...element and or clean 2 pre cleaner Excessive vibration Cutting blade loose or unbalanced 1 Damaged or bent cutting blade 2 Tighten blade and spindle 1 Replace blade 2 Uneven cut Deck not leveled properly 1 Dull blade 2 Uneven tire pressure 3 Perform side to side deck adjustment 1 Sharpen or replace blade 2 Check tire pressure in all four tires 3 Mower will not mulch grass If Equipped w Mulching Ki...

Page 37: ...il Filter BS 691035 Fuel Filter 954 04044A Drive Belt Mowing Deck 954 04043A Drive Belt Transmissions 942 04053C 2 in 1 Deck Blade 918 04125A Deck Spindle Phone 800 965 4CUB to order replacement parts or a complete Parts Manual have your full model number and serial number ready Parts Manual downloads are also available free of charge at www cubcadet com ...

Page 38: ...9 Throttle Control Cable 925 1745 Ignition Key 631 04070A Discharge Chute Assembly 634 04128 Wheel Assembly 634 04321A Caster Wheel Assembly Phone 800 965 4CUB to order replacement parts or a complete Parts Manual have your full model number and serial number ready Parts Manual downloads are also available free of charge at www cubcadet com ...

Page 39: ...lug 19A 115 100 Rear Bumper 19A 116 100 Rear Spreader 190 117 100 Sun Shade The following attachments and accessories are compatible with your Cub Cadet RZT tractor See your Cub Cadet dealer or the retailer from which you purchased your tractor for information regarding price and availability ...

Page 40: ...Notes 11 40 ...

Page 41: ...41 Section 11 Notes ...

Page 42: ...at cause the failure of a warranted part to be identical in all material respects to that part as described in MTD Consumer Group Inc s application for certification The warranty period begins on the date the outdoor equipment engine is delivered to an ultimate purchaser or first placed into service The warranty period is two years Subject to certain conditions and exclusions as stated below the w...

Page 43: ...l eligible for warranty coverage Further the coverage under this warranty extends only to parts that were present on the off road engine and equipment purchased The following emission warranty parts are covered if applicable 1 Fuel Metering System Cold start enrichment system soft choke Carburetor and internal parts or fuel injection system Fuel pump Fuel tank 2 Air Induction System Air cleaner In...

Page 44: ...age if the hour meter or any part thereof is altered modified disconnected or otherwise tampered with HOW TO OBTAIN SERVICE Warranty service is available WITH PROOF OF PURCHASE AND APPLICABLE MAINTENANCE RECORDS through your local authorized service dealer To locate the dealer in your area In the U S A Check your Yellow Pages or contact Cub Cadet LLC at P O Box 361131 Cleveland Ohio 44136 0019 cal...

Reviews: