background image

Cutting Deck Removal

WARNING! 

Before performing any maintenance or 

repairs, disengage blades, stop engine and remove 

key to prevent unintended starting. 

To remove the cutting deck, proceed as follows:

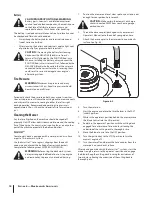
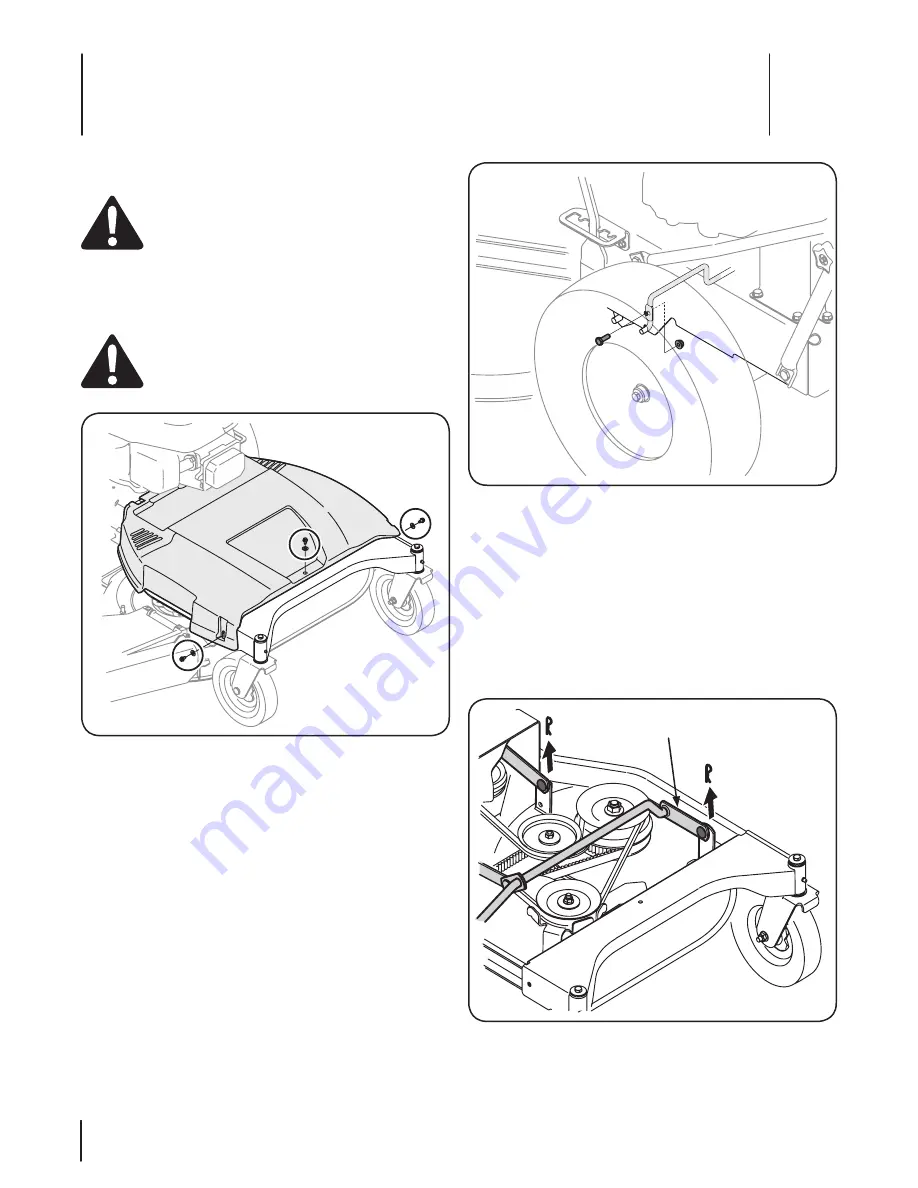
Remove the belt cover by removing the three screws and 

1. 

washers which secure it to the frame. See Fig. 7-1.

WARNING: 

Do not operate mower without the 

belt cover installed. Failure to follow this instruction 

could result in personal injury or property damage.

Place the deck height lever in its highest position.

2. 

Position wood blocks at various places under the deck’s 

3. 

edge. These will temporarily support the deck as you 

unmount it.
Use the deck height lever to lower the deck, so that it rests 

4. 

on the wood blocks.
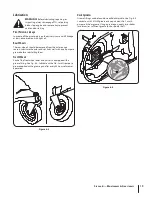
Remove the screw and flange nut which secures the belt 

5. 

keeper rod to the left side of the mower’s frame.


See Fig 7-2.

Remove the belt keeper rod and remove the deck belt from 

6. 

around the mower’s engine pulley.

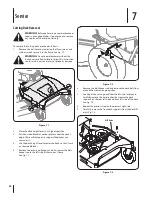
Looking at the cutting deck from the left side, locate and 

7. 

carefully remove the hairpin clips that secure the deck 

supports on the rear left side and front left side of the deck. 

See Fig. 7-3.
Repeat the previous step on the mower’s right side. 

8. 

Carefully remove the front deck supports from the deck lift 

9. 

arms, Fig. 7-3.

Figure 7-1

Figure 7-2

Figure 7-3

Lift Arm

Service

7

22

Summary of Contents for Time Saver

Page 1: ...es Set Up Operation Maintenance Service Troubleshooting Warranty WARNING READ AND FOLLOW ALL SAFETY RULES AND INSTRUCTIONS IN THIS MANUAL BEFORE ATTEMPTING TO OPERATE THIS MACHINE FAILURE TO COMPLY WITH THESE INSTRUCTIONS MAY RESULT IN PERSONAL INJURY Wide Cut Mower Time Saver Form No 769 03769 January 24 2007 ...

Page 2: ...es the right to change product specifications designs and equipment without notice and without incurring obligation This product has met the rigid safety standards of the Outdoor Power Equipment Institute and an independent testing laboratory If you have any problems or questions concerning the machine phone your local Cub Cadet dealer or contact us directly Cub Cadet s Customer Support telephone ...

Page 3: ...s and pets at least 75 feet from mower while it is in operation Stop machine if anyone enters area Always wear safety glasses or safety goggles during 9 operation and while performing an adjustment or repair to protect your eyes Thrown objects which ricochet can cause serious injury to the eyes Wear sturdy rough soled work shoes and close fitting 10 slacks and shirts Shirts and pants that cover th...

Page 4: ...t 25 adjustment while the engine is running Only use parts and accessories made for this machine by 26 the manufacturer Failure to do so can result in personal injury When starting engine pull cord slowly until resistance 27 is felt then pull rapidly Rapid retraction of starter cord kickback will pull hand and arm toward engine faster than you can let go Broken bones fractures bruises or sprains c...

Page 5: ...he blade and engine mounting bolts at frequent 3 intervals for proper tightness Also visually inspect blade for damage e g bent cracked worn Replace blade with the original equipment manufacture s O E M blade only listed in this manual Use of parts which do not meet the original equipment specifications may lead to improper performance and compromise safety Mower blades are sharp and can cut Wrap ...

Page 6: ... the muffler is available through your nearest engine authorized service dealer or contact the service department P O Box 361131 Cleveland Ohio 44136 0019 Average Useful Life According to the Consumer Products Safety Commission CPSC and the U S Environmental Protection Agency EPA this product has an Average Useful Life of seven 7 years or 140 hours of operation At the end of the Average Useful Lif...

Page 7: ... a guide to determine slopes where you may not operate safely WARNING Do not operate your lawn mower on such slopes Do not mow on inclines with a slope in excess of 15 degrees a rise of approximately 2 1 2 feet every 10 feet A riding mower could overturn and cause serious injury Operate riding mowers up and down slopes never across the face of slopes Operate walk behind mowers across the face of s...

Page 8: ...ive cable heavy red wire is secured to the positive battery terminal with a hex bolt and hex nut at the factory The negative cable heavy black wire may be secured to the negative battery terminal at the factory If it hasn t been attached proceed as follows Remove the carriage bolt and hex nut from the negative 1 cable heavy black wire Remove the black plastic cover if present from the 2 negative b...

Page 9: ...ositions For instructions refer to Handle Height in the Maintenance and Adjustments section of this manual Attaching the Shift Lever Remove the screw and the lock nut that secures the shift 1 lever to the shift lever plate See Fig 3 5 Remove the remaining screw and nut from the lower shift 2 lever plate See Fig 3 5 Position the upper shift lever into a vertical position 3 aligning the holes in the...

Page 10: ...30 days old unleaded gasoline Fill the tank no higher than four inches below the top of the filler neck to allow space for fuel expansion Warning Use extreme care when handling gasoline Gasoline is extremely flammable and the vapors are explosive Never fuel the machine indoors or while the engine is hot or running Extinguish cigarettes cigars pipes and other sources of ignition NOTE Your lawn mowe...

Page 11: ... control is in the fast position The throttle choke control is used to adjust engine speeds to activate the engine choke and to stop the engine Always run engine with the throttle choke control lever in the fast position for best mower performance Choke Use when starting a cold engine Fast Use during mower operation Slow Use when idling engine Stop Stops the engine Refer to Starting The Engine in ...

Page 12: ...eck To operate press and hold the lever against the handlebar grip To stop the blades release the blade control warning Never attempt to start the engine with the blade control engaged caution Always release the blade control when starting the engine Failure to do so may result in premature wear to your engine s electric starter Gear Shift Lever Use this lever to select any of four forward ground ...

Page 13: ...ll alternately flash the recorded hours CHG and OIL for five minutes after every 50 hours of recorded operation elapse The maintenance interval lasts for two hours from 50 52 100 102 150 152 etc The LCD will also flash as described above for five minutes every time the mower s engine has been started during this maintenance interval Before the interval expires change the engine oil as instructed i...

Page 14: ...he Drive WARNING Avoid sudden starts excessive speed and sudden stops Start the engine as instructed earlier in this section and 1 move the throttle choke control into the FAST rabbit position To travel FORWARD 2 Place the gear shift lever in any of the four forward a ground speeds Select a speed appropriate for the conditions and a pace you re comfortable with Slowly squeeze the Drive Control aga...

Page 15: ...h the throttle choke control in the FAST rabbit position while mowing For best results it is recommended that the first two laps be cut with the discharge thrown towards the center After the first two laps reverse the direction to throw the discharge to the outside for the balance of cutting This will give a better appearance to the lawn Do NOT attempt to mow heavy brush and weeds or extremely tal...

Page 16: ...tab A of the baffle into the bracket on 1 the deck See Fig 5 1 Insert the mulch baffle into the discharge opening B See 2 Fig 5 1 Once it s positioned in the deck opening push the baffle 3 towards the rear of the mower C to secure it in place See Fig 5 1 Removing the Mulch Baffle Slide the baffle to the right toward the front of the mower 1 to disengage the slot from the mower deck and then pry th...

Page 17: ... allow room to connect 3 the oil drain hose to the oil drain valve See Fig 6 1 Pop open the protective cap on the end of the oil drain 4 valve to expose the drain port See Fig 6 2 Remove the oil fill cap dipstick from the oil fill tube 5 Push the oil drain hose packed with this manual onto the 6 oil drain port Route the opposite end of the hose into an appropriate oil collection container with at ...

Page 18: ...smission s cooling fan or on any other part of the machine especially the belts and pulleys Smart Jet Your mower s deck is equipped with a water port on its surface as part of its deck wash system Use the Smart Jet to rinse grass clippings from the deck s underside and prevent the buildup of corrosive chemicals Complete the following steps AFTER EACH MOWING Warning Before using the deck wash syste...

Page 19: ... and rim hubs well with an all purpose grease before reinstalling them Front Wheels Each of the front wheel axles and casters is equipped with a grease fitting See Fig 6 3 Lubricate with a No 2 multi purpose grease applied with a grease gun after every 50 hours of mower operation Deck Spindles Grease fittings can be found on each deck spindle See Fig 6 4 Lubricate with 251H EP grease or an equival...

Page 20: ...your Cub Cadet dealer to have the deck s timing belt reset WARNING Do not operate the machine without the deck s timing belt properly set Failure to follow this instruction could result in personal injury or property damage Adjustments WARNING Shut the engine off and remove the ignition key before making adjustments Handle Height The upper handle is secured to two support bars that can be adjusted...

Page 21: ...il Level P Check Air Filter for Dirty Loose or Damaged Parts P Replace Air Filter Element P Change Engine Oil P Clean Battery Terminals P P Clean Engine Cooling Fins P P Lube Front Deck Wheels and Casters P P Lube Deck Spindles P P Lube Pivot Points P P Check Spark Plug Condition Gap P P Replace Fuel Filter P 21 Section 6 Maintenance Adjustments ...

Page 22: ...der the deck s 3 edge These will temporarily support the deck as you unmount it Use the deck height lever to lower the deck so that it rests 4 on the wood blocks Remove the screw and flange nut which secures the belt 5 keeper rod to the left side of the mower s frame See Fig 7 2 Remove the belt keeper rod and remove the deck belt from 6 around the mower s engine pulley Looking at the cutting deck ...

Page 23: ...ign object Do not operate the machine until damaged components are replaced To remove the blades proceed as follows Remove the deck from beneath the mower refer to 1 Cutting Deck Removal earlier in this section then gently flip the deck over to expose its underside Place a block of wood between the center deck housing 2 baffle and the cutting blade to act as a stabilizer See Fig 7 5 Remove the hex...

Page 24: ...ed wire its terminal first followed by the NEGATIVE Black wire Jump Starting WARNING Never jump start a damaged or frozen battery Be certain the vehicles do not touch and ignitions are off Do not allow cable clamps to touch Connect positive 1 cable to positive post of your mower s discharged battery Connect the other end of the cable to the positive 2 post of the jumper battery Connect the second ...

Page 25: ...hich secures 4 each deck idler pulley See Fig 7 8 Remove the belt from around all pulleys 5 Route the new belt as illustrated in Fig 8 6 Retighten the nuts and bolts which secure each idler 7 pulley Reattach the belt keeper and belt cover 8 Changing the Deck Timing Belt Several components must be removed and special tools used in order to change the mower deck s timing belt See your Cub Cadet deal...

Page 26: ...element 6 Engine overheats Engine oil level low 1 Air flow restricted 2 Fill crankcase with proper amount and 1 weight of oil Clean grass clippings and debris from around 2 the engine s cooling fins and blower housing Engine hesitates at high RPM Spark plug gap too close 1 Remove spark plug and reset the gap 1 Engine Idles rough Spark plug fouled faulty or gap too wide 1 Dirty air cleaner 2 Replac...

Page 27: ...el Filter 954 04139 Belt Mowing Deck Engagment 942 04154A Deck Blade 734 04263 Wheel Front 925 1707D Battery Phone 800 965 4CUB to order replacement parts or a complete Parts Manual have your full model number and serial number ready Parts Manual downloads are also available free of charge at www cubcadet com Replacement Parts 9 27 ...

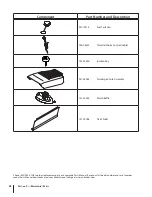
Page 28: ... ready Parts Manual downloads are also available free of charge at www cubcadet com Component Part Number and Description 951 10514 Fuel Tank Cap 746 04355 Throttle Choke Control Cable 725 2054A Ignition Key 931 04244 Discharge Chute Assembly 731 05938 Mulch Baffle 731 05766 Trail Shield 28 Section 9 Replacement Parts ...

Page 29: ... the Cub Cadet Time Saver Wide Cut Mower See your Cub Cadet dealer or the retailer from which you purchased your mower for information regarding price and availability Model Number Description 19A 119 100 Grass Collector 2 6 Bushel Attachments Accessories 10 29 ...

Page 30: ...r first placed into service The warranty period is two years Subject to certain conditions and exclusions as stated below the warranty on emission related parts is as follows 1 Any warranted part that is not scheduled for replacement as required maintenance in the written instructions supplied is warranted for the warranty period stated above If the part fails during the period of warranty coverag...

Page 31: ...ting adjustment limiting device is still eligible for warranty coverage The following emission warranty parts are covered 1 Fuel Metering System Cold start enrichment system soft choke Carburetor and internal parts Fuel pump Fuel tank 2 Air Induction System Air cleaner Intake manifold 3 Ignition System Spark plug s Magneto ignition system 4 Exhaust System Catalytic converter SAI Reed valve 5 Misce...

Page 32: ... MTD Products Limited Kitchener ON N2G 4J1 call 1 800 668 1238 or log on to our website at www mtdcanada com Without limiting the foregoing this limited warranty does not provide coverage in the following cases a The engine or component parts thereof These items may carry a separate manufacturer s warranty Refer to applicable manufactur er s warranty for terms and conditions b Routine maintenance ...

Page 33: ...seguridad Configuración Funcionamiento Mantenimiento Servicio Solución de problemas Garantía ADVERTENCIA LEA Y SIGA TODAS LAS INSTRUCCIONES DE ESTE MANUAL ANTES DE PONER EN FUNCIONAMIENTO ESTA MÁQUINA SI NO RESPETA ESTAS INSTRUCCIONES PUEDE PROVOCAR LESIONES PERSONALES Cortacésped Amplio Time Saver Formulario No 769 03769 Enero 25 2008 ...

Page 34: ...e modificar las especificaciones de los productos los diseños y el equipo estándar sin previo aviso y sin generar responsabilidad por obligaciones de ningún tipo Este producto cumple con las estrictas normas de seguridad del Outdoor Power Equipment Institute y de un laboratorio de pruebas independiente Si tiene algún problema o duda respecto a la unidad llame a un distribuidor de servicio Cub Cade...

Page 35: ...iliarizado con estas reglas de seguridad para la operación deberán usar esta máquina Inspeccione minuciosamente el área en donde utilizará 4 el equipo Saque todas las piedras palos cables huesos juguetes y otros objetos extraños con los que podría tropezar o que podrían ser arrojados por la cuchilla Los objetos arrojados por la máquina pueden producir lesiones graves Planifique el patrón en el que...

Page 36: ...torio Nunca opere la cortadora sin las guardas apropiadas 20 cubierta de descarga guarda para recorte manija de control de la cuchilla y otros dispositivos de seguridad y protección en su lugar y funcionando Nunca opere la cortadora si los dispositivos de seguridad están dañados Si no lo hace esto puede tener como resultado lesiones El silenciador y el motor se calientan y pueden producir 21 quema...

Page 37: ...gasolina derramada sobre el motor y el equipo 11 Traslade la máquina a otra zona Espere 5 minutos antes de encender el motor Nunca almacene la máquina o el recipiente de combustible 12 en unespacio cerrado donde haya fuego chispas o aparatos con piloto como por ejemplo calentadores de agua calentadores hornos secadores de ropa u otros aparatos a gas Para reducir el riesgo de incendio mantenga la m...

Page 38: ...no están certificados para operar con gasolina común sin plomo y pueden incluir los siguientes sistemas de control de emisiones Modificación de motor EM y catalizador de tres vías TWC si están equipados de esa manera Guardachispas Advertencia Esta máquina está equipada con un motor de combustión interna y no debe ser utilizada en o cerca de un terreno agreste cubierto por bosque malezas o hierba e...

Page 39: ...odría voltearse y causar lesiones severas Opere las podadoras MONTABLES arriba y abajo de las pendientes nunca cruzando el frente de las pendientes Opere las podadoras QUE SE EMPUJAN de manera que crucen el frente de las pendientes nunca hacia arriba y hacia abajo Alinee y sostenga este nivel con un árbol vertical o la esquina de una construcción o el poste de una cerca D o b l e a l o l a r g o d...

Page 40: ...omo Neg El cable positivo grueso de color rojo viene de fábrica sujeto al borne positivo de la batería por medio de un perno hexagonal y una tuerca hexagonal El cable negativo grueso de color negro puede venir de fábrica sujeto al borne negativo de la batería Si no se entrega unido proceda del siguiente modo Retire el perno del carro y la tuerca hexagonal del cable 1 negativo cable negro grueso Re...

Page 41: ...dad 5 la unidad del pálet saque primero los tornillos que fijan la cortadora al cajón Colocación de la palanca de cambios Extraiga el tornillo y la tuerca de seguridad que sujetan la 1 palanca de cambios a la placa de la palanca de cambios Vea la Fig 3 5 Extraiga el tornillo y la tuerca restantes de la placa de la 2 palanca de cambios inferior Vea la Fig 3 5 Coloque la palanca de cambios superior ...

Page 42: ...nte gasolina limpia nueva no más de 30 días de uso y sin plomo Llene el tanque a no más de cuatro pulgadas por debajo del borde superior del cuello de llenado para permitir la expansión del combustible Advertencia Tenga mucho cuidado al trabajar con gasolina La gasolina es sumamente inflamable y sus vapores pueden causar explosiones Nunca agregue combustible a la máquina en interiores ni mientras ...

Page 43: ...ador cebador en la posición de velocidad rápida para obtener mejores resultados de corte Cebador Utilícelo para arrancar un motor frío Rápido Use durante el funcionamiento de la cortadora Lento Useo durante la marcha al ralentí Parar Detiene el motor Consulte Arranque del motor en la sección Funcionamiento de este manual para ver instrucciones de arranque detalladas Motor Consulte el Manual del pr...

Page 44: ...r la plataforma de corte Para operar este control presione y retenga la palanca contra la empuñadura de la barra de control Para detener las cuchillas suelte el control de las cuchillas advertencia Nunca intente detener el motor con el control de las cuchillas enganchado precaución Suelte siempre el control de las cuchillas antes de arrancar el motor De lo contrario puede ocasionar desgaste premat...

Page 45: ... aceite del motor La pantalla de cristal líquido parpadea alternativamente las horas registradas CHG cambiar y OIL aceite durante cinco minutos después de cada 50 horas de operación registrada El intervalo de mantenimiento dura dos horas entre 50 52 100 102 150 152 etc La pantalla LCD también parpadea según se describe más arriba durante cinco minutos cada vez que el motor de la cortadora se encie...

Page 46: ...l control del regulador cebador a la posición STOP 2 parar Gire la llave de encendido en sentido contrario a las agujas 3 del reloj a la posición STOP parar Retire la llave del interruptor de encendido para evitar que 4 el motor se encienda accidentalmente Enganche de la transmisión ADVERTENCIA Evite arrancar súbitamente desarrollar excesiva velocidad y detenerse de repente Encienda el motor según...

Page 47: ...ector de césped No corte el césped demasiado corto El césped corto alienta el crecimiento de malezas y se pone amarillo rápidamente cuando escasea la lluvia Siempre haga funcionar la cortadora con el control del regulador cebador en la posición FAST rápida representada por una liebre mientras corta el césped Para obtener los mejores resultados se recomienda realizar los dos primeros cortes de césp...

Page 48: ... clavija en el soporte de 1 la plataforma Vea la Fig 5 1 Inserte la clavija de abono en la abertura de descarga B 2 Vea la Fig 5 1 Una vez colocada en la abertura de la plataforma empuje 3 la clavija hacia la parte posterior de la cortadora C para fijarla en su lugar Vea la Fig 5 1 Extracción de la tolva de abono Deslice la clavija hacia la derecha hacia la parte delantera 1 de la cortadora para d...

Page 49: ...renaje Vea la Fig 6 1 6 Abra el tapón protector en el extremo de la válvula de 4 drenaje de aceite para dejar expuesto el orificio de drenaje Vea la Fig 6 2 Retire el tapón de llenado de aceite la varilla de nivel de 5 aceite del tubo de llenado Inserte la manguera de drenaje de aceite embalada 6 con este manual dentro del orificio de drenaje de aceite Coloque el extremo opuesto de la manguera en ...

Page 50: ...a especialmente las correas y poleas Smart Jet La plataforma de la cortadora tiene un puerto de agua sobre la superficie como parte de su sistema de lavado Utilice el Smart Jet para desalojar los recortes de césped de la parte inferior de la plataforma e impedir la acumulación de sustancias químicas corrosivas Realice los siguientes pasos DESPUÉS DE CADA CORTE DE CÉSPED Advertencia Antes de usar e...

Page 51: ...Lubrique bien los ejes y las llantas con grasa multiuso antes de volver a instalarlos Ruedas delanteras Cada uno de los ejes y rueditas de la rueda delantera viene equipado con un accesorio de engrase Lubrique con grasa multiuso No 2 aplicada con una pistola de engrasar cada 50 horas de funcionamiento de la cortadora Husillos de plataforma Los accesorios de engrase se pueden encontrar en cada husi...

Page 52: ...ados entre sí consulte a su distribuidor Cub Cadet para volver a colocar la correa de sincronización de la plataforma ADVERTENCIA No haga funcionar la máquina si la correa de sincronización no está correctamente colocada Si no se observan estas instrucciones se pueden producir lesiones personales o daños materiales Ajustes ADVERTENCIA Apague el motor y retire la llave de encendido antes de realiza...

Page 53: ...tas o dañadas P Reemplace el elemento del filtro de aire P Cambie el aceite del motor P Limpie los bornes de la batería P P Limpie las aletas de refrigeración del motor P P Lubrique las ruedas y rueditas delanteras de la plataforma P P Lubrique los husillos de la plataforma P P Lubrique los puntos de pivote P P Inspeccione el estado y la separación de la bujía de encendido P P Reemplace el filtro ...

Page 54: ...ataforma Soportarán temporalmente la plataforma mientras la desmonta Use la palanca de altura de la plataforma para bajar la 4 plataforma y hacerla descansar sobre los tacos de madera Extraiga el tornillo y la tuerca de brida que sujeta la varilla 5 del guardacorrea al lado izquierdo del bastidor de la cortadora Vea la Fig 7 2 Extraiga la varilla del guardacorrea y extraiga la correa de la 6 plata...

Page 55: ... máquina hasta después de haber reemplazado los componentes dañados Para retirar las cuchillas haga lo siguiente Saque la plataforma de debajo de la cortadora consulte la 1 Extracción de la plataforma de esta sección luego voltee con delicadeza la plataforma para dejar al descubierto su parte inferior Coloque un taco de madera entre el deflector del 2 alojamiento central de la plataforma y la cuch...

Page 56: ...cable POSITIVO rojo a su borne y a continuación el cable NEGATIVO negro Arranque con pinzas para batería ADVERTENCIA Nunca arranque con pinzas una batería dañada o congelada Asegúrese de que los vehículos no se toquen y los motores están apagados No permita que las pinzas de los cables se toquen Conecte el cable positivo 1 al borne positivo de la batería descargada de su cortadora Conecte el otro ...

Page 57: ...cada 4 polea loca de la plataforma Vea la Fig 7 8 Retire la correa de alrededor de todas las poleas 5 Coloque la correa nueva como se muestra en la Fig 7 8 6 Vuelva a ajustar las tuercas y pernos que fijan cada polea loca 7 Vuelva a colocar el guardacorrea y la cubierta de la correa 8 Cambio de la correa de sincronización de la plataforma Para cambiar la correa de sincronización de la cortadora se...

Page 58: ...elemento de papel del filtro de aire 6 El motor recalienta El nivel de aceite del motor está bajo 1 Flujo de aire restringido 2 Llene el cárter con la cantidad y peso de aceite 1 adecuado Limpie los recortes de césped y residuos de alrededor 2 de las aletas de refrigeración del motor y del alojamiento del soplador El motor vacila a altas revoluciones La separación de la bujía es muy pequeña 1 Reti...

Page 59: ...de la plataforma de corte 942 04154A Cuchilla de plataforma 734 04263 Rueda delantera 925 1707D Batería Llame por teléfono al 800 965 4CUB para solicitar piezas de reemplazo o un Manual de Repuestos completo tenga el número de modelo y número de serie de su máquina a mano En www cubcadet com también podrá descargar el Manual de Repuestos sin cargo alguno Piezas de reemplazo 9 27 ...

Page 60: ...o En www cubcadet com también podrá descargar el Manual de Repuestos sin cargo alguno Componente Número de pieza y Descripción 951 10514 Tapón del tanque de combustible 746 04355 Control del regulador cebador cable 725 2054A Llave de encendido 931 04244 Conjunto de canal de descarga 731 05938 Tolva de abono 731 05766 Escudo posterior 28 Sección 9 Piezas de reemplazo ...

Page 61: ...ub Cadet Time Saver Consulte con su distribuidor Cub Cadet o con el representante al cual le ha comprado la cortadora para obtener más información con respecto a precios y disponibilidad Número de modelo Descripción 19A 119 100 Colector de césped de 2 6 fanegas Aditamentos y accesorios 10 29 ...

Page 62: ...l período de garantía comienza en la fecha de entrega de la cortadora al comprador final o en la fecha en que la máquina se pone en funcionamiento por primera vez El período de garantía es de dos años Sujeto a ciertas condiciones y exclusiones que se indican a continuación la garantía de las piezas relacionadas con las emisiones es la siguiente Cualquier pieza garantizada que no esté programada pa...

Page 63: ...siguiente lista de piezas es cubierta por la garantía de emisiones Línea de combustible abrazaderas de la línea de combustible 1 Sistema de medición de combustible Sistema de mejora para inicio en frío cebado suave Carburador y componentes internos Bomba de combustible Depósito de combustible 2 Sistema de inducción de aire Filtro de aire Colector de entrada 3 Sistema de encendido Bujía s Sistema d...

Page 64: ... en contacto con MTD Products Limited Kitchener ON N2G 4J1 llame al 1 800 668 1238 ó visite nuestro sitio web en www mtdcanada com Sin limitación de lo anteriormente dicho esta garantía limitada no ofrece cobertura en los siguientes casos a El motor o las piezas que lo componen Estos productos pueden tener una garantía por separado del fabricante Consulte los términos y condiciones en la garantía ...

Reviews: