background image

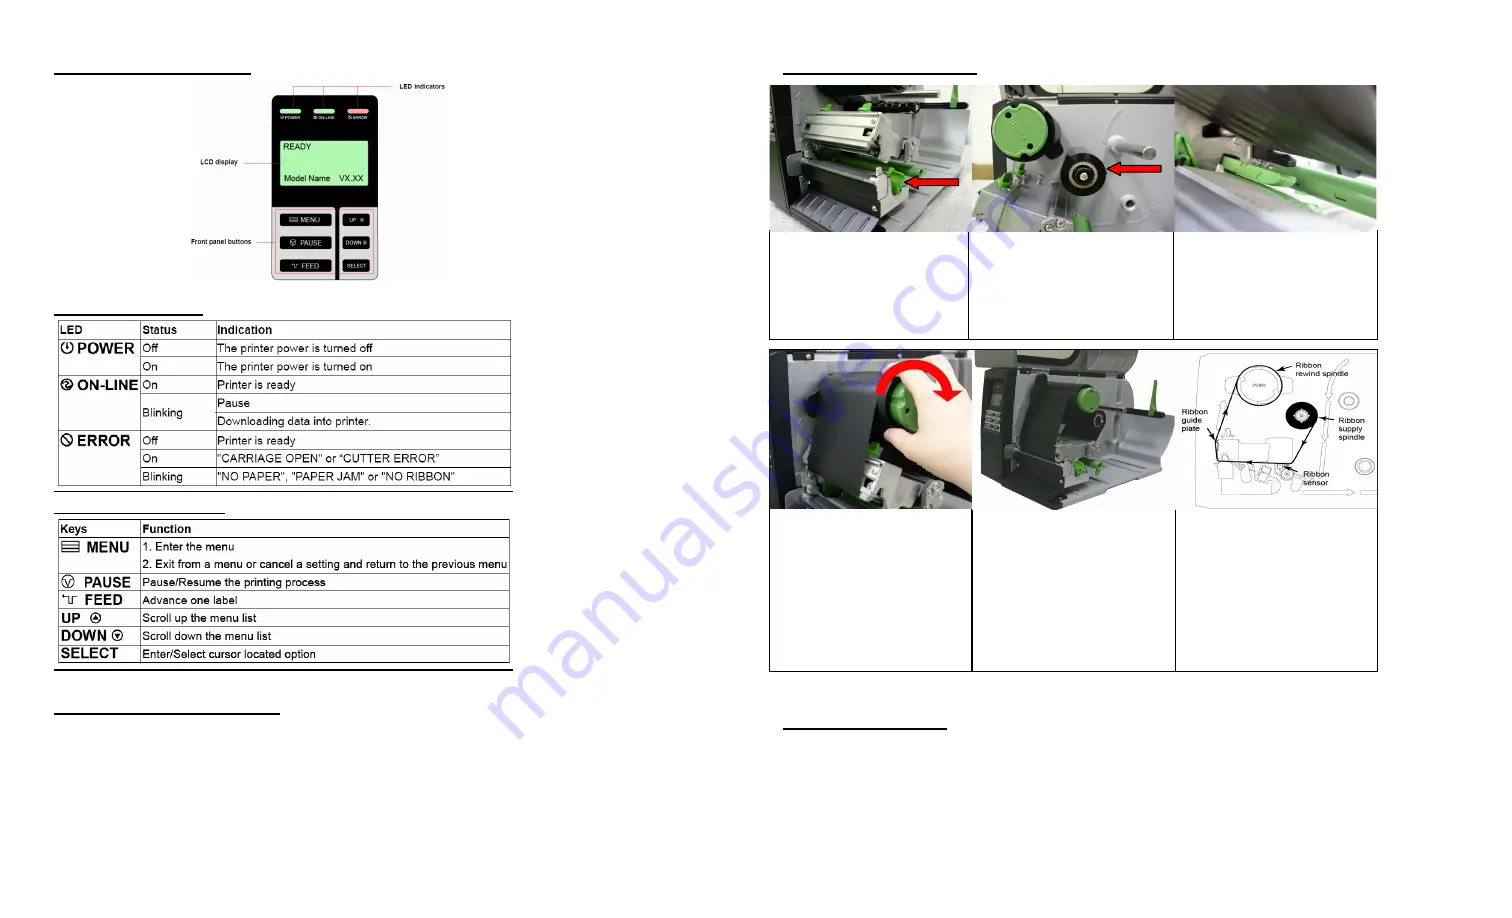
Front Panel Display 


LED Indicators 


Front Panel Keys 


Setting Up The Printer 

1.


Place the printer on a flat, secure surface. 

2.


Make sure the printers power is off.


3.


Plug the provided power cord into the AC power cord socket at the rear of the 

printer.  Plug the power cord into a properly grounded power outlet.


4.


Do not plug the printer into the PC at this time

 unless you are using the printers 

Ethernet connection for network printing applications. 

5.


Load ribbon and labels according to the following instructions.  

Ribbon Installation 


4. Wrap the ribbon onto 

the ribbon rewind spindle. 

Keep the ribbon flat and 
without wrinkles.  Wind 

the ribbon clockwise 3-5 

rotations onto the ribbon 
rewind spindle until it's 

smooth and there is 

tension on the ribbon. 

5. Close the print head 

mechanism making sure 

the latches are engaged 
properly.  You will hear the 

printhead click when 

locked in place.  You will 
need to apply some 

downward pressure to lock 

the printhead mechanism. 

Ribbon loading path. 


Ribbon Removal 

1.


Break the ribbon between the ribbon guide plate and the ribbon rewind spindle. 

2.


Push the ribbon release button to release the ribbon on the ribbon rewind spindle. 

3.


Slide of the ribbon from the ribbon rewind spindle and discard. 


1.  Lift open the 
printer's Media Door.  

Push the print head 
release lever to open 

the print head 
mechanism  


2. Install the ribbon 
onto the ribbon supply 

spindle. 

3. Thread the ribbon 
through the ribbon 

sensor slot and then 
through the open space 

in between the print 
head and platen. 

Summary of Contents for CB-1034

Page 1: ...face 5 A C Power 6 GPIO Interface 7 SD Card Slot 8 Ethernet Interface 9 PS 2 Interface 10 AC Power Switch 1 Ribbon take up spindle 2 Ribbon release button 3 Ribbon guide plate 4 Print head 5 Platen roller 6 Print head release lever 7 Media guide bar 8 Label roll guard 9 Label supply spindle 10 Ribbon supply spindle 11 Damper 12 Label guide 13 Z axis mechanism adjustment knob 14 Print head pressure...

Page 2: ... 5 rotations onto the ribbon rewind spindle until it s smooth and there is tension on the ribbon 5 Close the print head mechanism making sure the latches are engaged properly You will hear the printhead click when locked in place You will need to apply some downward pressure to lock the printhead mechanism Ribbon loading path Ribbon Removal 1 Break the ribbon between the ribbon guide plate and the...

Page 3: ...label roll guard horizontally to gently fit the width of label roll 4 Pull the label rolls leading edge forward over the media guide bar under the damper through the media sensor placing the label s leading edge onto the platen roller 5 Adjust the label guide to fit the width of the label 6 Close the print head mechanism making sure the latches are engaged properly You will hear the printhead clic...

Page 4: ...eagull Scientific BarTender UltraLite label creation software More Information about your Cub CB 1024 can be found in the User s Guide on the provided CB 1024 installation CD Network Printing The following steps are for network printing applications only When connecting your printer to the host PC via USB parallel or RS 232C interfaces these steps do not apply Viewing Network Status To view the cu...

Reviews: