background image

proGrAmmInG Your 

CoffeemAKer

1. Setting the Clock 

When the coffeemaker is plugged in, 12:00 will 

appear until you set the time.

Entering Time Set Mode

To set the time, hold down either the Hours or 

Minutes button until the clock begins flashing 

(about 2 seconds). You are now in the Time 

Set mode and can operate either button to 

achieve the desired setting. The buttons can 

be held down to scroll through the digits, or 

pressed and released lightly to advance one 

digit at a time. 
When scrolling, the numbers will advance 

slowly at first and then speed up to the rate  

of about three per second. When the number 

displayed approaches the desired setting, 

release the button and press repeatedly to 

advance one digit at a time. Be careful to 

make sure that “PM” is on if a PM time is 

desired.

Exiting Time Set Mode

The Time Set mode can be exited in  

one of two ways:
1.  Press any button besides the Hours or 

Minutes button. This will exit the Time Set 

and activate the selected function.

2.  Do nothing. If neither the Hours nor Min 

button is pressed for a period of five  

seconds, the Time Set mode will  

be exited.

2. Setting the Program Time

When you press the Program Set button,  

it displays the current program time  

(default time 12:00 p.m.). 

Entering Set Program Time Mode

Press and hold the Program button (about  

2 seconds) until the green light and LCD dis-

play begin to flash. This signals that you have 

entered the Set Program Time mode. The 

desired time can be set by pressing the Hours 

and Min buttons to scroll forward through the 

digits. Pressing and holding either button will 

allow you to scroll continuously, slowly at first, 

and then to accelerate to the rate of about three 

digits per second. As the desired time setting 

approaches, release the button and then press 

repeatedly to advance one digit at a time. 

The coffeemaker will start to brew at the  

programmed time. The Program mode cannot 

be entered if the coffeemaker is in its brew or 

keep warm cycle.

Exiting Set Program Time Mode

Set Program Time may be exited in any  

of three ways:
1.  Press the Program button. This will cause 

the coffeemaker to revert to its previous 

state. If it was Off, it will return to the Off 

position. If Programmed, it will revert to this 

state, and so on. This is a safety feature.

2.  Press any other button (except Hours  

or Min). Set Program Time will be exited 

and the function of that button will  

be executed.

3.  Do nothing. If neither the Hours nor  

Min button is pressed for a period of five 

seconds, the Set Program Time mode  

will be exited and the programmed setting 

will be in effect.

3. Programming  

Automatic Shutoff Time

The Automatic Shutoff Time can be pro-

grammed anywhere from immediate shutoff 

after completion of the brew cycle up to four 

hours. When the coffeemaker shuts itself off, 

two tones will sound. Two hours is the default 

time. The 0:00 setting shuts the unit off imme-

diately after brewing is complete. To check 

the current setting, press and hold the On/Off 

button and the Automatic Shutoff Time will be 

displayed.
To change the preset time, press and hold  

the On/Off button until the red power  

light and LCD display begin to flash.  

This signals that you have entered the  

Set Automatic Shutoff mode. 
Press the Hours and Min buttons  

to scroll forward through the digits until  

desired time appears. The first setting which 

appears is preset at 2:00. When it’s at 4:00, 

the next press key of Hour will roll back 

to 0:00, since four hours is the maximum 

Automatic Shutoff setting. Pressing and  

holding either button will allow you to scroll 

continuously, slowly at first, and then to  

accelerate to the rate of about three digits  

per second. As the desired time setting 

approaches, release the button and then press 

repeatedly to advance one digit at a time.
The Automatic Shutoff Time (ASO) may be  

8

Summary of Contents for DGB-475 - Corp 10 Cup Grind

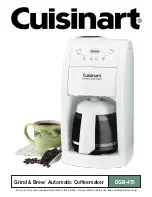
Page 1: ...Grind Brew Automatic Coffeemaker DGB 475 For your safety and continued enjoyment of this product always read the instruction book carefully before using ...

Page 2: ......

Page 3: ...n plug cord into the wall outlet To disconnect push the Off button then remove plug from wall outlet 12 Do not use appliance for other than intended use 13 Snap lid securely onto carafe before serving any beverages 14 Scalding may occur if the lid is removed during the brewing cycle 15 The glass carafe is designed for use with these appliances only It must never be used on the range top 16 Do not ...

Page 4: ... a polarized plug one blade is wider than the other To reduce the risk of electric shock this plug will fit into a polarized outlet only one way If the plug does not fit fully into the outlet reverse the plug If it still does not fit contact a qualified electrician Do not modify the plug in any way OPERATING NOTICE Clogging and backing up of water and or coffee in the filter basket can occur under...

Page 5: ...t can affect the final taste Can t wait for brewing to finish The Brew Pause feature lets you sneak a cup before the cycle is complete All of these features are designed to give you all you could want in a cup of coffee Only from Cuisinart Contents Important Safeguards 1 Operating Notice 2 Introduction 3 Unpacking Instructions 3 The Quest for the Perfect Cup of Coffee 4 Features and Benefits 5 Con...

Page 6: ...emperature since damaging condensation occurs every time the beans are removed from the freezer or refrigerator Note that some coffee experts advise against freezing dark roast beans because freezing can cause the oils to coagulate Other experts disagree We suggest you experiment and decide for yourself Element 3 Grind The grind is critical for proper flavor extraction If the grind is too fine ove...

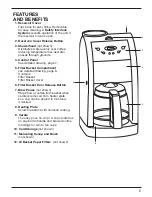
Page 7: ...g page 7 5 Filter Basket Compartment see detailed drawing page 6 Contains Filter Basket Filter Basket Cover 6 Filter Basket Door Release Button 7 Brew Pause not shown Stops flow of coffee from basket when carafe is removed from heater plate so a cup can be poured in mid brew if desired 8 Heating Plate Scratch resistant with nonstick coating 9 Carafe The easy pour no drip 10 cup carafe has an ergon...

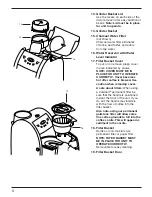
Page 8: ...RRECTLY Cover becomes hot after coffee is brewed Use caution when removing cover A note about filters When using a Cuisinart permanent filter be sure that the handle is positioned toward the front of the unit If you do not the handle may interfere with the flow of coffee into the filter basket Also note using our permanent gold tone filter will allow some fine coffee grounds to fall into the coffe...

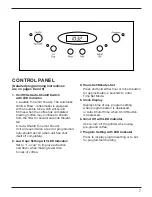
Page 9: ...uto shutoff period when unit has shut itself off completely 2 Low Cups Setting with LED Indicator Set to 1 4 cup to improve extraction and flavor when making fewer than 5 cups of coffee 3 Hours Set Minutes Set Press and hold either hour or minute button for approximately 2 seconds to enter Time Set Mode 5 Clock Display Displays time of day program setting when program button is depressed or Auto S...

Page 10: ...igit at a time The coffeemaker will start to brew at the programmed time The Program mode cannot be entered if the coffeemaker is in its brew or keep warm cycle Exiting Set Program Time Mode Set Program Time may be exited in any of three ways 1 Press the Program button This will cause the coffeemaker to revert to its previous state If it was Off it will return to the Off position If Programmed it ...

Page 11: ...ide of the unit directly under the water stream f Allow the filter to drain completely g Replace the water filter holder in the reservoir area of the coffeemaker pushing it all the way down to the base of the unit along the reservoir wall Note We recommend changing the water filter every 60 days or 60 uses more often if you have hard water Replacement water filters can be purchased in stores or by...

Page 12: ...ck to see that the Automatic Off Time is as you desire For information on these features see Programming Your Coffeemaker on page 8 6 Power Unit a Immediate grinding and brewing Press the on button The indicator will light and the process will begin b Programmed brewing Press the Program button The indicator will light and the display will show the pro grammed time for as long as the button is dep...

Page 13: ...by using the recessed area on each side of the lid Then remove grinder basket Open filter basket door Remove filter basket cover and filter basket The grinder basket grinder basket lid filter basket and filter basket cover can be washed in warm soapy water and rinsed thoroughly or cleaned in the upper rack of the dishwasher Dry all parts after every use Do not put any water in the unit once the gr...

Page 14: ...ever return of the product registration card does not eliminate the need for the consumer to maintain the original proof of purchase in order to obtain the warranty benefits In the event that you do not have proof of purchase date the purchase date for purposes of this warranty will be the date of manufacture If your Cuisinart Grind Brew Automatic Coffeemaker should prove to be defective within th...

Page 15: ...ons do not result in the appropriate relief to the consumer the consumer may then take the product to an independent repair facility if service or repair can be economically accomplished Cuisinart and not the consumer will be responsible for the reasonable cost of such service repair replacement or refund for nonconforming products under warranty California residents may also according to their pr...

Page 16: ...are and Savor the Good Life www cuisinart com Coffeemakers Food Processors Toaster Ovens Blenders Cookware Ice Cream Makers 2007 Cuisinart Cuisinart is a registered trademark of Cuisinart 150 Milford Road East Windsor NJ 08520 Printed in China 07CU26608 Any other trademarks or service marks referred to herein are the trademarks or service marks of their respective owners ...

Reviews: