background image

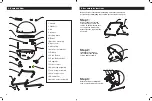
4. assembly instructions

Remove all the contents from packaging, and ensure all parts are 
present before attempting to assemble. (See Parts List on page 4)

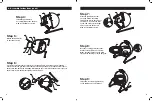
Step 3: 

Attach the leg assembly from  
step 1 onto the firebox as shown.

Step 1: 

Connect upper leg (H) and 
lower legs (I).  Secure with 
screws as shown.  Make sure 
to connect the match stick 
holder (L) to the leg assembly 
as shown.

Step 2: 

Install the Lid’s stopper 
(D) on the firebox (C) with 
screws (AA) as shown.

3. exploded View

1. Handle

2. Stand off

3. Lid

4. stopper

5.Cooking grate

6. Burner

7.Electrode assembly

8. Lid’s screw

9. Lid’s spring

10. Lid’s holder bracket

11. Firebox

12. Push Button

13. Push Button holder

14. Regulator

15. Lid’s stopper

16. Upper Leg assembly

17. Lower Leg assembly

18. Lower leg’s cover

19. Rubber feet

20. Match holder assembly

6

7

Summary of Contents for Searin CGG-049

Page 1: ...h water 5 Heated liquids remain at scalding temperatures long after the cooking process Never touch cooking appliance until liquids have cooled to 115ºF 45ºC or less m DANGER Failure to follow these instructions could result in fire explosion or burn hazard which could cause property damage personal injury or death m WARNING FOR OUTDOOR USE ONLY m This instruction manual contains important informa...

Page 2: ... Do not use gasoline kerosene or alcohol for lighting The LP gas cylinder must be constructed and marked in accordance with the specifications for propane gas cylinder of the U S Department of Transportation DOT m Do not move appliance when in use Allow the grill to cool to 115º 45 before moving or storing m Do not use the grill unless it is COMPLETELY assembled and all parts are securely fastened...

Page 3: ... off Firebox Lid stopper Push Button starter assembly Burner Electrode assembly Upper leg assembly Lower leg assembly Regulator Cooking Grates Match holder assembly M4x8 M6x12 M6x30 M6x60 M6 plastic washer M6 lock washer M6 metal washer M6 nut ...

Page 4: ...n Make sure to connect the match stick holder L to the leg assembly as shown Step 2 Install the Lid s stopper D on the firebox C with screws AA as shown 3 Exploded View 1 Handle 2 Stand off 3 Lid 4 stopper 5 Cooking grate 6 Burner 7 Electrode assembly 8 Lid s screw 9 Lid s spring 10 Lid s holder bracket 11 Firebox 12 Push Button 13 Push Button holder 14 Regulator 15 Lid s stopper 16 Upper Leg asse...

Page 5: ... Insert and screw the regulator J to the tubing end of the burner Step 4 Install the push button assembly E onto the firebox with screws AA as shown Step 7 Slide the ignition wire from the push button assembly through the hole in the front of the firebox Connect the wire to the end of the electrode G and secure it on the burner with screw AA as shown Step 5 Attach the handle A to the lid as shown ...

Page 6: ...grill Never fill the cylinder beyond 80 percent full If this instruction is not followed exactly a fire causing death or serious injury may occur Save the cylinder cap and reinstall when not in use Cylinder supply system must be arranged for vapor withdrawal Do not block the pressure relief valve during use or storage Always remove LP gas cylinder from grill when transporting and when not in use 5...

Page 7: ... grill when opening the grill lid Do not expose any part of your body directly above the cooking area The burner opening must be positioned properly over the valve orifices 6 Care And Maintenance 6 1 Care Regular care of your grill will help keep it operating properly All maintenance should be done only when the grill is cool and with the fuel supply turned off Occasionally inspect and tighten har...

Page 8: ...high enough temperature using LP bottle Be sure LP bottle still has fuel in it by gently shaking it there will be sounds of liquid inside if fuel remains Check to see that the venturi tube air inlet screen is not covered or clogged see Section 6 2 on page 11 Test gas system for leaks Section 5 4 page 9 Grill doesn t reach high enough temperature using 20lb LP tank with conversion hose Your LP tank...

Page 9: ...fulhamgroup com OR 1 866 994 6390 To order replacement parts or additional Cuisinart Grilling products visit us at www cuisinart com or contact us at grilling thefulhamgroup com OR 1 866 994 6390 Model CGG 049 North American Distributor The Fulham Group Newton MA 02466 16 ...

Reviews: