background image

4. 

อุปกรณ์ต่างๆ

1) 

ท่านต้องประกอบฝาครอบตัวเครื่องและ

โถปั่น


เครื่องจึงจะทำงาน

2)

หากท่านประกอบทั้งโถปั่นและทั้งชาม

ผสมอาหาร


ลงบนฐานเครื่องพร้อมกัน

โถปั่นน้ำผลไม้


จะทำงานเพียงเครื่องเดียว

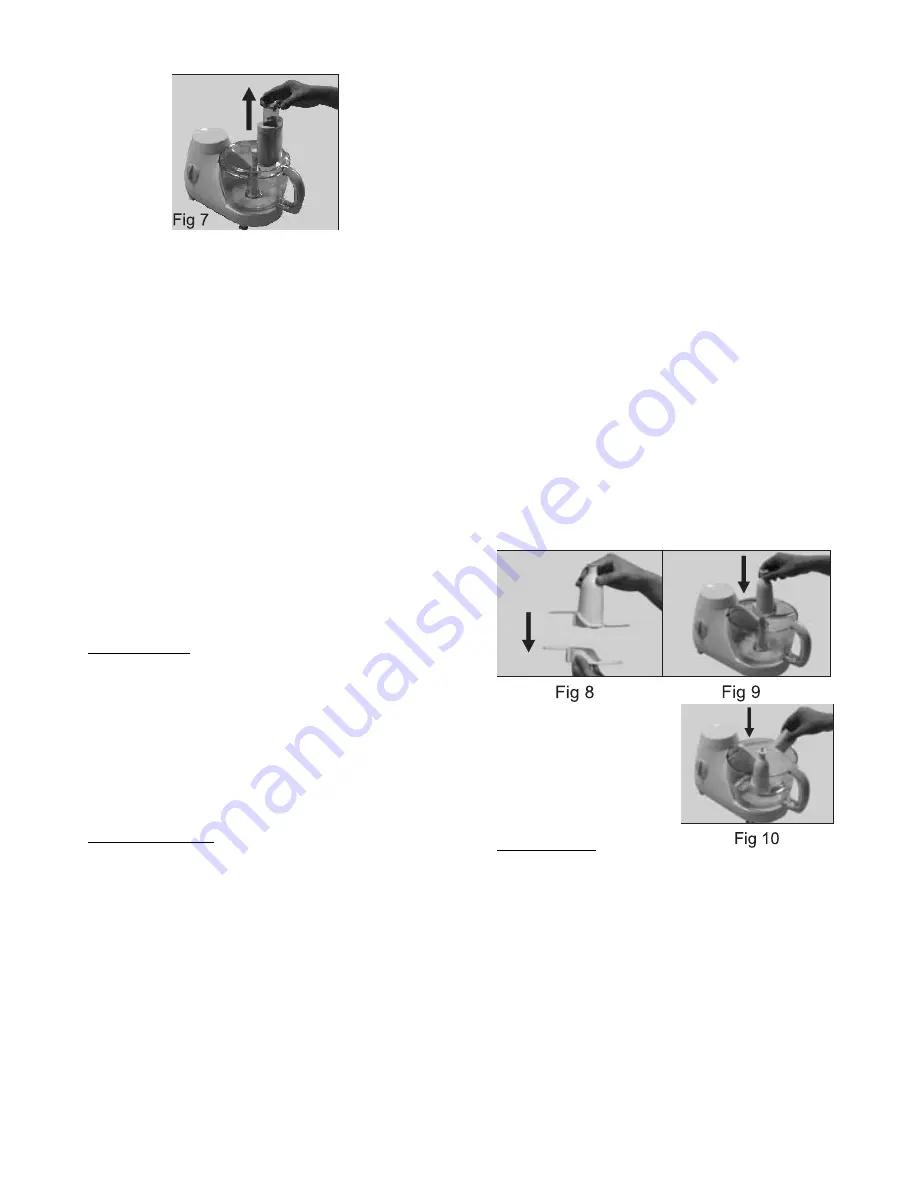
(fig.10)

ปิดฝาชามผสมอาหาร


ตามคำแนะนำ

ในหัวข้อ


การประกอบฝาชามผสมอาหาร

และใส่ก้านส่งอาหารไปที่ช่องลำเลียงอาหาร

หมุนปุ่มควบคุมการทำงาน


(F)

เพื่อ

ปรับระดับความเร็วของการปั่นตามความ
เหมาะสมของประเภทอาหารตามคำแนะนำ
ในตารางหน้า

 9 

หากท่านมีข้อสงสัยเกี่ยว

กับการเลือกระดับความเร็วของการปั่น
ให้หมุนเลือกระดับไปที่ระดับสูงสุดเสมอ

(

Max)

คำแนะนำและสูตรที่ระบุในตารางหน้า

 9

จะแล้วเสร็จในเวลาเพียง

 10-60 

วินาที

A.


ใบมีดตัว


“S” (N)

*

ระวัง

ขอบของใบมีดตัว


“S” 

มีความ

คมมาก

!

โดยเฉพาะอย่างยิ่งเมื่อต้องถอด

ใบมีดและในระหว่างการล้างทำความสะอาด

การใช้งาน

ใบมีดตัว


“S” 

เหมาะสำหรับการสับ

การผสมอาหาร


การปั่น


การทำซุปและ

เตรียมแป้ง


ขนมพัฟ


การตีละลายส่วนผสม

และการเตรียมแป้งอบ

Pastry

วิธีการใช้งาน

นำใบมีดตัว


“S”

ออกมาจากฝาครอบ

ป้องกันใบมีดตัว


“S”


ตามภาพ


(fig8)

ใส่ชามผสมอาหารเข้ากับตัวเครื่อง

ตามคำแนะนำในหัวข้อ


การประกอบชาม

ผสมอาหาร


จากนั้นสวมใบมีดตัว


“S”

เข้าไปที่แกนหมุนใบมีด

 (fig.9)

ใส่ส่วนผสมเข้าไปในชามผสมอาหาร

คำแนะนำ

1) 

หั่นอาหาร


ให้มีขนาดประมาณ

 3

x3x3

ซม

ก่อนใส่ในชามผสมอาหาร

2) 

เครื่องจะปั่นสับอาหารอย่างรวดเร็ว

ทำให้ประหยัดเวลามากขึ้น

3) 

ไม่ควรปล่อยให้เครื่องหมุนปั่นอาหาร

ทำงานติดต่อกันเป็นเวลานานเกินไป

4) 

หากมีอาหารติดบนใบมีดตัว


“S” 

หรือ

 5

Summary of Contents for rbsfooprep

Page 1: ......

Page 2: ...1...

Page 3: ...2 RBSFOODPREP 700 220 240 50 60 A B C D E F G H I J K L M N O P Q R S T U V W 1 5 S S 1 5 Cuizimate...

Page 4: ...3...

Page 5: ...4 1 D fig 1 H fig 2 2 I H fig 3 fig 4 3 1 fig 5 2 fig 6 3 4 fig 7...

Page 6: ...4 1 2 fig 10 F 9 Max 9 10 60 A S N S S Pastry S S fig8 S fig 9 1 3x3x3 2 3 4 S 5...

Page 7: ...F Off V B P Q R S T U U P Q R S T fig 11 Push up fig 12 fig 13 fig 14 fig 15 F Max F Med Low Push up fig 16 6...

Page 8: ...1 2 3 4 R French fry Fig 20 F Max 1 3 C M Fig 17 Fig 18 19 D C 1 2 3 4 80 7...

Page 9: ...5 1 5 6 7 8 3 Fig 21 Fig 22 Fig 23 Fig 24 25 Fig 26 F 1 2 8...

Page 10: ...9 Fig 27 Fig 28 1 2 3 4 5...

Page 11: ...2 10 Off 15...

Page 12: ...id is securely locked in place before operating appliance If you use the appliance without the blender the appliance will not function if the housing cap has not been screwed onto the attaching hole f...

Page 13: ...nual A B C D E F G H Blender stopper Blender Lid Blender jar Housing cap Housing Knob Driving Bowl Tip safety precautions I J K L M N O P Q R S T U V W Bowl lid Throat Pusher Pusher cup Kneading Acces...

Page 14: ...severe injury to persons or damage to the food processor A scraper may be used but must be used only when the food processor is not running Blades are sharp Handle carefully Instruction for use 13 To...

Page 15: ...Turn the lid with some force clockwise until the lid will not move any further and you hear a click fig 4 Make sure that the mark on the lid and the arrow on the bowl are directly opposite each other...

Page 16: ...control to the position indicated in the table and switch the application on If you have doubts about the correct speed always select the highest speed position3 Applications recipes mentioned in the...

Page 17: ...you want to cut soft vegetable or fruits you can also select a lower speed setting Press the ingredients slowly and steadily down with the pusher Press the side of the cutter that draw the word push...

Page 18: ...lug the appliance before you remove the blender jar from the housing 4 Do not fill the blender jar with ingredients that are hotter than 80 C 5 To prevent spilling do not put more than 1 5 liters of l...

Page 19: ...nd the bowl lid by twisting the lid until to its fixture in clockwise direction Switch on the appliance by setting the speed control to the recommended speed Tips 1 The opening in the lid can be used...

Page 20: ...ter each use Never immerse any part of the housing in water or other liquid 3 The bowl and lid may be washed by hand in hot soapy water Do not place in the dishwasher Do not use abrasives 4 Clean the...

Page 21: ...lly Damage or defect from misunderstand how to use or service from non authorized people Damage or defect from not follow this instruction manual Electrical shock or any electrical problem Warranty is...

Page 22: ......

Reviews: