background image

47

Protection Function

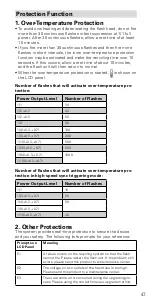
1. Over-Temperature Protection

•  To avoid overheating and deteriorating the flash head, do not fire 

more than 30 continuous flashes in fast succession at 1/1 full 

power. After 30 continuous flashes, allow a rest time of at least 

10 minutes.

•  If you fire more than 30 continuous flashes and then fire more 

flashes in short intervals, the inner over-temperature protection 

function may be activated and make the recycling time over 10 

seconds. If this occurs, allow a rest time of about 10 minutes, 

and the flash unit will then return to normal.

•  When the over-temperature protection is started,   is shown on 

the LCD panel.

Number of flashes that will activate over-temperature pro-
tection:

Power Output Level

Number of Flashes

1/1

30

1/2 +0.7

40

1/2 +0.3

50

1/2

60

1/4(+0.3,+0.7)

100

1/8(+0.3,+0.7)

200

1/16(+0.3,+0.7)

300

1/32(+0.3,+0.7)

500

1/64(+0.3,+0.7)

1000

1/128(+0.3,+0.7)

Number of flashes that will activate over-temperature pro-
tection in high-speed sync triggering mode:

Power Output Level

Number of Flashes

1/1

15

1/2(+0.3,+0.7)

20

1/4(+0.3,+0.7)

30

1/8(+0.3,+0.7)

1/16(+0.3,+0.7)

40

2. Other Protections

The system provides real-time protection to secure the device 

and your safety. The following lists prompts for your reference:

Prompts on 
LCD Panel

Meaning

E1

A failure occurs on the recycling system so that the flash 

cannot fire. Please restart the flash unit. If the problem still 

exists, please send this product to a maintenance center.

E2

The voltage on two outlets of the flash tube is too high. 

Please send this product to a maintenance center.

E3

There are some errors occurred during the upgrading pro-

cess. Please using the correct firmware upgrade method.

Summary of Contents for CUlight FR 36 C

Page 1: ...FR 36C für Canon ...

Page 2: ...z einfach die richtige Belichtung Dieses Blitzgerät verfügt über die folgenden technischen Eigenschaften LZ36 m ISO 100 105mm Volle Unterstützung der Canon E TTL II Blitztechnik In einer ka bellos gesteuerten Blitzgruppe als Master oder Slave Einheit verwendbar Mit eingebautem kabellosen 2 4 GHz Blitzfernsteuerungssys tem zur Übermittlung und zum Empfang von Daten Großer Funktionsumfang darunter m...

Page 3: ...innenliegenden elektrischen Komponenten Blitzen Sie mit diesem Gerät nicht direkt und in kurzer Distanz in die Augen insbesondere in die Augen von Babys Andern falls besteht das Risiko einer Augenschädigung Wenn Sie Auf nahmen von Babys machen halten Sie den Blitz mindestens einen Meter von ihnen entfernt Zur Minderung der Lichtinten sität wird außerdem ein indirektes Blitzen empfohlen Verwenden S...

Page 4: ...dvorausset zung dass sowohl die Kamera als auch das Blitzgerät ange schaltet sind Referenzseiten werden mit Seite angegeben Die folgenden Warnsymbole werden in dieser Anleitung ver wendet Das Symbol Vorsicht liefert zusätzliche Informationen Das Hinweissymbol deutet auf eine Warnung zur Vermeidung eines Aufnahmeproblems hin ...

Page 5: ...nkübertragung 2 4 GHz 13 Drahtloseinstellungen 13 Einstellen des Blitzmodus für das Master Gerät 13 Einstellen des Kommunikationskanals 14 TTL Vollautomatisches drahtloses Blitzen 15 M Drahtlos gesteuerte manuelle Blitzaufnahmen 16 Multi Drahtlos gesteuerte manuelle Blitzaufnahmen 16 Andere Anwendungen 18 Autofokus Hilfslampe 16 Indirekter Blitz 18 Spitzlichter kreieren 19 ZOOM Einstellen des Ausl...

Page 6: ...riefach 10 USB Schnittstelle Bedienelement 11 MODE Modus Auswahl taste 12 ZOOM Zoom Auswahl taste 13 SYNC Auswahltaste für die High Speed Synchro nisation 14 SLAVE Auswahltaste für das optische Auslösen des S1 S2 Slave Blitzes nicht im Drahtlosbetrieb 15 Ein Aus Schalter 16 Test Taste Blitzbereit schaftsanzeige 20 Einstellrad 21 SET Set Taste 01 02 09 03 04 05 06 07 10 08 13 14 15 20 21 12 11 16 ...

Page 7: ...Funkübertragung Master Einheit Zoom Zoom Anzeige Seite 19 TTL TTL Blitzautomatik High Speed Synchronisation Seite 10 Brennweite Seite 19 Blitzbelichtungs korrekturstufe Manuelle Blitzstärke M Manueller Blitz Multi Stroboskop Blitz Blitzfrequenz Anzahl Blitze Slave Auslöse gruppe Master Kanal Slave Einheit ...

Page 8: ...r RR 500C 4 CUlight Softbox Kit mit Blitzgerätehalter SB 40 40 Kit 5 CUlight Softbox Kit mit Blitzgerätehalter SB 60 60 Kit 6 CUlight Leuchtenstativ LS 2000 216 cm 7 CUlight Leuchtenstativ LS 2500 308 cm Befestigung auf der Kamera 1 Befestigen Sie den Kamera blitz auf der Kamera Schieben Sie den Kamera blitz vollständig in den Blitzschuh der Kamera 2 Sichern Sie den Kamera blitz Drehen Sie das Fes...

Page 9: ...oskop Im TTL Modus arbeiten die Kamera und der Blitz zu sammen um die korrekte Belichtung für den Bildgegenstand und den Hintergrund zu ermitteln In diesem Modus sind verschie dene TTL Funktionen verfügbar FEC HSS Synchronisation auf dem zweiten Verschlussvorhang usw Drücken Sie die Modus Auswahltaste MODE und es werden auf dem Display nacheinander für jedes Drücken drei verschiede ne Blitzmodi an...

Page 10: ...denpriorität arbeiten oder Portraits mit Aufhellblitz aufnehmen möchten Drücken Sie die Taste Drücken Sie die SYNC Taste um die High Speed Synchronisa tion zu aktivieren Bei der High Speed Synchronisation gilt je höher die Aus lösegeschwindigkeit desto kürzer die Blitzreichweite Der Mehrfach Blitz Modus kann im Modus High Speed Synchronisation nicht eingestellt werden Der Überhitzungsschutz aktivi...

Page 11: ...anuellen Blitzmodus M die Taste SLAVE da mit der Blitz als optisch gesteuerte S1 Sekundäreinheit mit opti schem Sensor arbeitet Mit dieser Funktion löst der Blitz genau dann aus wenn der Hauptblitz auslöst der Effekt ist also der glei che wie bei der Verwendung eines Funkauslösers Damit können verschiedene Lichteffekte kreiert werden Einstellung als optisch gesteuerte S2 Sekundäreinheit Drücken Si...

Page 12: ... Formel um die Be lichtungszeit zu berechnen und an der Kamera einzustellen Anzahl der Blitze Blitzfrequenz Belichtungszeit Wenn bspw die Anzahl Blitze auf 10 und die Auslösefrequenz auf 5 Hz eingestellt sind sollte die Belichtungszeit mindestens 2 Se kunden betragen Zur Vermeidung von Überhitzung und Schäden am Blitz kopf lösen Sie den Stroboskopblitz nicht mehr als 10 Mal hintereinander aus Lass...

Page 13: ... light Produkten kompatibel Als Master Einheit kann das CUlight FR 36C die folgenden Mo delle als Slave Einheiten steuern CUlight FR 60C CUlight RR 500C Als Slave Einheit kann das CUlight FR 36C von den folgenden Modellen als Master Einheit gesteuert werden CUlight FR 60C CUlight RT 500C Auch wenn mehrere Slave Einheiten zugeteilt werden kann die Master Einheit alle drahtlos steuern In dieser Bedi...

Page 14: ...ter Einheit AUS 1 Wenn der Blitz auf der Kame ra montiert ist verwenden sie die externe Speedlite Steue rung im Menü der Kamera 2 Schalten Sie das Master Blitzsteuerung auf der Kamera aus Das blinkt auf dem Display des CUlight FR 36C und die Master Blitzsteuerung ist ausgeschaltet Wählen Sie einschalten um das Aus schalten der Master Blitzsteu erung abzubrechen 4 Einstellen des Kommunikationskanal...

Page 15: ...r Einheit und die Slave Einheit en un terschiedliche Kanäle einge stellt sind stellen Sie sie auf denselben Kanal Seite 14 4 Positionieren Sie die Kamera und die Blitzgeräte Positionieren Sie die Kamera und die Blitzgeräte wie auf der Abbildung gezeigt Seite 17 5 Überprüfen Sie die Funkti onstüchtigkeit des Blitzes Drücken Sie die Test Taste an der Master Einheit Daraufhin wird die Slave Ein heit ...

Page 16: ...i Stroboskop Blitzes Halten Sie die MODE Taste 2 Sekunden lang ge drückt bis Multi ange zeigt wird Halten Sie die MODE Taste 2 Sekun den lang gedrückt um das Menü zu verlassen 2 Einstellen der Blitzstärke Blitzfrequenz Blitzzeiten Einstellen der Blitzstärke Blitzfrequenz Blitzzeiten in der A Gruppe Einstellen des Multi Blitzmodus sie he Seite 12 Die B und C Gruppen kön nen EIN AUS der Slave Ein he...

Page 17: ...onierung der Slave Ein heiten die Umgebung oder die Wetterbedingungen kür zer sein Die Übertragungsreichweite beträgt ca 30m Aufnahmen mit mehreren drahtlos gesteuerten Blitzgeräten Sie können die Slave Einheiten in zwei oder drei Gruppen auftei len und TTL Autoflash Aufnahmen bei gleichzeitiger Änderung des Blitzleistungsverhältnisses Faktor machen Außerdem kön nen Sie bei bis zu 3 Gruppen für je...

Page 18: ... Wand oder Decke richten wird der Blitz von der Oberfläche reflektiert bevor er den Bildgegenstand erhellt Dies kann die Schatten hinter dem Bildgegenstand wei cher werden und die Aufnahme natürlicher wirken lassen Dies wird als indirekter Blitz bezeichnet Zum Einstellen der Richtung des indirekten Blitzes drehen Sie den Blitzkopf in den gewünschten Winkel Wenn die Wand oder Decke zu weit entfernt...

Page 19: ...mit dem indi rekten Blitz auf die gleiche Weise vor ZOOM Einstellen des Ausleuchtbereichs und Verwenden der Streuscheibe Der Ausleuchtbereich kann manuell oder automatisch eingestellt werden Er kann entsprechend der eingestellten Objektivbrenn weite auf einen Wert von 24 bis 105 mm eingestellt werden Au ßerdem kann der Ausleuchtbereich von 14 mm Weitwinkelobjek tiven mit der eingebauten Streulicht...

Page 20: ...n stant bei 24 mm C Fn Einstellung der Benutzerfunktionen In der nachfolgenden Liste sind sowohl die verfügbaren als auch die nicht verfügbaren Benutzerfunktionen dieses Blitzgerätes aufgelistet C Fn Benutzerfunktionen Symbole der Be nutzerfunktionen Funktion Einstel lung Nr Einstellungen Beschreibung ST Automatischer Ruhemodus Standby EIN EIN AUS AUS AF AF Hilfslampe EIN EIN AUS AUS BL Regelung d...

Page 21: ...40 1 2 0 3 50 1 2 60 1 4 0 3 0 7 100 1 8 0 3 0 7 200 1 16 0 3 0 7 300 1 32 0 3 0 7 500 1 64 0 3 0 7 1000 1 128 0 3 0 7 Anzahl Blitze die eine Aktivierung des Überhitzungsschutzes im High Speed Synchronisation Auslösemodus zur Folge hat Ausgangsleistung Anzahl Blitze 1 1 15 1 2 0 3 0 7 20 1 4 0 3 0 7 30 1 8 0 3 0 7 1 16 0 3 0 7 40 2 Sonstige Schutzfunktionen Das System verfügt über einen Echtzeitsc...

Page 22: ...B Kabel ist nicht im Lieferumfang enthalten Bei der USB Schnittstelle handelt es sich um eine Standard Mikro USB Schnittstelle Ein handelsübliches USB Kabel kann verwendet werden Überprüfen der Version Drücken Sie die MODE Taste und schalten Sie dann den Blitz ein Dann wird die Updateversion der Firmware auf dem LCD Display angezeigt Version 1 0 wird bspw als U 1 0 angezeigt ...

Page 23: ...unde Synchronisati on auf dem ersten und zweiten Ver schlussvorhang Multi Blitz Möglich bis zu 90 Mal 90 Hz Drahtlos gesteuerte Blitzaufnahmen 2 4 GHz Funkübertragung Drahtlos Blitzfunktion Master Slave Aus Steuerbare Slave Gruppen 3 A B und C Sendereichweite ca 30 m Kanäle 16 1 16 Frequenzband 2 4 GHz max Sendeleistung 0 49 mW Autofokus Hilfslampe Effektive Reichweite ca Mitte 0 6 4 m Randbereich...

Page 24: ...n Wenn es als Slave Einheit eingestellt ist und 60 Minuten nicht verwendet wurde schaltet sich das Gerät in den Ruhemodus Drücken Sie eine beliebige Taste am Blitzgerät um es aufzu wecken Die Autozoom Funktion funktioniert nicht Der Kamerablitz ist nicht sicher auf der Kamera montiert Befestigen Sie den Blitzfuß des Blitzgerätes sicher auf der Kamera Die Aufnahme ist über oder unterbelichtet Sie v...

Page 25: ...ehmen Dieses Gerät erfüllt Teil 15 der FCC Bestimmungen Für den Betrieb gelten die folgenden beiden Bedingungen 1 Dieses Gerät darf keine schädli chen Interferenzen verursachen und 2 dieses Gerät muss empfan gende Interferenzen aufnehmen können auch Interferenzen die eventuell einen unerwünschten Betrieb verursachen Erklärung zu den FCC Grenzwerten für die Strahlenbelastung Dieses Gerät stimmt mit...

Page 26: ......

Page 27: ...FR 36C for Canon ...

Page 28: ...e a correct flash exposure even in complex light changing environ ments This camera flash features GN36 m ISO 100 105mm Fully support Canon E TTL II camera flash Workable as Master or Slave unit in a wireless flash group With built in 2 4GHz wireless remote system to support trans mitting and receiving Provided multiple functions include manual flash multi flash HSS up to 1 8000s second curtain sy...

Page 29: ... the flash directly into the eyes especially those of babies within short distances Otherwise visual impairment may occur When taking pictures for babies keep the flash unit at least 1 meter 3 3 feet away from them Using bounce flash to reduce light intensity is also recommended Do not use the flash unit in the presence of flammable gases chemicals and other similar materials In certain circumstan...

Page 30: ...assumption that both the camera and camera flash s power switches are powered on Reference page numbers are indicated by p The following alert symbols are used in this manual The Caution symbol gives supplemental information The Note symbol indicates a warning to prevent shooting prob lem ...

Page 31: ... 4G Transmission 39 Wireless Settings 39 Setting Group Unit s Flash Mode 40 Master Unit s Flash OFF 40 Setting the Communication Channel 40 TTL Fully Automatic Wireless Flash Shooting 41 M Wireless Flash Shooting with Manual Flash 42 Multi Wireless Flash Shooting with Manual Flash 42 Other Applications 44 Auto Focus Assist Beam 44 Bounce Flash 44 Creating a Catchlight 45 ZOOM Setting the Flash Cov...

Page 32: ...ing 09 Battery Compartment 10 USB Port Control Panel 11 MODE Mode Selection Button 12 ZOOM Zoom Selection Button 13 SYNC High Speed Sync Button 14 SLAVE S1 S2 Optic Slave Triggering Selection Button in non wireless mode 15 Power Switch 16 Test Button Flash Ready Indicator 20 Select Dial 21 SET Set Button 01 02 09 03 04 05 06 07 10 08 13 14 15 20 21 12 11 16 ...

Page 33: ...sion Shooting Master Unit Flash exposure compensation amount Zoom zoom display Page 45 TTL TTL autoflash High speed sync Page 36 Focus length Page 45 M Manual flash Manual flash output Multi Stroboscopic flash Flash frequency Number of flashes Slave Firing group Master Channel Slave Unit ...

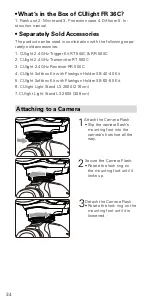
Page 34: ... CUlight 2 4 GHz Receiver RR 500C 4 CUlight Softbox Kit with Flashgun Holder SB 40 40 Kit 5 CUlight Softbox Kit with Flashgun Holder SB 60 60 Kit 6 CUlight Light Stand LS 2000 216 cm 7 CUlight Light Stand LS 2500 308 cm Attaching to a Camera 1 Attach the Camera Flash Slip the camera flash s mounting foot into the camera s hotshoe all the way 2 Secure the Camera Flash Rotate the lock ring on the mo...

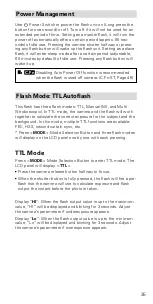
Page 35: ... camera and the flash will work together to calculate the correct exposure for the subject and the background In this mode multiple TTL functions are available FEC HSS second curtain sync etc Press MODE Mode Selection Button and three flash modes will display on the LCD panel one by one with each pressing TTL Mode Press MODE Mode Selection Button to enter TTL mode The LCD panel will display TTL Pr...

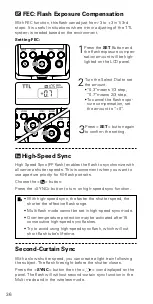
Page 36: ...camera shutter speeds This is convenient when you want to use aperture priority for fill flash portraits Choose the button Press the SYNC button to turn on high speed sync function With high speed sync the faster the shutter speed the shorter the effective flash range Multi flash mode cannot be set in high speed sync mode Over temperature protection may be activated after 15 consecutive high speed...

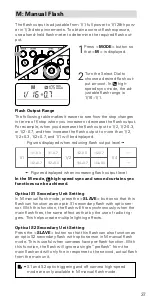
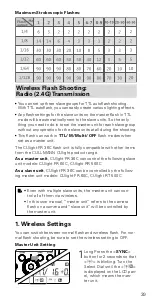
Page 37: ... 7 1 2 0 3 1 2 0 3 1 4 0 7 1 2 0 7 1 4 0 3 Figures displayed when increasing flash output level In the M mode high speed sync and second curtain sync functions can be achieved Optical S1 Secondary Unit Setting In M manual flash mode press the SLAVE button so that this flash can function as an optic S1 secondary flash with optic sen sor With this function the flash will fire synchronously when the ...

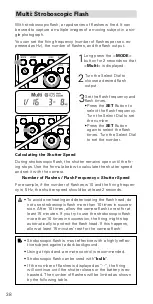
Page 38: ...he shutter speed and set it with the camera Number of Flashes Flash Frequency Shutter Speed For example if the number of flashes is 10 and the firing frequen cy is 5 Hz the shutter speed should be at least 2 seconds To avoid overheating and deteriorating the flash head do not use stroboscopic flash more than 10 times in succes sion After 10 times allow the camera flash to rest for at least 15 minu...

Page 39: ...h other items from the CULLMANN CUlight product range As a master unit CUlight FR 36C can control the following slave unit models CUlight FR 60C CUlight RR 500C As a slave unit CUlight FR 36C can be controlled by the follow ing master unit models CUlight FR 60C CUlight RT 500C Even with multiple slave units the master unit can con trol all of them via wireless In this user manual master unit refer...

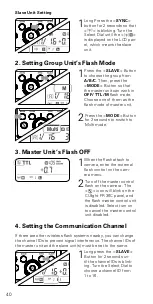
Page 40: ...r Unit s Flash OFF 1 When the flash attach to camera enter the external flash control on the cam era menu 2 Turn off the master control flash on the camera The icon will blink on the CUlight FR 36C panel and the flash master control unit is disabled Select turn on to cancel the master control unit disabled 4 Setting the Communication Channel If there are other wireless flash systems nearby you can...

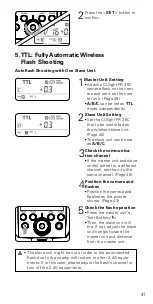
Page 41: ...eck the communica tion channel If the master unit and slave unit s are set to a different channel set them to the same channel Page 40 4 Position the camera and flashes Position the camera and flashes as the picture shows Page 43 5 Check the flash operation Press the master unit s Test Button Then the slave unit will fire If not adjust the slave unit s angle toward the master unit and distance fro...

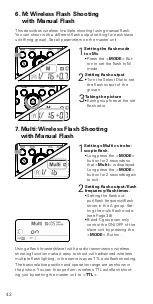
Page 42: ...flash Long press the MODE button for 2 seconds so that Multi is displayed Long press the MODE button for 2 seconds again to exit 2 Setting flash output flash frequency flash times Setting the flash out put flash frequency flash times in the A group Set ting the multi flash mode see Page 38 B and C group can only control the ON OFF of the slave unit by pressing the MODE Button Using a flash master ...

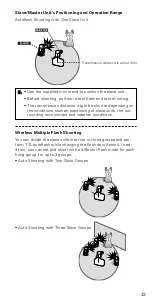
Page 43: ... conditions such as positioning of slave units the sur rounding environment and weather conditions Transmission distance is about 30m Wireless Multiple Flash Shooting You can divide the slave units into two or three groups and per form TTL autoflash while changing the flash ratio factor In ad dition you can set and shoot with a different flash mode for each firing group for up to 3 groups Auto Sho...

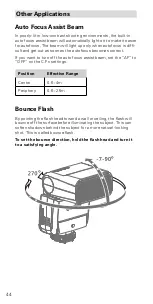
Page 44: ...us becomes correct If you want to turn off the auto focus assist beam set the AF to OFF on the C Fn settings Position Effective Range Center 0 6 4m Periphery 0 6 2 5m Bounce Flash By pointing the flash head toward a wall or ceiling the flash will bounce off the surface before illuminating the subject This can soften shadows behind the subject for a more natural looking shot This is called bounce f...

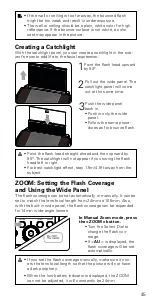
Page 45: ...e wide panel The catchlight panel will come out at the same time 3 Push the wide panel back in Push in only the wide panel Follow the same proce dures as for bounce flash ZOOM Setting the Flash Coverage and Using the Wide Panel The flash coverage can be set automatically or manually It can be set to match the lens focal length from 24mm to 105mm Also with the built in wide panel the flash coverage...

Page 46: ... can not be adjusted it will constantly be 24mm C Fn Setting Custom Functions The following table lists the available and unavailable custom functions of this flash C Fn Custom Functions Custom Func tion Signs Function Setting No Settings De scription ST Auto sleep standby ON ON OFF OFF AF AF assist beam ON ON OFF OFF BL Backlighting control 10 sec Off in 10 sec OFF Always off ON Always lighting 1...

Page 47: ...f Flashes 1 1 30 1 2 0 7 40 1 2 0 3 50 1 2 60 1 4 0 3 0 7 100 1 8 0 3 0 7 200 1 16 0 3 0 7 300 1 32 0 3 0 7 500 1 64 0 3 0 7 1000 1 128 0 3 0 7 Number of flashes that will activate over temperature pro tection in high speed sync triggering mode Power Output Level Number of Flashes 1 1 15 1 2 0 3 0 7 20 1 4 0 3 0 7 30 1 8 0 3 0 7 1 16 0 3 0 7 40 2 Other Protections The system provides real time pro...

Page 48: ... official website USB connection line is not included in this product The USB port is a standard Micro USB socket Common USB connection line is applicable Checking the version Press the MODE Button and the turn the flash on Then the firmware update version e g Version 1 0 will read U 1 0 will be displayed on the LCD panel ...

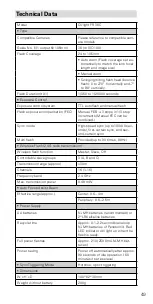
Page 49: ...ync and sec ond curtain sync Multi flash Provided up to 90 times 90Hz Wireless Flash 2 4G radio transmission Wireless flash function Master Slave Off Controllable slave groups 3 A B and C Transmission range approx 30m Channels 16 1 16 Frequency band 2 4 GHz Max transmission power 0 49 mW Auto Focus Assist Beam Effective range approx Center 0 6 4m Periphery 0 6 2 5m Power Supply AA batteries Ni MH ...

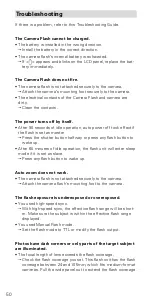
Page 50: ... halfway or press any flash button to wake up After 60 minutes of idle operation the flash unit will enter sleep mode if it is set as slave Press any flash button to wake up Auto zoom does not work The camera flash is not attached securely to the camera Attach the camera flash s mounting foot to the camera The flash exposure is underexposed or overexposed You used high speed sync With high speed s...

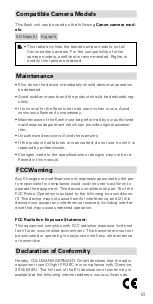
Page 51: ...on is subject to the following two conditions 1 This device may not cause harmful interference and 2 this device must accept any interference received including interfer ence that may cause undesired operation FCC Radiation Exposure Statement This equipment complies with FCC radiation exposure limits set forth for an uncontrolled environment This transmitter must not be colocated or operating in c...

Page 52: ...52 ...

Reviews: