background image

A. DETERMINE THE APPLIANCE LOCATION

The appliance can be located under a sink or in a basement

depending on space availability and the customer's preference.  If
a basement installation is selected, additional tubing, hardware
and fittings may be needed and a hole will have to be made from
inside the cabinet, through the floor, to the basement.  Never
install it in an area of the home where the temperature may drop
to freezing, because damage to the appliance may occur. It will
be important that appropriate, protected, electrical service be
available at the appliance location.  If not already available, make
sure to contract the necessary work prior to appliance installation.

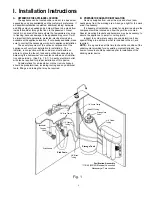
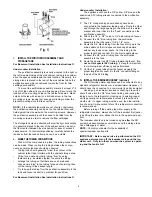
The exact placement of the various components of the

appliance will vary from installation to installation.  The
installer, in conjunction with the customer, must decide on
where to place the faucet, tank and purification assembly by
balancing the homeowner's convenience with ease of installa-
tion and servicing.  (See Fig. 1 & 7). A nearby electrical outlet
will also be required for proper installation of this device.

Considerations for an icemaker or other remote hookup

should be predetermined, including routing and any additional
tools, fittings, and tubing that may be required.

B. PREPARE THE AREA FOR INSTALLATION

Remove supplies from under the sink and stack them

neatly away from the working area. Arrange a light for the work
area, if necessary.

If a basement installation is called for, determine where the

components will be located and how they will be mounted.
Special mounting brackets and hardware may be necessary to
secure the appliance to a wall or ceiling joists.

Inspect the cold water supply line and determine if any

special fittings, in addition to what is included in the kit, are
required.

NOTE: 

It is a good idea at this time to check the condition of the

undercounter plumbing for any existing or potential leaks.  Any
items of concern should be repaired prior to installation of the
drinking water device.

I. Installation Instructions

3

Fig. 1

Storage Tank

Drain Saddle

Feedwater

Tapping

Valve

1/4” Orange

Tubing

3/8” Black

Tubing

3/8” Blue Tubing

1/4” Green Tubing

Red SFC Tubing

Storage Tank

Valve

3/8” Yellow

Tubing

Sink Drain

Purification Assembly

* 110/60 (220/50) Electrical Connection

Necessary at This Location

Summary of Contents for SQC Pro

Page 1: ...001 CUNO Incorporated 98 91220 0601 CUNO Incorporated 400 Research Parkway Meriden CT 06450 U S A Toll Free 1 800 733 1199 Worldwide 203 237 5541 Fax 203 238 8701 www waterfactorysystems com www cuno com ...

Page 2: ...aution The RO membrane cartridge is shipped with a preservative solution inside Make sure to flush it thoroughly as directed before the first use TABLE OF CONTENTS I Installation Instructions A Determine the appliance location 3 B Prepare the area for installation 3 C Prepare the appliance for installation 4 D Make the faucet mounting hole 4 E Mount the faucet 5 F Install the feed water tapping va...

Page 3: ...for proper installation of this device Considerations for an icemaker or other remote hookup should be predetermined including routing and any additional tools fittings and tubing that may be required B PREPARE THE AREA FOR INSTALLATION Remove supplies from under the sink and stack them neatly away from the working area Arrange a light for the work area if necessary If a basement installation is c...

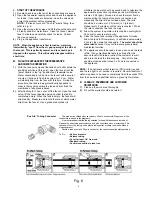
Page 4: ...ses by worn dur ing the sink hole drilling operations in order to prevent eye injury Before drilling the hole always check underneath the sink to ensure that nothing will interfere with mounting the faucet such as reinforcing ribs support brackets or the cabinet construction Stainless steel sink air gap or non air gap faucet Recommended tools Center punch Variable speed drill and high speed drill ...

Page 5: ...arb on the air gap faucet Push it on firmly until it seats 5 From above the sink counter top feed the air gap tubing and the threaded nipple through the faucet mounting hole and position the faucet spout over the sink 6 From below the sink countertop install the white spacer open side toward the air gap tubing flat washer and hex nut onto the threaded nipple and tighten it by hand 7 Back off on th...

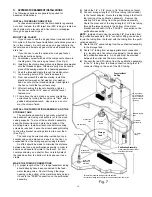
Page 6: ...the feedwater fitting See Fig 6 7 Connect one end of the orange tubing to the feedwater tapping valve using the brass compression nut insert in plastic sleeve See Fig 3 NOTE For basement installations the existing orange feed water tubing may have to be longer to reach the feedwater tap ping valve IMPORTANT Some local plumbing codes may prohibit the use of saddle type valves and or drain connectio...

Page 7: ...e pressure Remove the 1 piece from the tank fitting NOTE If an alternate storage tank is used it should be sani tized with household bleach 5 1 4 Use 3 ml 1 2 tea spoon of bleach for a 2 5 gallon tank 7 Reconnect the 3 8 yellow tubing to the back of the purification assembly Reconnect the 1 4 orange tubing to the feedwater fitting on the purification assembly IMPORTANT After the installation is co...

Page 8: ...tions O Undercounter Installation The appliance will have the 3 8 yellow 3 8 blue and the special red SFC tubing already connected to the purification assembly 1 The 1 4 orange tubing should already have been connected to the feedwater tapping valve Route the other end through the large opening in the bottom of the metal bracket and loop it back to the Feed connection on the purification assembly ...

Page 9: ...rs per minute x 0 38 gpd Proceed to check the reject flow by disconnecting the tubing at the drain connection and measuring the drip rate as outlined above The ratio should be a minimum of 2 5 reject to 1 product Repeat every 5 minutes until the rate is constant When the rate is constant the tank is empty 3 Allow the system to operate in this condition overnight or 24 hours to ensure water purity ...

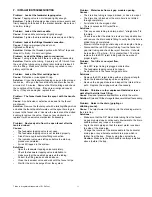
Page 10: ...spended from the ceiling supports using brackets An effort should be made to minimize the distance between the tank and purification assembly in order to ensure an adequate flow rate to the faucet For hori zontal positioning on a shelf or floor carefully detach the tank base from the bottom of tank and use it as a cradle MAKE THE TUBING CONNECTIONS 1 A proper length of the 1 4 orange feedwater tub...

Page 11: ...e feedwater tapping valve completely Check the feedwater tapping valve installation to make sure that the needle has pierced the tubing Correct the fitting leak as outlined above Close the icemaker valve and wait until the faucet drips Wait for the air to be purged from the system Problem Water leaks from air gap module opening Causes The drain line tubing is looped kinked or has a low spot The dr...

Page 12: ...ter requires changing As a rule private wells require more frequent sediment prefilter changes while softened feed water usually requires only yearly replacement Recommended maximum sediment or sediment carbon prefilter service life is one year When to Replace the Carbon Postfilter Cartridge If the filter is being used to control tastes and odors replace it every year If the filter is being used t...

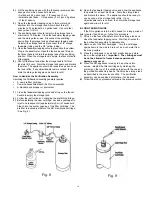
Page 13: ...t will go Line up the cartridge ears insert the cartridge and push it into the head until it is fully seated Twist the cartridge 1 4 turn counterclockwise to lock it into place 10 Open the feedwater tapping valve plug in the transformer and carefully check for leaks Carefully inspect the fitting at the bottom of the new RO membrane cartridge 11 Follow the sanitizing procedure for the storage tank ...

Page 14: ...pping valve and lift up on the faucet handle to empty the storage tank 2 Follow the instructions on changing the prefilter cartridge 3 Before installing the new cartridge use and eyedropper to inject one teaspoonful approximately 5 ml of household bleach into the center opening of the filter cartridge The prefilter is located just before the RO membrane cartridge See Fig 9 4 Open the feedwater tap...

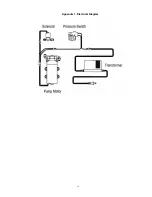
Page 15: ...Appendix 1 Electrical Diagram 15 ...

Reviews: