background image

DEUTSCH

d-42

M1058-0

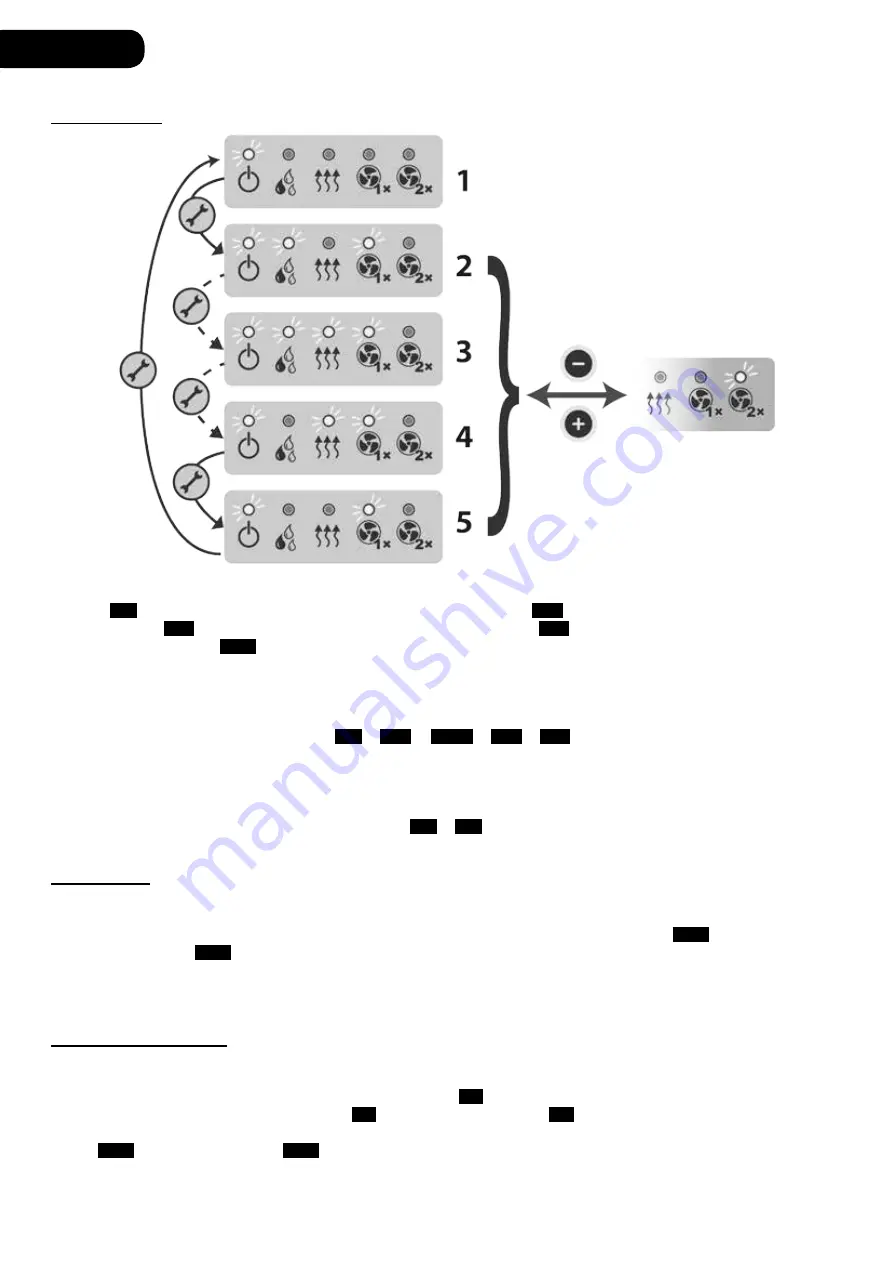
Betriebsarten

Abb.5 – Sequenz Betriebsarten

  1.  Aus (

OFF

)

  2.  Entfeuchten (

d.  

)

  3.  Entfe Heizen (

d.r.

 )

  4.  Heizen (

r.  

)

  5.  Lüftung (

F.  

)

Durch Drücken der Taste Betriebsart werden die Betriebsarten durchgeblättert. Die Betriebsarten mit Heizfunktion werden nur 

dann angezeigt, wenn die Brücke (2b) wie auf Abbildung 2 positioniert ist. Beim Umschalten von einer Betriebsart auf die nächste 

blinkt die Bezeichnung der Betriebsart, die aktiviert wird, einige Sekunden lang auf dem Display:

Off

 -> 

d.  

 ->  

d.r. 

 -> 

r.  

 -> 

F.  

Durch Drücken der Tasten T1 und T3 in den Betriebsarten 2 bis 5 kann die Geschwindigkeit vom Gebläse eingestellt werden. Die 

Geschwindigkeitsstufe 1 ist die ideale Geschwindigkeit für das Entfeuchten. Die Geschwindigkeitsstufe 2 kann schneller oder 

langsamer als die Geschwindigkeitsstufe 1 sein, je nach Modell.

Bei Gerätebetrieb werden auf dem Display abwechselnd die Luftfeuchtigkeit und die Temperatur angezeigt:

hxx

 -> 

tzz

Je nach gewählter Betriebsart können der Setpoint der Feuchtigkeit, der Setpoint der Temperatur oder beide geändert werden.

Entfeuchten

Das Gerät läuft in der Standardbetriebsart und entfeuchtet die Raumluft.

Zum Ändern vom Setpoint der Feuchtigkeit wie folgt vorgehen:

•  Die Taste T2 2 Sekunden lang gedrückt halten, um den Parameter Feuchtigkeit aufzurufen. Es wird 

h.xx

 angezeigt und die 

Anzeige blinkt (z.B. 

h.45

).

•  Den Wert der Feuchtigkeit mit den /- ändern. Der Wert kann in einem Bereich von 40 bis 90 eingestellt werden.

•  Die Taste T2 2 Sekunden lang drücken, um den geänderten Wert zu speichern, oder aber eine Minute lang abwarten, um den 

Programmierungsmodus zu verlassen, ohne die Änderungen zu speichern.

Entfe Heizen

Das Gerät funktioniert sowohl als Luftentfeuchter als auch als Heizung.

Zum Ändern vom Setpoint der Feuchtigkeit und der Temperatur wie folgt vorgehen:

•  Die Taste T2 2 Sekunden lang gedrückt halten. Es wird der Wert 

h. 

 angezeigt und die Anzeige blinkt.

•  Durch Drücken der /- kann zwischen 

h. 

 (Setpoint Feuchtigkeit) und 

t. 

 (Setpoint Temperatur) hin- und hergeschal-

tet werden. Zum Einstellen vom Setpoint die Taste T2 drücken. Es wird folgender Wert angezeigt:

• 

h.xx

 für die Luftfeuchtigkeit (

h.60

 zeigt z.B. an, dass der aktuelle Setpoint 60% ist).

Summary of Contents for F8035

Page 1: ...SPW 32 SPW 46 SPW 72 I DEUMIDIFICATORE PER PISCINE GB SWIMMING POOL DEHUMIDIFIER F DÉSHUMIDIFICATEUR POUR PISCINES D SCHWIMMBADENTFEUCHTER ...

Page 2: ......

Page 3: ...cheda di potenza 2 Ponte riscaldamento 2a Ponte macchina standard 2b Ponte macchina con accessori di riscaldamento 3 Scheda di comando 4 Sensore umidità e temperatura ambiente 5 Sonda di temperatura sbrinamento 6 Compressore 7 Ventilatore 8 Valvola riscaldamento acqua opzionale 9 Resistenza riscaldamento opzionale 10 Protezione linea non fornita ...

Page 4: ...sull utiliz zo corretto dell apparecchiatura da una persona responsabile per la loro incolumità Tenere fuori dalla portata di bambini e animali Non utilizzare questo apparecchio in luoghi dove ci sia il pericolo di esplosioni Tenere sempre libere le griglie di ingresso e di uscita dell aria Non inserire alcun oggetto estraneo all interno dell apparecchio Nel caso fosse necessario intervenire sulla...

Page 5: ...namento Quando la temperatura ambiente è inferiore a 16 C circa si può formare sull evaporatore del ghiaccio la scheda elettronica provvede in modo completamene automatico all eliminazione del ghiaccio eseguendo un ciclo di sbrina mento Per un corretto funzionamento dell apparecchio è necessario attenersi scrupolosamente alle indicazioni d installazione di seguito riportate Posizionamento Rispetta...

Page 6: ...sioni riportate in figura La posizione della staffa è determinante al fine della corretta corrispondenza dei fori di aspirazione e di mandata dell aria Utiliz zare la staffa come dima per segnare i fori quindi fissare con le viti in dotazione Assicurarsi che il muro sia in grado di sostenere l apparecchio in condizioni operative eseguire sul muro n 5 fori Ø8 profondi 45mm pulire l interno dei fori...

Page 7: ...la piastra del compressore sul lato destro Altri punti del telaio vanno comunque bene per il sollevamento l importante è non esercitare alcuna forza sulle parti del circuito frigorifero Per posizionare il deumidificatore seguire i seguenti passi Sollevare il deumidificatore Portare il deumidificatore adiacente alla parete premere il deumidificatore contro la parete in modo da deformare le guaine m...

Page 8: ...io compressore Per l imballo e il trasporto il compressore viene fissato al telaio mediante speciali staffe che devono essere rimosse prima di mettere in funzione la macchina mollare e rimuovere le due viti V fissate posteriormente al telaio rimuovere la staffa anteriore S1 rimuovere la staffa S2 posizionata dietro al compressore S S Conservare le staffe e le viti in modo da poterle riutilizzare q...

Page 9: ...ite un interruttore di comando dotato di protezione non fornito La scheda è alloggiata all interno della scatola Sp Rimuovere il coperchio della scatola Sp utilizzare il foro B per far entrare il cavo di alimentazione nella macchina arrivare all interno della scatola Sp attraverso il pressacavo P collegare il filo di terra al morsetto unipolare volante collegare i fili ai morsetti L e N serrare il...

Page 10: ...nferiore del telaio dove sono posizionati i punti di aggancio prima di chiudere completamente il cofano collegare il filo di terra al terminale che si trova nella zona indicata in figura montare le due viti V di bloccaggio e serrare Il pannello di comando S1 Spia ON S2 Spia deumidificazione S3 Spia riscaldamento S4 Spie velocità ventilatore S5 Spia sbrinamento T1 Tasto decremento T2 Tasto funzione...

Page 11: ... umidità il set point temperatura oppu re entrambi come di seguito spiegato Deumidificazione La macchina lavora in modo standard e fa deumidificazione Per modificare il set point umidità tenere premuto il tasto T2 per 2 secondi per accedere al parametro umidità viene visualizzato h xx lampeggiante ad esempio h 45 Premere i tasti e per modificare il valore dell umidità i valori vanno da 40 a 90 Pre...

Page 12: ...curezza resistenza aperto Tab 3 Elenco segnalazioni errori S S Questi errori comportano lo spegnimento automatico del deumidificatore in ogni caso bisogna richiedere l intervento di personale specializzato che sia in grado di aprire il deumidificatore ed eventualmente individuare e sostituire i componenti difettosi Smaltimento del prodotto INFORMAZIONE AGLI UTENTI Ai sensi dell art 13 del Decreto ...

Page 13: ...rences 1 Power supply board 2 Heating bridge 2a Bridge standard machine 2b Bridge machine with heating accessories 3 Control board 4 Room Humidity and temperature probe 5 Defrost temperature probe 6 Compressor 7 Ventilator 8 Water heating solenoid valve optional accessory 9 Heating resistance optional accessory 10 Electrical line protection not supplied ...

Page 14: ...y a person responsible for their safety Keep out of reach of children and animals Do not use the appliance in places where there is a danger of explosions Always keep free air inlet grille and air outlet grille Do not insert any strange objects into the appliance In case you need to work into the machine be sure that after the work is completed to not leave any tools inside the unit before putting...

Page 15: ...below 16 C ice can form on the evaporator the electronic Board authomatically detects it and performs a defrost cycle eliminating it when necessary For a correct operation of the appliance it is necessary to observe the installation instructions below Positioning A B C D 840 500 800 800 Tab 2 Minimum distances Installation For a correct installation follow the sequence of operations described belo...

Page 16: ...e ones described on the picture The bracket position is essential for the correct positioning of the air outlet hole and the air inlet hole Use the bracket as a template for the holes than use the supplied screws to secure it Make sure that the wall is capable of supporting the appliance in working condition Make on the wall nr 4 x Ø8 holes deep 45 mm clean the inside of the holes ...

Page 17: ...the compressor plate on the right side Other points of the frame should be good for lifting the important thing is to not exert any force on the parts of the cooling circuit To position the dehumidifier follow the steps below Lift the dehumidifier Carry it adjacent to the wall Pull the dehumidifier to the wall so that the sheaths on the holes are deformed and then let it go down slowly Check that ...

Page 18: ...fixed to the frame by special brackets which must be removed before oper ating the machine loosen and remove the two screws V attached posteriorly to the frame remove the front bracket S1 remove the bracket S2 positioned behind the compressor S S Store the brackets and screws so you can reuse them if you need to move the dehumidifier ...

Page 19: ... terminals L N power adapter via a control switch with protection not supplied The electronic board is placed inside the box Remove the lid of the box Sp use the B hole to let the power cord in the machine get inside the box through the cable gland Sp P connect the ground wire to the free pole clamp connect the wires to the terminals L and N tighten the cable gland P If installing the optional hea...

Page 20: ...l the bottom of the frame where are located the hang points before fully close the hood connect the ground wire to the Terminal located in the area shown in the picture fit the two clamping screws V and tighten The control panel S1 ON Light S2 dehumidification on light S3 heating Lamp S4 fan speed lights S5 defrost light T1 Decrement key T2 function key T3 increment Key D 3 digit Display ...

Page 21: ...ehumidification The machine works in standard mode and dehumidify To change the humidity setpoint Press and hold down key T2 for 2 seconds to enter the humidity parameter h xx appears flashing e g h 45 Press the and keys to change the humidity value values range from 40 to 90 Press T2 for 2 seconds to save value or wait for one minute to exit without saving the new values Dehumidification heating ...

Page 22: ...dity and temperature probe is disconnected or broken E01 resistance safety thermostat open Tab 3 Error reports list S S These errors lead to automatic shut down of the dehumidifier in any case you have to request the intervention of specialized personnel that is able to open the dehumidifier and possibly locate and replace the defective parts Disposal of the product INFORMATION FOR USERS Applicabl...

Page 23: ...férences 1 Carte de puissance 2 Pont chauffage 2a Pont machine standard 2b Pont machine avec accessoires de chauffage 3 Carte de commande 4 Capteur d humidité et température ambiante 5 Sonde de température dégivrage 6 Compresseur 7 Ventilateur 8 Vanne chauffage eau option 9 Résistance chauffage option 10 Protection ligne non fournie ...

Page 24: ...sances insuffisantes à moins d avoir reçu des informations correctes sur l utilisation de l appareillage par une personne respon sable pour leur sécurité Garder hors de la portée des animaux et des enfants Ne pas utiliser cet appareil dans des endroits où existe un danger d explosion Ne rien mettre sur les grilles d entrée et de sortie de l air Ne mettre aucun objet à l intérieur de l appareil S i...

Page 25: ...température ambiante est inférieure à environ 16 C de la glace peut se former sur l évaporateur la carte électronique permet d éliminer de manière complètement automatique la glace moyennant un cycle de dégivrage Pour que l appareil fonctionne correctement suivre avec attention les indications d installation reportées ci après Positionnement Respecter les mesures minimales reportées ci après A B C...

Page 26: ...sible les dimensions indiquées sur la figure La position de la bride est déterminante pour la correspondance correcte des trous d aspiration et de refoulement de l air Utili ser la bride comme gabarit pour marquer les trous puis fixer avec les vis fournies Contrôler si le mur est en état de soutenir l appareil en exercice faire 5 trous Ø8 de 45mm de profondeur nettoyer l intérieur des trous ...

Page 27: ...ur à droite voir Fig 7 D autres parties du châssis peuvent également être utilisées pour le levage l important c est de n exercer aucune force sur les parties du circuit frigorifique Pour positionner le déshumidificateur suivre les étapes suivantes Soulever le déshumidificateur Amener le déshumidificateur adjacent au mur Presser le déshumidificateur contre le mur de façon à déformer les gaines mon...

Page 28: ...ixation du compresseur Pour l emballage et le transport le compresseur est fixé au châssis à l aide d étriers spéciaux qui doivent être enlevés avant de mettre la machine en marche Desserrer et déposer les deux vis en V fixées à l arrière du châssis déposer l étrier avant S1 déposer l étrier S2 placé derrière le compresseur S S Conserver les étriers et les vis pour pouvoir les réutiliser s il sera...

Page 29: ...N de la carte de puissance moyennant un interrupteur de commande pourvu de protection non fourni La carte se trouve à l intérieur du boîtier Sp Déposer le couvercle du boîtier Sp se servir du trou B pour faire entrer le câble d alimentation dans la machine arriver à l intérieur du boîtier Sp par le passe fil P raccorder le fil de la terre au bornier unipolaire volant raccorder les fils aux bornier...

Page 30: ...ù se trouvent les points d accrochage avant de refermer complètement le capot raccorder le fil de la terre au terminal qui se trouve dans la zone indiquée sur la fig 11 monter les deux vis en V de blocage et serrer Le panneau de commande Fig 3 Le panneau de commande S1 Voyant ON S2 Voyant déshumidification S3 Voyant chauffage S4 Voyants vitesse ventilateur S5 Voyant dégivrage T1 Touche diminution ...

Page 31: ...ent sélectionné il sera possible de modifier le set point humidité le set point température ou bien les deux Déshumidification La machine travaille en mode standard et fait de la déshumidification Pour modifier le set point humidité appuyer sur la touche T2 pendant 2 secondes pour accéder au paramètre humidité h xx s affiche en clignotant par exemple h 45 Appuyer sur les touches et pour modifier l...

Page 32: ...r l écran L état d erreur s accompagne du clignotement des voyants de contrôle ntc Capteur de température désactivé ou cassé SEn Sonde d humidité et température désactivée ou cassée E01 Thermostat de sécurité résistance ouvert Tab 3 Liste signalisation erreurs S S Ces erreurs entraînent l extinction automatique du déshumidificateur dans tous les cas il faut de mander l intervention de personnel sp...

Page 33: ...it Heizfunktion Legende 1 Leistungsplatine 2 BrückeHeizung 2a Brücke Standardausführung 2b Brücke mitHeizfunktion 3 Steuerkarte 4 SensorLuftfeuchtigkeitundRaumtemperatur 5 SondeAbtautemperatur 6 Kompressor 7 Gebläse 8 VentilHeizungWasser Optional 9 Heizaggregat Optional 10 Schutzschalter nichtmitgeliefert ...

Page 34: ...rsiewurdevoneinerPerson diefürihre Unversehrtheitverantwortlichist indenkorrektenGebrauchdesGerätseingewiesen DiesgiltauchfürKinder VorKindern undTierensicheraufbewahren DasGerätdarfnichtanStandortenverwendetwerden andenenExplosionsgefahrbesteht DieLüftungsgitteranderAnsaugöffnungundderAusgabeöffnungmüssenimmersauberseinunddürfennichtabgedeckt werden KeineGegenständeindasGerätstecken WennEingriffe...

Page 35: ...mtemperaturunterca 16 Csinkt kannsichamVerdampferEisbilden DieelektronischeKarteverfügtübereine vollautomatischeAbtaufunktion dieeinenAbtauzyklusstartet umdasEiszuentfernen FüreinenkorrektenGerätebetriebmüssendiefolgendenInstallationsanweisungenstriktbeachtetwerden Positionierung DiefolgendangegebenenMindestmaßemüssenbeachtetwerden Abb 3 Positionierung A B C D 840 500 800 800 Tabelle 2 Mindestabst...

Page 36: ...glich beachtetwerden DiePositionderBügelistzweckseinerkorrektenÜbereinstimmungder Ansaug und Zufuhrluftbohrungenausschlaggebend DieBügelalsSchablonefürdieMarkierungderBohrungenverwendenunddannmitdenmitgeliefertenSchraubenfestschrau ben Sicherstellen dass die Wand in der Lage ist das Gerät wenn es in Betrieb ist zu tragen AnderWand5BohrungenØ8Tiefe45mm DasBohrungsinnerereinigen ...

Page 37: ...tes dürfen keinesfalls die Rohre des Kühlungskreises berührt sondern der sich auf der linken Maschinensei te befindenden Griff und die Kompressorenplatte auf der rechten Seite verwenden Auch sonstige Rah menstellen können für die Hochhebung benutzt werden wichtig ist nur dass die Teile des Kühlungskrei ses nicht beansprucht werden FürdiePositionierungdesEntfeuchtungsgerätsmüssenfolgendeSchrittebea...

Page 38: ...andieWandundandieGerätestruk turmitdendafürbestimmtenSchraubenbefestigtwerden Entfernung der Bügel für die Kompressorbefestigung FürdieVerpackungunddenTransportwirdderKompressorandenRahmendurchSonderbügelbefestigt die vorderInbetrieb nahmederMaschine entferntwerdenmüssen DiehinterdemRahmenbefestigtenV Schraubenlösenundentfernen DenVorderbügelS1beseitigen DenBügelS2hinterdemKompressorentfernen S S ...

Page 39: ...tedurcheinenmit einerSchutzhülleausgestattendenBedienungsschalter nichtgeliefert angeschlossenwerden DieLeistungsplattebefindetsich innerhalbderAnschlussdoseSp DenDeckelderAnschlussdoseSpentfernen DurchdieBohrungBdasVersorgungskabelderMaschineziehen DasInnerederAnschlussdoseSpüberdie KabelpressePerreichen DieErdungsleitungandiefreiliegendeeinpoligeKlemmeverbinden DieKabelandenKlemmenLundNanschließ...

Page 40: ...astungsstellenbefinden Bevor dasGehäusevollständiggeschlossenwird mussdasErdungskabelandas inderAbbildungdargestellteEndstückange schlossenwerden DiebeidenV Schraubenansetzenundfestanziehen Bedienpanel Abb 4 Bedienpanel S1 KontrollleuchteON S2 KontrollleuchteLuftentfeuchter S3 KontrollleuchteHeizung S4 KontrollleuchtenGeschwindigkeitGebläse S5 KontrollleuchteAbtauen T1 TasteAbnahme T2 TasteBetrieb...

Page 41: ...SetpointderFeuchtigkeit derSetpointderTemperaturoderbeidegeändertwerden Entfeuchten DasGerätläuftinderStandardbetriebsartundentfeuchtetdieRaumluft ZumÄndernvomSetpointderFeuchtigkeitwiefolgtvorgehen DieTasteT22Sekundenlanggedrückthalten umdenParameterFeuchtigkeitaufzurufen Eswirdh xxangezeigtunddie Anzeigeblinkt z B h 45 DenWertderFeuchtigkeitmitdenTasten ändern DerWertkannineinemBereichvon40bis90...

Page 42: ...derAbtauzyklusamLuftentfeuchterläuft schaltetsichdiegelbeKontrollleuchteS5ein Fehlermeldungen FolgendeFehlermeldungenkönnenamDisplayangezeigtwerden ZusammenmitderAnzeigekönnenauchdieKontrollleuch tenblinken ntc Temperaturfühlernichtkorrektangeschlossenoderdefekt SEn Feuchtigkeits undTemperatursondenichtkorrektangeschlossenoderdefekt E01 SicherheitsthermostatHeizaggregatoffen Tabelle 3 Fehlerliste ...

Reviews: