38
Эксплуатация
Uso
Benutzung
Utilisation
Use
Cleaning the appliance
Warnings
Before carrying out any cleaning operations, it is neces-
sary to disconnect the power supply of the appliance
(using the system switch), wear suitable personal pro-
tection equipment (e.g. gloves, etc.). The user must carry out
only routine maintenance, for extraordinary maintenance, con-
tact a Service Centre requesting service from an authorised
technician. The Manufacturer warranty does not cover damag-
es due to negligent or incorrect maintenance or cleaning (e.g.
use of unsuitable detergents).
When cleaning any part or accessory do NOT use:
• abrasive or powder detergents;
• aggressive or corrosive detergents (e.g. hydrochloric
or sulphuric acid, caustic soda, etc,). Caution! Never use these
substances also when cleaning the substructure/floor under
the appliance or its base;
• abrasive or sharp tools (e.g. abrasive sponges, scrapers, steel
brushes, etc.);
• steamed or pressurised water jets.
It is best to have an authorized service centre perform
maintenance and inspection on the appliance at least
once a year to ensure top working and safety conditions.
Cleaning the appliance
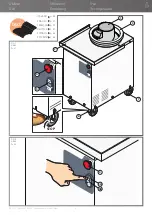
Cleaning the external steel parts
Fig.10.
Use a cloth soaked in hot soapy water and finish with a thor-
ough rinsing and drying, taking care to remove all traces of de-
tergent.
Cleaning the control panel and emergency button
Clean the control panel and emergency button with a soft
cloth and a little detergent for delicate surfaces. Avoid using
considerable quantities of product since any infiltration may
seriously damage the controls. Avoid also using very aggressive
detergents that may damage the material the display is made
of (polycarbonate).
Cleaning the wheels
Clean the wheels with a soft cloth and a little detergent for del-
icate surfaces. Avoid also using very aggressive detergents that
may damage the material the wheels are made of.
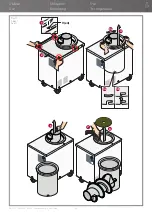
Cleaning the tray, outer cylinder, auger and inner disk
Fig.11.
1
Remove the 4 “V” screws that hold the tray to the machine
body and
2
remove it.
3a
Rotate the outer cylinder anticlockwise until you feel a block
3b
,
4
then lift it upwards to extract it.
5
Lift the auger upwards until it is completely extracted.
6
Remove the lower disk.
7
Vacuum the compartment inside the machine to remove
any residues.
The tray, outer cylinder, auger and bottom disk can be cleaned
with a soft cloth moistened with warm water and some dish
soap.
Finish cleaning with a thorough rinsing and drying.
Reassemble the pieces only when they are perfectly dry.
Removing the auger in case of difficulty
Fig.12.
If the manual removal of the auger proves difficult, for example,
because there are many encrustations of dough, it is possible to
extract it by force.
1
Take the M10 screw from inside the envelope provided with
the appliance and get a 17mm wrench (not supplied).
2
Remove the tray and outer cylinder as explained in the
previous chapter.
3
Place the machine on its side; protect the side in contact
with the floor with cardboard to avoid scratching the stainless
steel surfaces.
4
Insert the M10 screw into the hole on the underside of
the machine and screw it clockwise with the 17mm wrench.
The screw might resist; in this case, exert more force until it
completely enters the machine body. At this point the auger will
be free and can be extracted by pulling it out from the top of the
machine. Unscrew the M10 screw and keep it for future use.
Downtime for prolonged periods
During any downtime, switch the power off. Protect the steel
outside surfaces passing over them with a soft cloth slightly
damp with Vaseline oil.
Before resuming operations:
• accurately clean the equipment and accessories;
• reconnect the equipment to the power;
• inspect the equipment before using it.
Disposing of food residues
The ash and food residues removed when cleaning must
be disposed of according to the regulations in force in
the country where the product is used.
If in doubt, we suggest contacting the local authorities to ask
for the correct method of disposal.
Utilizzo


