background image

18

21

M5x12

3

M8x16

2

x4

fig. 12 

fig. 13 

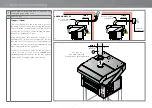
Positioning and connection to the oven below

The hoods can be positioned 

only

 over a Giorgione Gas oven.

assembly must be carried out by a minimum of fOuR people because of the dimensions and 
weight of the hood.


Fig. 12

Disconnect the power supply from the oven to which the hood will be connected. 
fix the hood to the oven below acting as shown in the figure. 


Fig. 13

Make sure there is a distance of about 

600 mm [24”] 

from the ceiling (shorter distances could damage 

ceilings made of particularly delicate and heat sensitive materials - e.g. wood); 

Installation

minimum distance: 

~


600 mm [24 in.]

Summary of Contents for Giorgione KGR4

Page 1: ...Giorgione HOOD Pre installation and installation manual KGR4 KGR6 KGR6L KGR9...

Page 2: ...e oven 7 Giorgione KGR635 hood technical data hood double oven 8 Giorgione KGR635L hood technical data hood single oven 9 Giorgione KGR635L hood technical data hood double oven 10 Giorgione KGR935 hoo...

Page 3: ...y flat and capable of withstanding the weight of the hood and underlying oven the installation room is dedicated and suitable to cooking food has adequate air ventilation complies with the current reg...

Page 4: ...ough the manu facturer s hood under hood type Using metal clamps not supplied connect to it a 200mm 7 87in flue tube not supplied The flue tube must be for the exclusive use of the equipment in stainl...

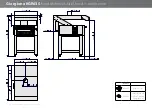
Page 5: ...n model KGR435 62 kg 136 6 lb KGR435 1320x1370x420mm 51 97x53 94x16 54in 140kg 308 6lb 2143mm 84 4in 1215mm 47 8in 20mm 0 8in 500mm 19 7in 1473mm 58 0in 1215mm 47 8in 608mm 23 9in 608mm 23 9in 805mm 3...

Page 6: ...hood double oven 2280mm 89 8in 500mm 19 7in 1215mm 47 8in 20mm 0 8in 200mm 7 9in 805mm 31 7in 668mm 26 3in 1473mm 58 0in 1215mm 47 8in 608mm 23 9in 608mm 23 9in 100mm 3 9in 260mm 10 2in 954mm 37 6in...

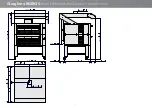
Page 7: ...2143mm 84 4in 1215mm 47 8in 20mm 0 8in 500mm 19 7in 805mm 31 7in 1026mm 40 4in 1831mm 72 1in 608mm 23 9in 608mm 23 9in 1215mm 47 8in 100mm 3 9in 260mm 10 2in 1312mm 51 7in 259mm 10 2in 1890mm 74 4in 2...

Page 8: ...data hood double oven 2280mm 89 8in 1215mm 47 8in 20mm 0 8in 200mm 7 9in 608mm 23 9in 608mm 23 9in 1215mm 47 8in 805mm 31 7in 1026mm 40 4in 1831mm 72 1in 100mm 3 9in 260mm 10 2in 1312mm 51 7in 259mm...

Page 9: ...2143mm 84 4in 1573mm 61 9in 500mm 19 7in 20mm 0 8in 200mm 7 9in 1473mm 58 0in 805mm 31 7in 668mm 26 3in 1573mm 61 9in 787mm 31 0in 787mm 31 0in 200mm 7 9in 100mm 3 9in 260mm 10 2in 954mm 37 6in 259mm...

Page 10: ...a hood double oven 2280mm 89 8in 500mm 19 7in 20mm 0 8in 1573mm 61 9in 1573mm 61 9in 787mm 31 0in 787mm 31 0in 200mm 7 9in 805mm 31 7in 668mm 26 3in 1473mm 58 0in 200mm 7 9in 100mm 3 9in 260mm 10 2in...

Page 11: ...20mm 0 8in 1573mm 61 9in 500mm 19 7in 2143mm 84 4in 200mm 7 9in 787mm 31 0in 787mm 31 0in 1573mm 61 9in 805mm 31 7in 1026mm 40 4in 1831mm 72 1in 200mm 7 9in 100mm 3 9in 1890mm 74 4in 260mm 10 2in 1312...

Page 12: ...hood double oven 1573mm 61 9in 20mm 0 8in 500mm 19 7in 2280mm 89 8in 200mm 7 9in 1573mm 61 9in 787mm 31 0in 787mm 31 0in 805mm 31 7in 1026mm 40 4in 1831mm 72 1in 100mm 3 9in 200mm 7 9in 2027mm 79 8in...

Page 13: ...mation This is vital in case of a request for maintenance or repair of the equipment please do not remove damage or modify it Failure to follow these regulations may cause damage or even fatal injury...

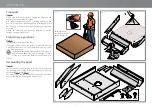
Page 14: ...Preliminary operations Fig 6 Carefully remove the protective film If any glue residue is left on the surfaces remove it with soapy water but without any corrosive or abrasive products or sharp or poin...

Page 15: ...Ed 0521 70702820 REV00 Giorgione hood Installation 15 1 3 4 5 M5x12 M5x12 2 M5x12 Fig 8 Installation...

Page 16: ...16 3 1 M5x12 2 M5x8 Fig 9 Installation...

Page 17: ...gione hood Installation 17 1 2 3 M8x16 M8x16 180 x4 Fig 10 Fig 11 Turn the hood upside down the manoeuvre must be carried out by FOUR people equipped with personal protective equip ment e g gloves and...

Page 18: ...f the dimensions and weight of the hood Fig 12 Disconnect the power supply from the oven to which the hood will be connected Fix the hood to the oven below acting as shown in the figure Fig 13 Make su...

Page 19: ...34552 Installation Model Voltage Absorption Year of production Serial number Serial number plate reading Fig 7 The serial number is on the back of the appliance It provides important technical informa...

Page 20: ...on motor however it is possible to connect it to a suitable user suction system the extractor the flue tube and the clamps are NOT supplied by the manufacturer Fig 15 Using metal clamps B not supplied...

Page 21: ...ly to packaging was carefully checked from both the operating and safety standpoints After installing the appliance check and mark with a all the boxes of the table on the side this will confirm the i...

Page 22: ...CUPPONE 1963 Cuppone F lli S r l Via Sile 36 31057 Silea TV ITALY T 39 0422 361143 F 39 0422 360993 info cuppone com www cuppone com...

Reviews: