3
B E N D I N G
B E N D I N G
B E N D I N G
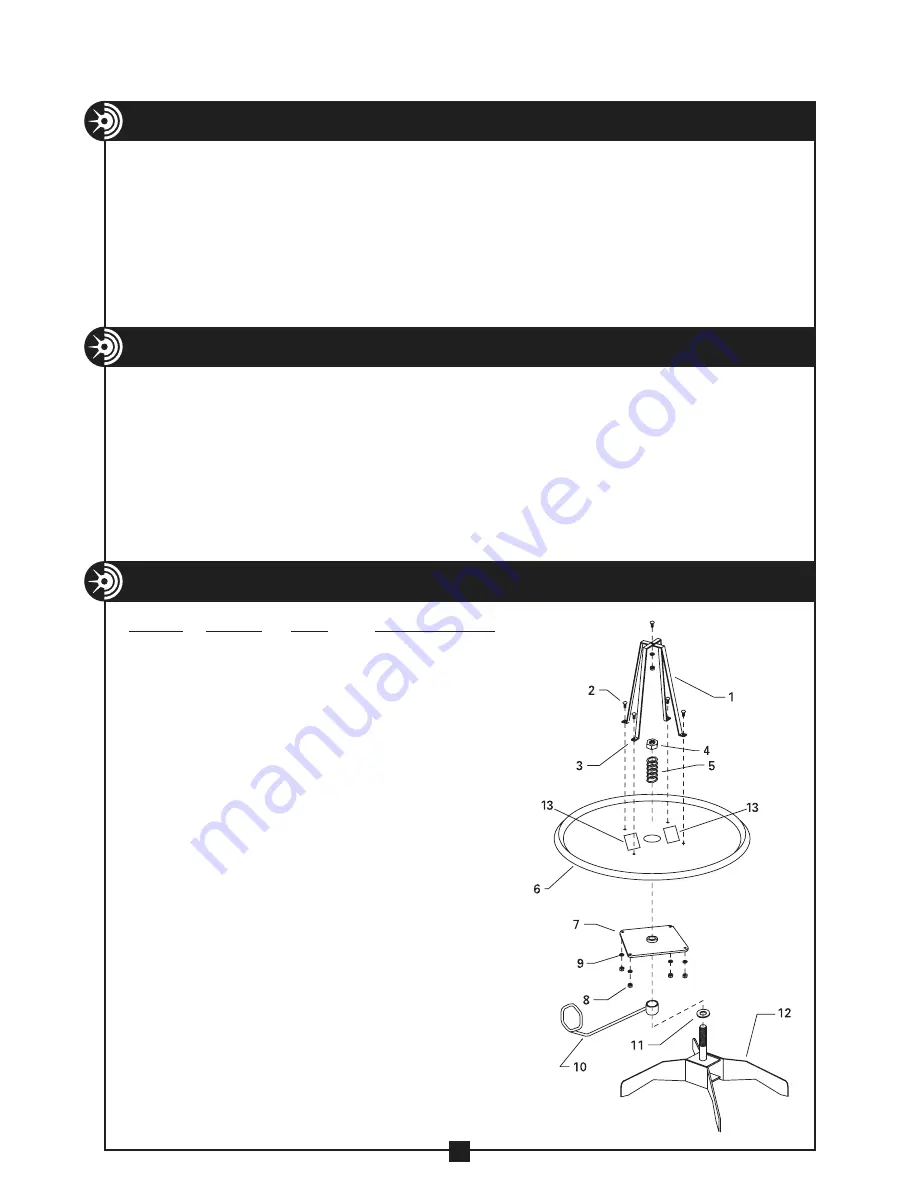
ITEM# PART#
QTY
DESCRIPTION
1 ...........509-267A ...........1 ..................... REEL STRAP
2 ............9544-15 ............5 ........
5
/
16
–18 X 1" HEX HD SCREW
3 ...........509-267B ...........1 ..................... REEL STRAP
4 ..............509-3 ..............1 ..... 1"–8 HEX NUT (NYLON INSERT)
5 ..............509-2 ..............1 ........... SPRING COMPRESSION
6 ............509-271 ............1 .....................TURN TABLE
7 ............509-266 ............1 ................MOUNTING PLATE
8 ..............412-8 ..............5 ...................
5
/
16
–8 HEX NUT
9 .............412-11 .............5 ................
5
/
16
LOCK WASHER
10 ...........509-272 ............1 .................... CABLE GUIDE
11 ............509-15 .............1 ............... WASHER – THRUST
12 ...........509-585 ............1 ..........................FRAME
13 ........... 509C/M ............1 ..............DECAL – MODEL NO.
AND CAUTION
FEATURES
• Sturdy steel construction for rugged use.
• Convenient T-handle and durable wheels on 509M for easy mobility.
• Fits through a standard doorway.
• Includes an adjustable spring to set the drag required and to prevent
over-feeding.
• Cable guide pivots for tangle-free spooling in any direction.
OPERATING INSTRUCTIONS
1. Remove all ties or straps from coil of wire or cable and position it on the
turntable. ( For Romex, remove from box and place onto unit. )
2. Locate the end of the cable and pull it through the cable guide.
3. Set the desired drag by adjusting the hex nut at the top of the spring.
4. Prior to first use of 509M mobile unit, assemble handle to frame by
inserting handle (Item #17) into frame (Item #12) and secure with hex head
cap screw (Item #18) and hex nut (Item #19). See exploded view on Page 4.
PARTS LIST — Model 509 Cable Dispenser


