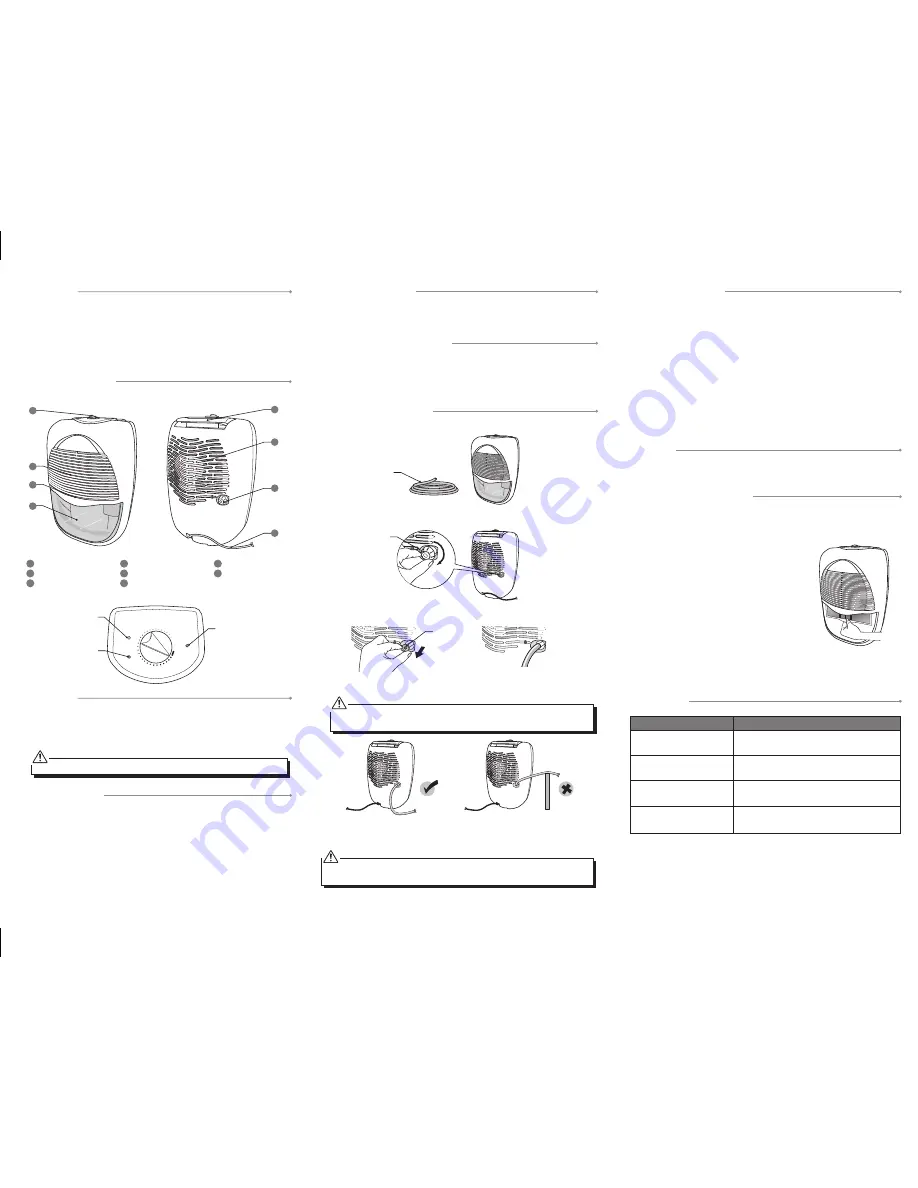
CONTINUOUS DRAINAGE
For permanent drainage, use the supplied 14mm inner diameter hose.
GB-1
GB-2
GB-3
PRODUCT OVERVIEW
UNPACKING
Remove all packaging from the unit. Retain the packaging. If you dispose of it please
do so according to any local regulations.
The following items are included:
• The Main Unit
• The Instruction Manual (
P.N.: 66129905784)
If items are missing or damaged, please contact Partmaster (UK only).
Tel: 0844 800 3456 for assistance.
BEFORE USE
1. Place on a stable, flat floor. If the floor surface is not even:
• Vibration and noise will occur.
• Water may leak from the water tank
2. Make sure the air inlet and air outlet openings are clear and free from blockage.
START OPERATION
1. Connect to the mains socket.
2. Make sure the water tank is correctly positioned. If the
FULL WATER TANK
indicator illuminates at first time use, remove then refit the water tank to the unit
until the indicator goes off.
3. Turn the HUMIDITY CONTROL dial to the desired setting or CONTINUOUS for
continuous operation.
4. The unit will shut down when turned to the OFF position.
5. The DEFROST indicator will briefly illuminate when the HUMIDITY CONTROL dial
is turned to the OFF position. This is normal.
The unit must stand upright for at least 2 hours prior use.
FULL WATER TANK INDICATOR
When the water tank is full, the
FULL WATER TANK indicator will illuminate. The unit
will also switch off automatically.
To empty the water tank, turn the HUMIDITY CONTROL dial to the OFF position.
Unplug from the mains socket then carefully remove the water tank and empty the
collected water. Replace the water tank carefully before switching the unit back on.
DEFROST INDICATOR
If the temperature is too low the unit will automatically start to defrost and the
indicator will illuminate.
The DEFROST indicator will also illuminate if the air filter become clogged.
This unit has a 3-min lag during start up in order to prolong the compressor’s
working life. The compressor will not start until the unit has run for 3 minutes.
The hose level must be lower than the drainage outlet, see diagrams shown
below.
SUITABLE FOR USE IN
• Bedrooms
• Studies
• Cellars / Basements
• Kitchens
• Storage rooms
• Libraries
• Galleries
• Computer rooms
Protects moisture sensitive items, eg :
• Musical instruments
• Cameras
• Computers
Benefits:
• Prevents clothes and leather products from moulding.
• Dehumidifies flooring and carpets.
• Prevents ceiling and windows from condensation.
• To obtain best results, try to avoid opening and closing windows and doors.
HINTS & TIPS
PVC hose for
drainage
Tube stopper
Rubber
stopper
RUNNING
FULL
CON
OFF
DEFROST
6
5
7
8
1
2
3
4
Front View
Humidity Control Dial
Rear View
1
Humidity Control Dial
2
Air Inlet
3
Air Filter
4
Water Tank
5
Handle
6
Air Outlet
7
Tube Stopper
8
Mains Cable
RUNNING indicator
To indicate the unit is
operating
FULL WATER TANK
indicator
To indicate the water
tank is full
DEFROST indicator
To indicate the unit is
in defrost condition
1. Take out the tube stopper of the drainage outlet. (Be careful the water will come out
from the drainage outlet if it has been used.)
3. Take out the rubber stopper and store it in a safe place for future use.
4. Connect the hose to the drain tap.
5. Connect the unit to the mains socket and turn the HUMIDITY CONTROL dial to the
desired setting.
Unscrew
Empty the water tank.
The FULL WATER TANK
indicator is flashing.
Clean the air filter. Make sure that the air inlet
and the air outlet are not obstructed.
Dehumidifying function
does not work.
Ensure the unit is on a stable flat surface.
Clean the air filter.
Excessive noise.
Clean the air filter.
No air coming out from the
air outlet.
Problems
Solutions
CAPACITY
• Water tank = 2.4 litres
• Maximum capacity = 10 litres per day
CLEANING & MAINTENANCE
Maintenance of your air filter
The air filter located inside the air inlet of the unit collects dust contained in the air.
The build up of dust reduces the efficiency of the unit. To prevent the dust from
clogging up the unit always use it with the air filter in place.
Always clean the air filter every 2 weeks. If the unit
operates in a dusty atmosphere clean the air filter more
often.
• To remove the filter, pull down the plastic lip from
bottom the vents as shown.
• Clean the air filter with a vacuum cleaner. lf the air filter
is very dirty, you can wash it in warm water (never use
hot or soapy water). Make sure that the air filter is
refitted correctly to the unit. Do not bend the filter and
ensure it is fitted before operating the unit.
Cleaning the unit
• Clean the unit by using a damp sponge, and dry it with a clean, soft cloth.
• Never use alcohol or any product containing solvents.
• Do not immerse the unit in water.
Remove the continuous drainage hose.
Turn off the unit and unplug it from the mains socket. Remove the hose from the
drainage outlet and refit the rubber stopper and the tube stopper back on to the unit.


