background image

G

. Loading and Playing a Disc

     a. After connecting power to the unit, turn on  DVD player  with the ON/OFF 
         switch. The power indicator will light.
     b. Open the disc tray by "OPEN" , and place a disc into the tray with the label
         side facing up.
     c. Close the tray.The unit will load the disc and start playing.
     d. Adjust picture quality by entering into video quality setup via SETUP 
         button on the unit or from the remote control.
     e. To stop playing a disc, press STOP.

H

. Setup

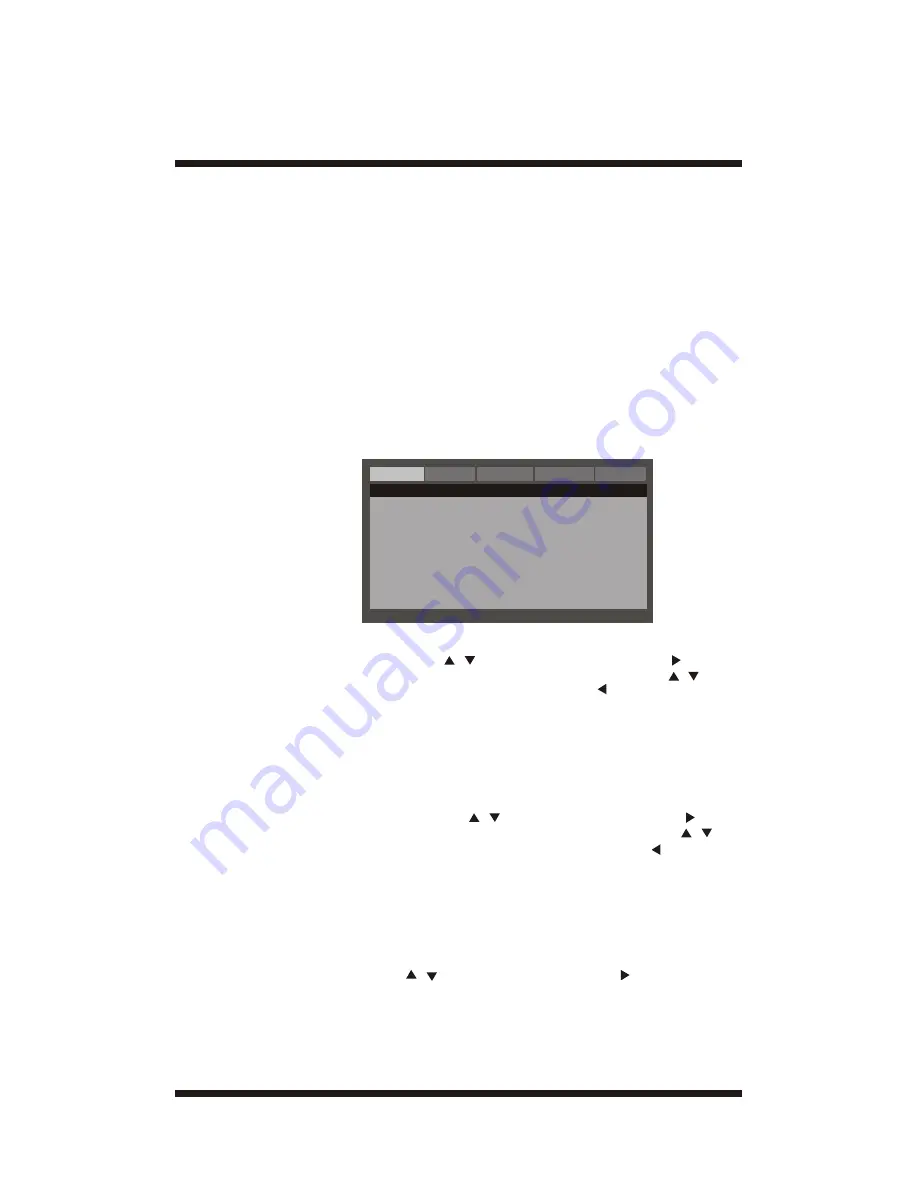
     Press 'SETUP' to display the Main screen of the Setup Menu on the screen.  
     Press 'SETUP' again to exit the Setup Menu and the unit  will resume its last 
     playback mode.

1)  Press  SETUP , the 'General Setup Page' will display on screen.
   a).Select 'Angle Mark' using the      /     button, and then press  the      button
          to enter the submenu.  Choose  Angle Mark on or off using the     /    button 
          and then press OK to confirm the setting. Press the      button to return.

     * On: The screen will show the angle mark icon. (*If an angle option is
               available).
     * Off: The screen will not display the Angle Mark
     NOTE: Not all discs contain above features. The above features are disc 
                  dependent.

     b). Select 'Screen Saver' using the     /     button, and then press the     button
           to enter the submenu.  Choose Screen Saver on or off using the    /     
           button and then press OK to confirm the setting. Press the       button
           to return.

         *On: Enables screen saver
         *NOTE: The DVD player will enter the Screen Saver mode after ap-
                       proximately five minutes if the same image remains on  the screen.
         *Off: Disables screen saver (off)

     C) Select 'OSD LANG' by      /    button ,and then press the     button to enter
          the submenu
         *Note:OSD language is also available with the others than the listed


4

General


Video


Password


Preference


Exit

--

General


Setup


Page

–-

TV


Display


WIDE

Angle


Mark


ON

TV


Type


PAL

Screen


Saver


ON

OSD


Lang


ENG

Go


To


General


Setup


Page

Summary of Contents for DVD8009

Page 1: ......

Page 2: ... Powering and installation 2 F Controls Indicators and Connectors 2 G Loading and Playing a Disc 4 H Setup 4 I Basic Operation 8 J PlayingMp3Audio CD Discs 12 K Playing JPG files 12 L Connecting to TV or another monitor 13 M Rechargeable battery use 13 N Specifications 14 O Troubleshooting 14 ...

Page 3: ...rain or moisture Caution Danger of explosion if battery is incorrectly replaced Replace only with the same or equivalent type 1 Read these Instructions 2 Keep these Instructions 3 Heed all warnings 4 Follow all instructions 5 Do not use this unit near water 6 Clean only with dry cloth 7 Do not block ny ventilation openings Install in accordance with the man fa cturer s instructions 8 Do not instal...

Page 4: ...s D Contents 1 1 x 7 LCD Monitor DVD Player Combo with built in rechargeable lithium Polymer battery 2 1 x Remote Control with battery 3 1 x Audio Video Cable 4 1 x AC DC Adapter 5 1 X Cigarette Lighter Adapter 6 1 x Instruction Manual 7 1 X Earphone E Powering and installation 1 Powering the system indoors Plug one end of the AC to DC adapter into the DC input jack on the back of the main unit th...

Page 5: ...H 12 AV OUT 13 HEADPHONE 14 VOLUME 1 Number buttons 2 Zoom To zoom in out picture 3 Title 4 Audio 5 Setup 6 Enter 7 Previous Next when playing Fast backward FF when playing Direction buttons when at menu setup 8 OSD 9 Play Pause 10 Stop 11 Slow 12 Subtitle 13 Menu 14 A B 15 Angle 16 Repeat 17 Mute 18 Return 19 Volume 3 2 Controls ...

Page 6: ...on or off using the button and then press OK to confirm the setting Press the button to return On The screen will show the angle mark icon If an angle option is available Off The screen will not display the Angle Mark NOTE Not all discs contain above features The above features are disc dependent b Select Screen Saver using the button and then press the button to enter the submenu Choose Screen Sa...

Page 7: ...ss OK You can adjust the Hue by pressing the button To exit Hue Setting press OK again to return C Select Saturation by using the button then press OK You can adjust the Saturation by pressing the button To exit Saturation setting press OK again to return 3 Select Password using the button then press the OK button to enter the submenu Press OK twice to enter the Password Change Page Input the Old ...

Page 8: ...ter the submenu Select the Disc Menu Language you desire using the button then press OK to confirm the setting Press to return Note Language and subtitle selection are only available for discs that are recorded in the above listed languages If the selected language is not available the player will display the original recorded language contained in the disc on the screen 6 General Video Password P...

Page 9: ... using the button then press to enter the submenu Press OK to make the setting return to the factory set mode NOTE The parental setting is not affected by the default reset function NOTE The Default Password is 8888 To avoid the possibility of the others using the default password to set the parental level and change the password you can record this default password in another area and delete it f...

Page 10: ...le language and turn it on off Select the audio language Enlarge an image to 2 3 or 4 times the original size Display the setup menu to select and set items and exit the setup menu To return to main menu when PBC on for VCD To return to root menu during DVD playing and resume playing when in title menu or root menu by pressing it again Root title Slow Menu A DVD is divided into two sections called...

Page 11: ...t pressed again within 3 seconds Some DVDs only allow access to this function through the DVD menu AUDIO During playback press AUDIO to select the audio language you desire with the current Audio Channel Number 1 and the total number of Audio Channels 2 displayed Press AUDIO again to select another audio language The audio display will disappear automatically if the AUDIO button is not pressed wit...

Page 12: ... a 4th time the picture will return to normal size A B REPEAT a During playback press a first time A B to set the Starting Point A b Press A B a second time to set the Ending Point B and the player will repeatedly play the part between Point A and Point B C Press A B a third time to cancel A B repeat and resume normal playback 10 ...

Page 13: ... to repeatedly play the current chapter b During playback press REPEAT again to repeatedly play the current title c During playback press REPEAT a 3rd time to repeat all Chapters and Titles d Press REPEAT a 4th time to resume normal playback 11 ...

Page 14: ...choose a song from the list Press EN TER to select and begin playback of the highlighted song USING THE REPEAT FEATURE The default mode for the Repeat feature is OFF Folder Pressing REPEAT consecutively changes the repeat options o Single o Repeat One repeat playback of a song o Repeat Folder repeat playback of a specific folder o Folder normal playback As you toggle through the options the repeat...

Page 15: ...r canbe obtained in 6H Fully recharged battery can last about 2 hours Precautions related to Battery Recharge 1 The battery can be only recharged when turning power to OFF state and keep continuous power supply the red light will be on indicating the unit is under recharging When it s fully charged the light will turn green Using and Maintaining Rechargeable Battery 1 The normal working temperatur...

Page 16: ...ted into the appropriate jacks You can t advance through the opening credits and warning information that appears at the beginning of movies because the disc is programmed to prohibit that action The feature or action cannot be completed at this time because 1 The disc s software restricts it 2 The disc s software doesn t support the feature e g angles 3 The feature is not available at the moment ...

Page 17: ...VER 273 C 1 0 ...

Reviews: