-
6
-
WARNING
Read the instruction manual before you attempt to use the unit. Handle glass panels with care.
Consult your dealer or service personnel if you have questions about the installation, operation or
safety of the unit.
Make sure unit is plugged into an 110V-127V outlet. Using higher voltage outlets could cause the
unit to malfunction or catch fire. Make sure all electrical connections (including extensions and inter
connectors) are properly made.
Turn unit off before unplugging it from power source.
Do not expose to temperatures above 95 ºF.
Do not place unit near heaters or in areas subjected to direct sunlight.
Place unit where there is good air circulation.
Protect unit from dust, moisture, water and other liquids.
Do not place unit near TVs, speakers and other objects that generate strong magnetic fields.
Do not clean with strong chemical agents.
Do not grease or oil components, running mechanisms, etc. CD player is designed to be
maintenance-free.
Do not attempt to service this unit yourself. Take to an approved service center if repairs are
necessary.
Do not operate unit if it is not working normally or has been damaged in any way. Turn unit off,
unplug it from the power source and consult service personnel.
Do not remove any fixed cover. This will increase the chance of electrical shock.
Do not leave unit unattended when in use.
Do not listen to headphones at high volumes.
Do not obstruct vents on unit.
Do not attempt to create your own stand for the unit. Use only the included stand.
Do not push object into any holes, slots or openings on unit.
Do not allow children to operate unit without adult supervision.
Erratic performance may occur if unit is used in rooms lit with fluorescent lights.
CAUTION
– This CD player may be used only with the captioned manufacturer’s stand. Use
with other stand may result in instability causing possible injury.
Above all
l
NEVER let anyone, especially children, push anything into holes, slots or any other openings
in the case this could result in a fatal electric shock.
l
NEVER guess or take chances with electrical equipment of any kind.
l
It is better to be safe than sorry!
Note: If energy saving lamps (Fluorescent) are used in the
Same room as the unit erratic operation may occur.
-
7
-
INSTALLATION
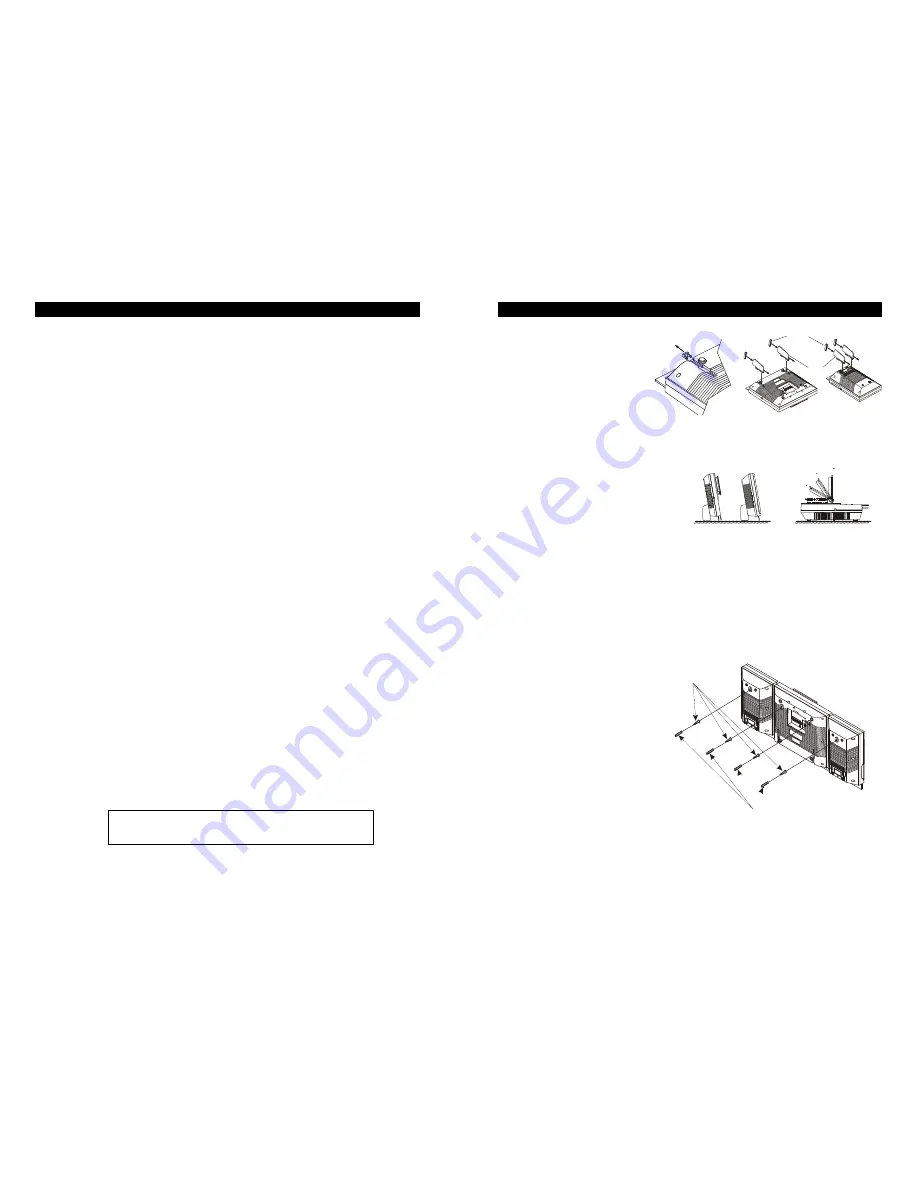
FOR TABLE TOP
l
Put the main unit and the
speaker on a piece of soft
cloth, which for preventing
scratches the unit front
panel.
l
Use your finger press on the
decoration part, which are at
the groove of the main unit rear
cabinet and slide down to
release away it from the
groove.
l
Insert the support plate into the groove.
l
Slide up the support plate until it is
locked.
l
If you put your equipment on a glass table or a very smooth surface. The main unit and
speaker box would be easy to move by hand pushing. You could insert the rubber sleeve to
the bottom of the support plate.
l
This product is designed both for placing vertically and horizontally. Removing the support
plate away for horizontal placing. The display can be rotated staying in 1 of 3 kind of viewing
angle (30º, 60º, 90º) as you like.
FOR WALL MOUNTING:
1.
Use the wall-mounting template
supplied with unit to make anchor
hole marks on the wall. Make
sure the marks are leveled.
2.
Drill 3/16" holes on the marks.
3.
Insert the plastic anchor supplied
with unit through the hole and tap
it until it is flush with the wall.
4.
Inset the screw and tighten the
screw 3mm sway from the wall.
5.
Hang the main unit and the
speakers to the screw.
SUPPORT PLATE
RUBBER SLEEVE
SLIDE DOWN THE DECORATING
PART TO REMOVE FROM MAIN
UNIT REAR CABINET
60
90
30
Plastic Anchor
Screw.


