


C
URTISS
-W
RIGHT
H
ARDWARE
I
NSTALLATION
826448 V
ERSION
5 M
ARCH
2015
P
ROPRIETARY
3-3
I
NSTALLATION
P
REREQUISITES
Before installing the CHAMP-AV8 in your chassis, please take a moment to review the following
items and planning considerations:
I
NSTALLATION
C
HECKLIST
Make sure you have the following items before proceeding with the installation:
• The CHAMP-AV8 board
• A VPX chassis with P0 connector. The chassis must be capable of pro12 Volts on
the VITA 46 VS1 and VS2 rails and +3.3 Volts on the VITA 46 3.3V_AUX rail. VS3 is not
used (normally would be +5 Volts). For XMC usage, the chassis may also provide
+12V_AUX and -12V_AUX (dependent on XMC requirements). An air-cooled chassis
must provide a minimum inlet air flow of 20CFM for L0 variants or 24 CFM for L100 var-
iants, to ensure adequate cooling.
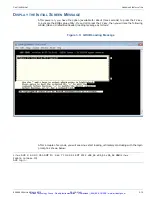
• A front panel cable, part number CBL-462-FPL-000, attached to a computer with a ter-
minal emulator program capable of operating at 115200 baud. The front panel cable is
used for air-cooled variants only.
• Standard Ethernet cables with RJ-45 connectors.
• The Board Support Package CD-ROM
U
NPACK
AND
C
ONFIGURE
THE
C
ARD
Ensure that you complete the pre-installation tasks described in Chapter 2 of this manual and
the pre-installation tasks described in the User’s Manuals for any XMC module you need to
install on the CHAMP-AV8.
I
NSTALL
THE
XMC M
ODULE
ON
THE
B
ASECARD
If the XMC module is not already installed on the basecard, install it on your basecard using
the appropriate mounting kit.
Cross Reference
Please refer to “XMC Module Installation Requirements” on page 2-4 for important
information concerning the factors you need to consider before mounting an XMC Module
on your CHAMP-AV8.
Artisan Technology Group - Quality Instrumentation ... Guaranteed | (888) 88-SOURCE | www.artisantg.com