background image

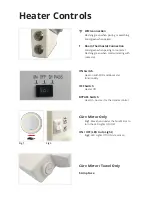
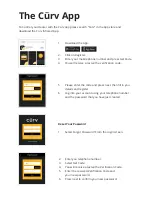
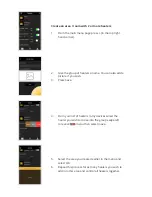
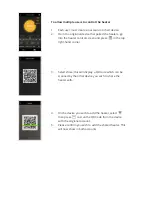
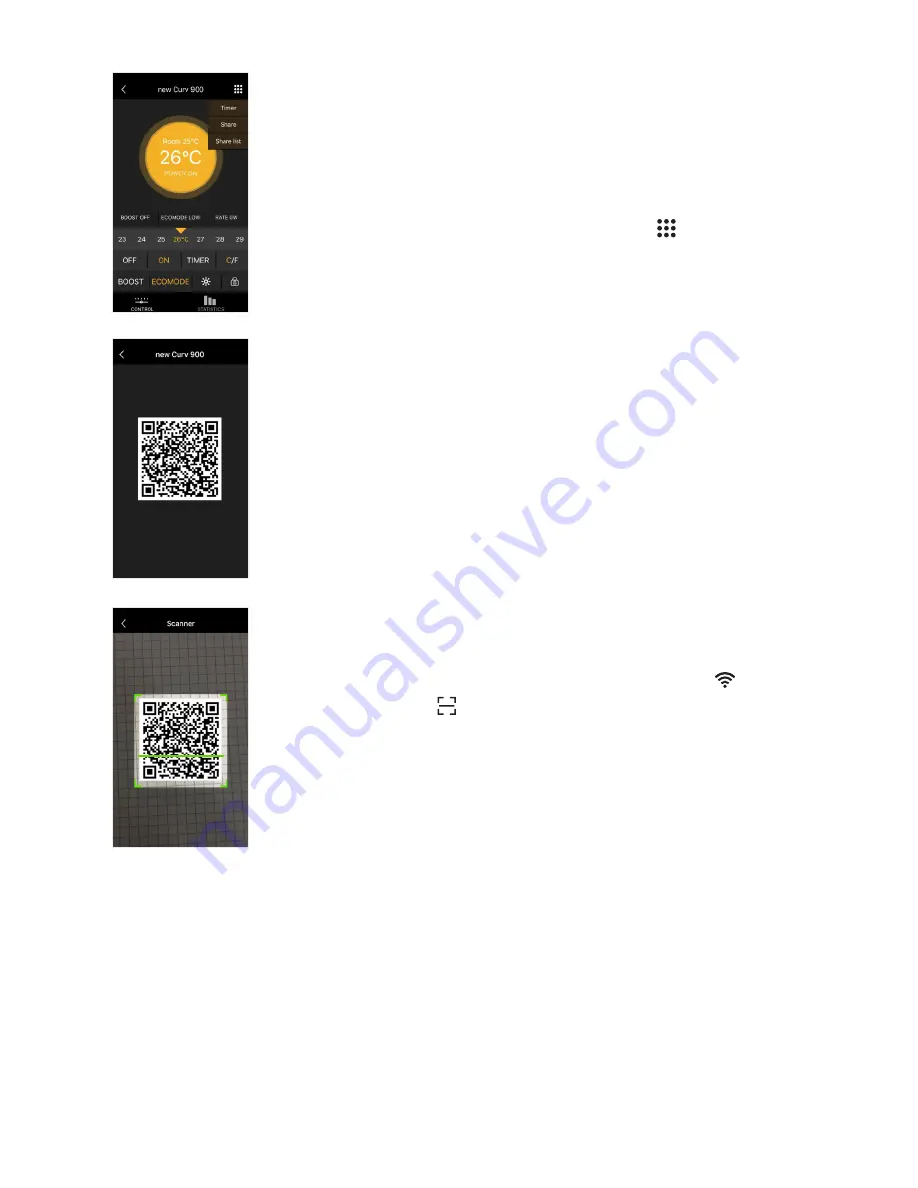
To allow multiple users to control the heater

1. 

Each user must create an account on their device.

2. 

From the origional device that paired the heaters, go  


into the heater control screen and press     in the top  


right-hand corner.

3. 

Select share, this will display a QR code which can be  


scanned by the other device you wish to share the    


heater with.

4. 

On the device you wish to add the heater, select      


then press     to scan the QR Code from the device   


with the origional account.

5. 

Please confirm you wish to add the shared heater. This  


will now show in both accounts.

Summary of Contents for CF12060

Page 1: ...The Smarter Way To Heat Your Home Installation Operating Instructions For Cürv Flat Towel Rail and Mirror Infrared Heaters Curv infrared com ...

Page 2: ...tallation 3 In order to avoid overheating and potential fire hazard do not cover the heater with insulating material or similar material under any circumstances 4 Do not touch the heater when in use Cürv infrared heaters have a surface temperature of around 85 c and prolonged contact with the heater will cause burns and injury 5 Do not operate the heater if the cable or plug is damaged or after th...

Page 3: ...orrect placement of heaters close to water sources Installation Position Cürv infrared heaters heats objects by transferring energy directly from the heater into the object Therefore consider placing the heater where it will not be obstructed by objects like furniture or where it cannot effectively radiate the heat Objects placed in front of the heater will heat up and can prevent effective heat b...

Page 4: ...ensure the heater will disconnect from the supply if there is a fault Colour coding used in the supplied mains cable BROWN wire is to be connected to LIVE L BLUE wire to NEUTRAL N GREEN YELLOW wire to EARTH E Ensure mains power is OFF before commencing an installation involving fixed wiring Ensure that the power cable is not coiled Do not place excess cable on the rear of the heater Electrical con...

Page 5: ...cloth For mirror models and towel rails glass cleaner can be used Never use a wet cloth When clean dry the surfaces with a dry cloth Wait until the heater is completely dry before use DO NOT apply abrasive materials solvents or solvent wipes to the surface as this can cause irreparable damage DO NOT attempt to repair or adjust any electrical or mechanical functions on this unit Doing so will void ...

Page 6: ...ernet connection to access the smart hub Curv cannot be held responsible for the quality or consistency of your internet connection and faults should be addressed with your provider This Limited Warranty does not guarantee that the use of the Curv Smart products will be uninterrupted or error free The warranty covers the repair or replacement of the defective product only and Cürv360 Limited shall...

Page 7: ...ig 2 Cürv Mirror Towel Only 5 Amp Fuse WIFI connection Flashing green when pairing or searching Solid green when paired T Room Thermostat Connection Solid green when pairing to room stat Flashing green when communicating with room stat ON Switch Heat on with WIFI and Room stat functionality OFF Switch Heater Off BYPASS Switch Heat On no smart or thermostat control ...

Page 8: ...ar of the heater are screwed into the screw holes marked A See Fig 1 To install vertically fix the bracket to the wall with the B pointing up Ensure the fixings on the rear of the heater are screwed into the screw holes marked B See Fig 2 Installation Guide Fig 2 How the bracket will sit on the back of the heater when fixed to the wall horizontally Fig 1 How the bracket will sit on the back of the...

Page 9: ... wall fixings to secure the bracket to the wall Step 3 Place your Cürv Infrared heater onto the bracket ensuring all it locks into place on the bracket Please refer to Fig 1 and Fig 2 for help Heater Installation Step 4 Remove any protective film Step 5 Plug your heater in and switch on the power Fig 2 How the bracket will sit on the back of the heater when fixed to the wall horizontally Fig 1 How...

Page 10: ...lation Fixing Locations Please use these measurements below or the template provided to install for your Cürv Towel Rail mark the fixing points Fig 1 1200 x 600 CT12060 Fig 2 600 x 600 CT6060 20mm 20mm 300mm 680mm 200mm ...

Page 11: ...conds for frost holiday mode Boost Mode x Cancel function delete Heater Quick press thermostat On Off Long press to start the timer mode Increase Temperature scroll left Long press to switch to Celsius Decrease Temperature scroll right Long press to switch to Fahrenheit Wireless Room Thermostat To Wake the thermostat press any button ...

Page 12: ...conds so that it lights up green 3 Press the until you reach the pair option 4 Press Set 5 Choose which number which will be flashing in the bottom right of the screen that you wish to allocate the heater to by using the buttons 6 Then press the to accept 7 When the number stays on the screen the heater is now paired to the room thermostat 8 To cancel pairing hold X for 4 seconds 9 You can pair up...

Page 13: ...select the ON Hour 6 Press 7 Use and to select the ON Minutes 8 Press 9 Use and to set the Temperature 10 Press 11 Use and to select the OFF Hour 12 Press 13 Use and to select the OFF Minutes 14 Press 15 Repeat Until you have set your temperatures throughout the day 16 Press SET and and to change the Day you wish to program 17 Press to select and continue from stage 5 18 Press for 3 seconds to sav...

Page 14: ... and the password that you have just created 1 Download the App 2 Click on Register 3 Enter your mobile phone number and press Get Code 4 You will receive a text with a verification code Reset Your Password 1 Select Forgot Password From the login screen 2 Enter you telephone number 3 Select Get Code 4 You will receive a text with a Verification Code 5 Enter the received Verification Code and your ...

Page 15: ...wait for pairing to complete 5 Please set a name for the Cürv heater and set currency Then click Connect to complete the configuration Add A Heater Cürv Smart products require a WIFI enabled 2 4Ghz protocols 802 11b g n router and internet connection to access the smart hub Cürv cannot be held responsible for the quality or consistency of your internet connection and faults should be addressed wit...

Page 16: ...also add a picture if you wish 3 Press Save 4 From your list of heaters in my devices select the heater you wish to move into the group swipe left to reveal menu then select move 5 Select the area you created earlier in the menu and select OK 6 Repeat this process for as many heaters you wish to add into this area and control all heaters together ...

Page 17: ...l screen and press in the top right hand corner 3 Select share this will display a QR code which can be scanned by the other device you wish to share the heater with 4 On the device you wish to add the heater select then press to scan the QR Code from the device with the origional account 5 Please confirm you wish to add the shared heater This will now show in both accounts ...

Page 18: ...cting timer from the drop down menu 3 Press the to add a schedule 4 Set your start time 5 Set your end time 6 Select the days you wish to repeat this schedule 7 Select the required temperature 8 Then save 9 You can repeat this process to schedule different heating temperatures throughout the day Cürv Heater Cürv Heater Cürv Heater Cürv Heater ...

Page 19: ... Low Medium and High heating mode Anti freeze mode will not go below 5 C Press the child lock button for 3 seconds to lock the heaters surface temperature to a maximum of 43 degrees Controling your heater From the Statistics menu you can view your monthly usage in kWh and costs to run your heating Menu Bar 1 Modify your password 2 Displays your app version 3 Exit App Set up new heaters WIFI and ad...

Page 20: ...v1 1 Curv360 Limited Lakes Court Newborough Road Burton on Trent DE13 9PD Manufactured in China curv infrared com ...

Reviews: