background image

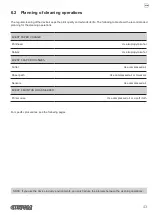
6.2  Planning of cleaning operations

The regular cleaning of the device keeps the print quality and extends its life. The following table shows the recommended 
planning for the cleaning operations.

EVERY PAPER CHANGE

Printhead 

Use isopropyl alcohol

Rollers

Use isopropyl alcohol

EVERY 5 PAPER CHANGES

Cutter

Use compressed air

Paper path

Use compressed air or tweezers

Sensors

Use compressed air

EVERY 6 MONTHS OR AS NEEDED

Printer case

Use compressed air or a soft cloth

For speciic procedures, see the following pages.

NOTE: If you use the device in dusty environments, you must reduce the intervals between the cleaning operations.

43

Summary of Contents for Kube II

Page 1: ...CUSTOM S p A USER MANUAL KUBE II ...

Page 2: ......

Page 3: ...al switch Before any type of work is done on the machine disconnect the power supply Use the type of electrical power supply indi cated on the device label These devices are intended to be powered by a separately certiied power module hav ing an SELV non energy hazardous output IEC60950 1 second edition Only POS equipment The energy to the equipment must be provided by power supply approved by CUS...

Page 4: ...o radio communications However there is no guarantee that interference will not occur in a particular installation If this equipment does cause harmful interfer ence to radio or television reception which can be determined by turning the equipment off and on the user is encouraged to try and correct the interference by one or more of the following measures Reorient or relocate the receiving antenn...

Page 5: ...MANUAL For details on the commands refer to the manual with code 77200000001000 ...

Page 6: ......

Page 7: ...ssages 17 3 INSTALLATION 19 3 1 Wall mounting 19 3 2 Connections 23 3 3 Pinout 24 3 4 Driver and SDK 27 4 OPERATION 29 4 1 Opening the device 29 4 2 Switch the device ON OFF 30 4 3 Loading the paper roll 31 5 CONFIGURATION 33 5 1 Coniguration mode 33 5 2 Setup report 34 5 3 Device status 35 5 4 Printer parameters 36 5 5 Hexadecimal dump 40 6 MAINTENANCE 41 6 1 Autocutter jam 41 6 2 Planning of cle...

Page 8: ... 54 7 5 Power supply dimensions cod 961GE020000001 55 7 6 Power supply dimensions cod 963GE020000003 optional 56 7 7 Paper speciications 57 7 8 Character sets release HW R6 58 8 CONSUMABLES 61 9 ACCESSORIES 63 9 1 Sides replacement 64 10 ALIGNMENT 67 10 1 Enable alignment 68 10 2 Calibration 70 10 3 Alignment parameters 72 10 4 Printing area 75 11 TECHNICAL SERVICE 77 8 ...

Page 9: ...ation for the device and its accessories 8 CONSUMABLES description and installation of the available consumables for the device 9 ACCESSORIES description and installation of the available accessories for the device 10 ALIGNMENT information required for managing the paper alignment 11 TECHNICAL SERVICE information required for contacting the technical service 1 2 Explanatory notes used in this manu...

Page 10: ...10 ...

Page 11: ... below are present and that there are no signs of damage If there are contact Customer Service 1 Paper roll 2 AC adapter 3 Serial cable 4 AC Power cable 5 Device 6 Documentation Short guide sheet warranty 1 4 5 6 2 3 Open the device packaging Remove the packing frame content and remove the packing frame Take out the device Keep the box trays and packing materials in the event the device must be tr...

Page 12: ...onents External view 1 Paper compartment 2 Paper out with serrated blade 3 Opening levers 4 Status LED 5 FEED key 6 ON OFF key 7 RS232 serial port 8 USB port 9 Drawer port 10 Power supply port 7 8 9 10 4 5 6 2 1 3 12 ...

Page 13: ...Internal view 1 Sensor for cover open 2 Sensor for paper in presence Sensor for black mark 3 Temperature sensor for the printhead 4 Sensor for detecting low paper 1 2 3 4 13 ...

Page 14: ...2 3 Product label PC Product code 14 digits SN Serial number HW Hardware release XXXXXXXXXXXXXX Rx 0000000000000000000 HW PC SN 14 ...

Page 15: ...F printing FONT TEST POWER UP Hold down Fast push Hold down printing SETUP report ON OFF LF Fast push skip the SETUP mode ON OFF LF Fast push enter the SETUP MODE ON OFF LF next parameter Fast push ON OFF LF modify selected parameter Fast push 15 ...

Page 16: ...F LF ON OFF LF Advance the paper preset length STANDBY Fast push Fast push printing demo ticket Is the Notch Alignment parameter set on Disabled see Setup perform the ticket alignment no action required YES NO ON OFF LF Fast push 16 ...

Page 17: ...ER OFF GREEN ON PRINTER ON NO ERROR GREEN COMMUNICATION STATUS x 1 RECEIVE DATA x 2 RECEPTION ERRORS PARITY FRAME ERROR OVERRUN ERROR x 3 COMMAND NOT RECOGNIZED x 4 COMMAND RECEPTION TIME OUT x 5 LOW PAPER YELLOW RECOVERABLE ERROR x 2 PRINTHEAD OVERHEATED x 3 PAPER END x 5 POWER SUPPLY VOLTAGE INCORRECT x 6 COVER OPEN RED UNRECOVERABLE ERROR x 3 RAM ERROR x 4 EEPROM ERROR x 5 CUTTER ERROR 17 ...

Page 18: ...18 ...

Page 19: ... at the bottom of the machine see following igure The dimensions shown in the image are in millimetres 60 Ø3 2 2 x M3 Detail A Ø3 2 A A Attach two pins to the wall using the measurements shown above The dimensions of the ixing pins are provided below The dimensions shown in the image are in millimetres 2 5 1 0 2 Ø5 0 1 Ø3 0 0 5 19 ...

Page 20: ...ing screw and remove the left side Unscrew the fixing screw and remove the low paper sensor board Place the low paper sensor board in the new position as shown in figure While holding the point A put pressure at point B by pushing the left carter in the direction indicated 3 2 4 A B 20 ...

Page 21: ...ously Reassemble the left carter removed previously sliding it in the direction indicated Remove the two adhesive foots by levering with a small screwdriver as shown Fix the sensor board using the fixing screw removed previously 7 5 6 8 21 ...

Page 22: ...Fix the device to the wall 9 22 ...

Page 23: ...ply Power Supply cable included PC Standard USB cable PC Standard serial cable RS232 DK Vin 24 Vdc VIn 24Vdc RS232 USB DK ATTENTION In some using conditions we recommend the installation of a ferrite core on the power supply cable NOTE If RS232 and USB connectors are inserted communication port is USB 23 ...

Page 24: ... power supply polarity NOTE Power supply cable The following igure shows the connector pinout of the power supply cable for the device Tripolar male connector Power supply cable 24 V n c GND 1 2 3 4 USB INTERFACE Female USB type B connector J14 1 USB PLUG in 2 D0 in out 3 D0 in out 4 GND SH1 SHIELD SH2 SHIELD 24 ...

Page 25: ...2 standard logic value 0 corresponds to a voltage level of between 3 Vdc and 15 Vdc and logic value 1 corresponds to a voltage level of between 3 Vdc and 15 Vdc DEVICE PC connection Use an RS232 serial cable to connect the printer to a personal computer The following picture shows an example of connection between the device and a personal computer using a 9 pin serial connector DEVICE PC DCD RXD T...

Page 26: ... 6 GND NOTES The solenoid of the drawer 1 must be connected from Pin 2 to Pin 4 on the drawer connector PIN 2 DRAWER 1 PIN 4 DEVICE CASH DRAWER optional connection Use an optional adapter cable RJ12 Jack to connect the device to a cash drawer Refer to the picture below for the connector pin signals DEVICE JACK RJ12 CASH DRAWER SOL 24Vdc 26 ...

Page 27: ...n advance Windows Linux Driver for JavaPOS Extract the zipped folder to the destination path desired Android SDK for CustomAndroidAPI Extract the zipped folder to the destination path desired Follow the instructions present in the software package that you downloaded on how to install and use the library iOS SDK for CustomiOSApi Extract the zipped folder to the destination path desired Follow the ...

Page 28: ...28 ...

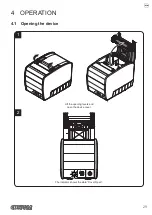
Page 29: ...4 OPERATION 4 1 Opening the device The indicator shows the state Cover Open Lift the opening levers and open the device cover 1 2 29 ...

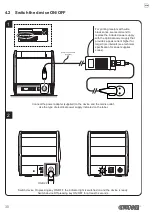
Page 30: ...tor light is switched on and the device is ready Switch device Off pressing key ON OFF for at least 3 seconds 2 IN DC 24V 1A VIn 24Vdc For printing receipts with wide black zones we recommend to replace the included power supply with the optional power supply that provides a peak current higher for larger time intervals see technical specification for power supplies codes Power supply cable suppli...

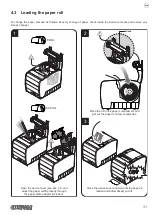
Page 31: ...emove any scraps of paper 1 2 3 Open the device cover see par 4 1 and adjust the paper width properly through the paper width adapter included Close the device cover and wait until the paper is loaded and automatically cut off Place the roll in the paper compartment and pull out the paper for a few centimetres 80mm 82 5mm Blade 31 ...

Page 32: ...32 ...

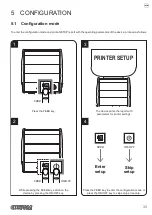
Page 33: ...as follows 1 While pressing the FEED key switch on the device by pressing the ON OFF key 3 2 The device prints the report with parameters for printer settings Press the FEED key 4 Press the FEED key to enter the configuration mode or press the ON OFF key to skip setup procedure Enter setup FEED ON OFF Skip setup FEED FEED ON OFF PRINTER SETUP 33 ...

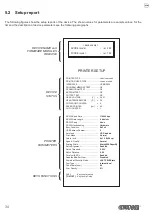
Page 34: ...UNTER 4 PAPER PRINTED cm 40 CUT COUNTER 1 RS232 Baud Rate 115200 bps RS232 Data Length 8 bits chr RS232 Parity None RS232 Handshaking Hardware Busy Condition RxFull USB Address Number 0 Autofeed CR Disabled Print Mode Normal Chars inch A 15 B 20 cpi Speed Quality Normal Printing Width 80mm 82 5 PaperW Notch Alignment Enabled Notch Threshold 2 00V Notch Distance 0 00 Total cut ESC i Enabled PaperEn...

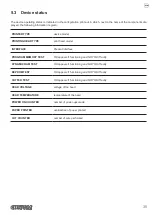
Page 35: ...t interface PROGRAM MEMORY TEST OK appears if functioning and NOT OK if faulty DYNAMIC RAM TEST OK appears if functioning and NOT OK if faulty EEPROM TEST OK appears if functioning and NOT OK if faulty CUTTER TEST OK appears if functioning and NOT OK if faulty HEAD VOLTAGE voltage of the head HEAD TEMPERATURE temperature of the head POWER ON COUNTER number of power ups made PAPER PRINTED centimetr...

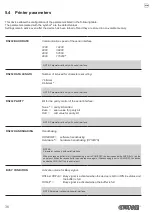
Page 36: ...the serial interface None D parity bit omitted Even even value for parity bit Odd odd value for parity bit NOTE Parameter valid only with serial interface RS232 HANDSHAKING Handshaking XON XOFF software handshaking Hardware D hardware handshaking CTS RTS NOTES Parameter valid only with serial interface When the receive buffer is full if handshaking is set to XON XOFF the device sends the XOFF 0x13...

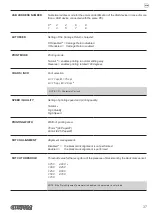
Page 37: ...selection A 11 cpi B 15 cpi A 15 cpi B 20 cpi D NOTE CPI Characters Per Inch SPEED QUALITY Setting of printing speed and printing quality Normal D High Quality High Speed PRINTING WIDTH Width of printing area 76mm D 80 PaperW 80mm 82 5 PaperW NOTCH ALIGNMENT Alignment management Disabled D the black mark alignment is not performed Enabled the black mark alignment is performed NOTCH THRESHOLD Thres...

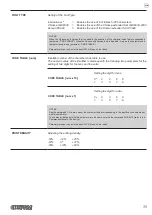
Page 38: ...otal cut command 0x1B 0x69 ESC i is sent Disabled The total cut command 0x1B 0x69 ESC i will be ignored and the printer always executes a partial cut command 0x1B 0x6D ESC m Enabled D The total cut command 0x1B 0x69 ESC i will be executed PAPEREND BUFFER CLEAR Cleaning mode of the data in receive buffer if the printing is stopped due to lack of paper Disabled D The data remain in the receive buffe...

Page 39: ...el CODE TABLE num Identiier number of the character code table to use The numeric value of the identiier is made up with the following two parameters for the setting of two digits for the tens and the units CODE TABLE num x 10 Setting the digit for tens 0 D 2 4 6 8 1 3 5 7 9 CODE TABLE num x 1 Setting the digit for units 0 D 2 4 6 8 1 3 5 7 9 NOTES See the paragraph 7 6 to learn about the characte...

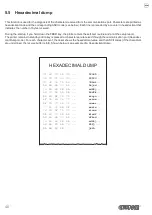
Page 40: ... until a key is pressed or characters are received through the communication port Hexadeci mal Dump mode For each character sent the ticket shows the hexadecimal value and the ASCII codes if the characters are underlined the receive buffer is full Shown below is an example of a Hexadecimal Dump 31 32 33 34 35 39 30 31 32 33 37 38 39 75 69 68 6B 6A 73 64 73 64 66 6B 6A 66 73 64 66 6B 65 69 6F 79 75...

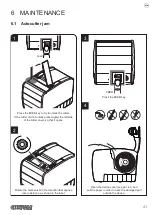
Page 41: ... unlock press slightly the left side of the cutter cover so that it opens 2 Rotate the mechanism in the direction that oppose less resistance as shown in the label 3 Press the FEED key 4 FEED FEED Open the device cover see par 4 1 and pull the paper in order to have the damaged part outside the device 41 ...

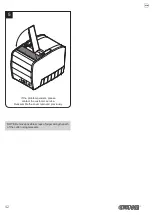
Page 42: ...If the problem persists please contact the customer service Reassemble the cover removed previously 5 NOTE Remove possible scraps of paper along the path of the cutter using tweezers 42 ...

Page 43: ...Printhead Use isopropyl alcohol Rollers Use isopropyl alcohol EVERY 5 PAPER CHANGES Cutter Use compressed air Paper path Use compressed air or tweezers Sensors Use compressed air EVERY 6 MONTHS OR AS NEEDED Printer case Use compressed air or a soft cloth For speciic procedures see the following pages NOTE If you use the device in dusty environments you must reduce the intervals between the cleanin...

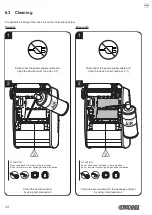
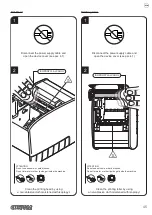
Page 44: ...ION Do not use alcohol solvents or hard brushes Do not let water or other liquids get inside the device ON Alcohol solvent 2 Paper path Disconnect the power supply cable and open the device cover see par 4 1 ATTENTION Do not use alcohol solvents or hard brushes Do not let water or other liquids get inside the device ON Alcohol solvent Clean the area involved in the passage of paper by using compre...

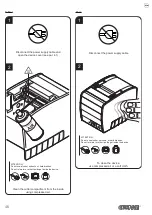
Page 45: ...s or hard brushes Do not let water or other liquids get inside the machine ON ISOPROPYL ALCOHOL Printing roller 1 Disconnect the power supply cable and open the device cover see par 4 1 2 Clean the printing roller by using a non abrasive cloth moistened with isopropyl ATTENTION Do not use solvents or hard brushes Do not let water or other liquids get inside the machine ON ISOPROPYL ALCOHOL 45 ...

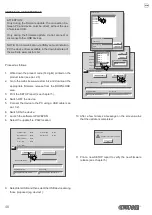
Page 46: ...NTION Do not use alcohol solvents or hard brushes Do not let water or other liquids get inside the device ON Alcohol solvent Case 1 2 To clean the device use compressed air or a soft cloth ATTENTION Do not use alcohol solvents or hard brushes Do not let water or other liquids get inside the device ON Alcohol solvent Disconnect the power supply cable 46 ...

Page 47: ...ON the device 7 Launch the software UPGCEPRN 8 Select the update ile PSW location Data flush status Upgrade status No upgrade thread active Port config Communication port not init Firmware rel Hardware rel PSW Version File cfg Printer type Select port None None None None None None File psw Select psw Begin upgrade 9 Select the serial communication port ex COM1 Data flush status Upgrade status No u...

Page 48: ...ata flush status Upgrade status No upgrade thread active Port config Communication port not init Firmware rel Hardware rel PSW Version File cfg Printer type Select port None None None None None None File psw Select psw Begin upgrade 9 Select item USB and then select the USB device among those proposed eg device1 Data flush status Upgrade status No upgrade thread active Port config Communication po...

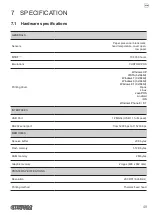
Page 49: ... Windows 7 32 64bit Windows 8 32 64bit Windows 8 1 32 64bit Opos Linux JavaPOS Android iOS Windows Phone 8 8 1 INTERFACES USB Port 12 Mbit s USB 1 1 full speed RS232 serial port from 1200 bps to 115200 bps MEMORIES Receive buffer 20 Kbytes Flash memory 512 Kbytes RAM memory 2 Mbytes Graphic memory 2 logos 608 x 862 dots PRINTER SPECIFICATIONS Resolution 203 DPI 8 dot mm Printing method Thermal ixe...

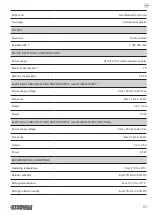
Page 50: ...949 Printable barcode UPCA UPCE EAN13 EAN8 CODE39 ITF CODABAR CODE93 CODE128 CODE32 PDF417 QRCODE Printing speed 2 3 High quality 130 mm s Normal 200 mm s High speed 220 mm s 250 mm s 4 5 PAPER Type of paper Thermal rolls heat sensitive side on outside of roll Paper width 80 mm 0 5 mm 82 5 mm 0 5 mm Paper weight 58 g m2 5 g m2 90 g m2 5 g m2 Paper thickness 63 μm 5 μm for KF50 paper Recommended pa...

Page 51: ...ER SUPPLY cod 961GE020000001 7 Power supply voltage from 100 Vac to 240 Vac Frequency from 47 Hz to 63 Hz Output 24 V 2 5 A Power 60 W ELECTRICAL SPECIFICATIONS POWER SUPPLY cod 963GE020000003 OPTIONAL Power supply voltage from 100 Vac to 240 Vac Frequency from 50 Hz to 60 Hz Output 24 V 2 5 A Power 60 W ENVIRONMENTAL CONDITIONS Operating temperature from 0 C to 50 C Relative humidity from 10 Rh t...

Page 52: ...is achieved in the following test conditions parameter Speed Quality High Speed Print Density 0 Ambient Temperature 25 C Power Supply 24Vdc 6 Possibility through Firmware coniguration up to 250 mm s respecting the test conditions described in note 4 and using paper MITSUBISHI TL4000 7 For receipts with wide black zones is recommended the optional power supply cod 963GE020000003 that provides a pea...

Page 53: ...andards IEEE 802 11 b g n Networking standards 10 100Mbps Frequency range from 2 4GHz to 2 485GHz Wireless transfer rates 11 54 135 150Mbps Port ETH and USB Protocol supported UPnP DDNS and a static router TCP IP Security supports SSID broadcast with control of MAC lists with access authorization WEP 64 128 152 bit coding compatible with WPA 128 bit TKIP AES Reset button Press the Reset button loc...

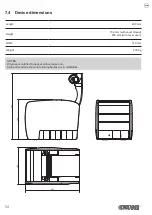
Page 54: ...h 209 mm Height 152 mm with cover closed 254 mm with cover open Width 140 mm Weight 2300 g NOTES Dimensions referred to devices without paper roll All the dimensions shown in following igures are in millimetres 254 152 209 140 54 ...

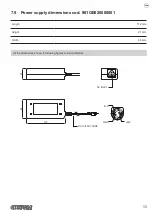
Page 55: ... 5 Power supply dimensions cod 961GE020000001 Length 112 mm Height 27 mm Width 48 mm All the dimensions shown in following igures are in millimetres 27 48 112 AC INLET 24V GND N C 1 2 3 DC OUTPUT WIRE 55 ...

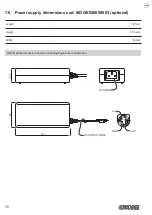
Page 56: ...supply dimensions cod 963GE020000003 optional Length 127 mm Height 35 5 mm Width 56 mm NOTE All the dimensions shown in following igures are in millimetres 35 5 1 2 3 n c GND 24V 56 127 DC OUTPUT WIRE AC INLET 56 ...

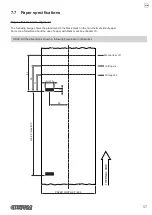
Page 57: ... black mark on the non thermal side of paper For more information about the use of paper with black mark see chapter 10 NOTE All the dimensions shown in following igures are in millimetres THERMAL SIDE Printing line Cutting line Manual tear off 5 min 10 25 11 29 min 20 max 400 41 PAPER WIDTH 80 82 5 57 ...

Page 58: ...e and the Chars Inch parameters during the Setup procedure see par 5 4 The following is the full list of coding tables that can be installed on the device CodeTable Coding table 0 PC437 U S A Standard Europe 1 Katakana 2 PC850 Multilingual 3 PC860 Portuguese 4 PC863 Canadian French 5 PC865 Nordic 11 PC851 Greek on request 12 PC853 Turkish on request 13 PC857 Turkish 14 PC737 Greek 15 ISO8859 7 Gre...

Page 59: ...9 on request 41 PC1098 Farci on request 42 PC1118 Lithuanian on request 43 PC1119 Lithuanian on request 44 PC1125 Ukranian on request 45 WPC1250 Latin 2 on request 46 WPC1251 Cyrillic on request 47 WPC1253 Greek 48 WPC1254 Turkish on request 49 WPC1255 Hebrew on request 50 WPC1256 Arabic on request 51 WPC1257 Baltic Rim on request 52 WPC1258 Vientamese on request 53 KZ1048 Kazakhstan on request 25...

Page 60: ...60 ...

Page 61: ...8 CONSUMABLES The following table shows the list of available consumables for device DESCRIPTION CODE THERMAL PAPER ROLL width 80mm Ø external 90mm Ø core 25mm 67300000000406 61 ...

Page 62: ...62 ...

Page 63: ...020000001 POWER SUPPLY for technical speciications see the paragraph 7 1 963GE020000003 RIGHT AND LEFT SIDES KUBE color black see the paragraph 9 1 976BG010000002 USB CABLE TYPE AB Length 1 8 m 26500000000356 Wi Fi DONGLE External Wi Fi Access Point ETHERNET and USB for technical speciications see the paragraph 7 3 972GU010000002 W PS L A N W L A N W P S SY S PO W ER 63 ...

Page 64: ...eed as follows 1 Unscrew the fixing screw for the printer side Assemble the new side and fix it with the screw previously removed Remove the printer side 3 2 4 While holding the point A put pressure at point B by pushing the carter in the direction indicated A B NEW 64 ...

Page 65: ...5 Reassemble the carter sliding it in the direction indicated 65 ...

Page 66: ...66 ...

Page 67: ...or assembled on the device is relection sensor this kind of sensor emits a band of light and detects the quantity of light relected to it The presence of the notch is therefore detected by the amount of light that returns to the sensor considering that the light is relected by the white paper and absorbed by the black mark The following paragraphs show how to correctly set the coniguration paramet...

Page 68: ...e alignment Device is provided with one mobile sensor facing the thermal side of paper To guarantee the alignment you must enable the parameter Notch Alignment during the Setup procedure see chapter 5 SENSOR 1 68 ...

Page 69: ...Paper with black mark on the thermal side In the standard model the detection of black mark and paper presence is performed by the ixed sensor direction of paper feed SENSOR 1 THERMAL SIDE 69 ...

Page 70: ...ng of the procedure result the device offers the execution of the function of paper characterization Character ize Paper and the change of the Notch Threshold parameter which represents the detection threshold of the black mark Choosing the Yes value for the Characterize Paper parameter the device prints a graphic representation see following igures of the outgoing voltage of the alignment sensor ...

Page 71: ...d about halfway between the peak value and the maximum value of the noise THERMAL SIDE THERMAL SIDE Peak Notch B Mark Threshold Noise If the maximum value of noise read by the sensor is very close to the peak value it might be dificult to place the value of the Notch B Mark Threshold at an intermediate point In these cases it is mandatory that the portion of paper between the point of printing end...

Page 72: ...n the black mark edge and the alignment point is deined as Notch Distance Notch Distance value varies from 0mm minimum and 99 9 mm maximum If the Notch Distance value is set to 0 the alignment point is set at the beginning of the black mark Alignment point black mark front Alignment point positive values of Notch Distance 0 PRINTING DIRECTION 72 ...

Page 73: ...sensor the printing head and the cutter cutting line where NOTE The dimension shown in following igures are in millimetres 1 1 14 Distance between printing line and cutting line D i s t a n c e b e t w e e n p r i n t i n g l i n e a n d f i x e d s e n s o r f o r b l a c k m a r k p a p e r p r e s e n c e 73 ...

Page 74: ...ance of 15mm between the notch and the alignment point the parameters must be set on the following values Notch Distance Sign Notch Distance mm x 10 1 Notch Distance mm x 1 5 Notch Distance mm x 1 0 The Notch Distance parameter may be modiied as follows during the Setup procedure of the device see chapter 5 by using the 0x1D 0xE7 command for more details refer to the Commands Manual by driver 74 ...

Page 75: ...on printable area of 14 mm generated from Distance between cutter printing head Value for the paper recovery after a cut where Distance between printhead and cutter 25 mm ixed distance Value for the paper recovery after a cut 11 mm H Distance between the irst and the last print line called Height of the printing area L Distance between an edge of the black mark and the next one called Inter notch ...

Page 76: ...76 ...

Page 77: ...ph 5 1 The Setup report shows the firmware release 2 XXXXXXXXXXXXXX Rx 0000000000000000000 Send an e mail to the Technical Service with the data collected 3 Customer Service Department support customamerica com specific for North South American customers support custom it worldwide or PRINTER SETUP PRINTER TYPE device model PRINTING HEAD TYPE head model INTERFACE RS232 PROGRAM MEMORY TEST OK DINAM...

Page 78: ...78 ...

Page 79: ......
Page 80: ...tom biz CUSTOM S p A World Headquarters Via Berettine 2 B 43010 Fontevivo Parma ITALY Tel 39 0521 680111 Fax 39 0521 610701 info custom biz www custom biz All rights reserved Part Number 762000000065 Rev 3 00 ...

Reviews: