background image

5

5. 

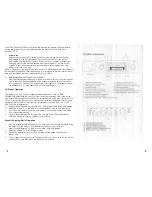
To rewind the tape,press the Tape Advance Control (6 or 7) with the two arrows that 
point in the opposite direction of the tape direction indicator.

6. 

Fast forward or rewind will stop when the opposite control is depressed or when the 
tape reaches the end of a side.

7. 

To eject the cassette ,depress the Tape Eject Control (3).The tape will be ejected 
from the cassette door and the unit will go back to the radio mode automatically.

NOTE: If a cassette does not fully eject,reinsert the tape and depress the Eject Control
(3)until the cassette can be easily removed. Never force the tape from the cassette door.

Cassette Auto Reverse Operation

The USA-1 features an Auto Reverse Cassette Deck. This feature eliminates the need to
eject, remove and reinsert the cassette at the end of one sides play. The other side of the
cassette will be played when the tape reaches the end of one side. This allow for continu-
ous cassette play. The tape program can also be reversed at any time during the normal
cassette playing cycle. To reverse the direction of tape play, momentarily depress both of
the Tape Advance Control (6 and 7) simultaneously. The tape will reverse direction and the
Tape Direction Indicator (18 )will reverse.

Setting The Time

The following procedure must be preformed with the radio ON.
1. 

With the unit on press and release the Time/Frequency Recall Button (12)so the time
is displayed.

2. 

Press the Time/Frequency Recall Button (12) for 5 seconds. The hour should be 
blinking on the display. Release the button and rotate the Manual Tuning Control (10) 
gently to the right, the Hour will advance, Rotating the Manual Tuning Control (10) 
gently to the left, the Hour will decrease.

3. 

Press and release the time/Frequency Recall Button (12) and now the minutes 
should be blinking on the display. Rotating the Manual Tuning Control (10) gently to 
the right, the Minute will advance. Rotating the Manual Tuning Control (10) gently to 
the left, the Minute will decrease.

4. 

When finished setting the time, press display button. The hours and the minutes will 
stop blinking, the clock will show on the display for 5 seconds, and then will revert 
back to the radio station display.

Cassette Care

Before inserting cassette it is recommended that any excess tape slack be eliminated For
best performance follow these simple “Do’s and Don’ts.”
Do not store cassettes in direct sunlight to avoid warping the cassette case and damaging
the USA-1 tape mechanism.
Do not leave a cassette inserted when the unit is switched off. This minimizes wear to the
capstan and pinch roller.
Do not store cassettes near any device that might generate a magnetic field (any device
with a transformer, motor or any electrical windings, car speakers, permanent magnets,
etc.).

10

Summary of Contents for CONCOURS SERIES

Page 1: ...red for Limited Warranty service To obtain repairs or replacement within the terms of this warranty the product should be delivered transportation prepaid to the Company at the address shown below This warranty does not extend to the elimination of car static or motor noise cor rection antenna problems costs incurred for removal or reinstallation of product or damage of tapes speakers accessories ...

Page 2: ...quency Range 87 5 1 08 MHz Image Rejection 50dB Quieting Sensitivity 4uV T H D 1 IF Rejection 60dB AM Section Frequency Range 530 1710KHz S N Ratio 50dB Selectivity 25dB Audio Section Output Channel 50X4 Output Impedance 4ohm per speaker Response 30Hz 18KHz Tape Section Mechanism Type Auto Reverse Tape Speed 4 76cm SEC Response 40Hz 10KHz NORM Separation 45dB General Power Supply 12VDC Negative Gr...

Page 3: ...Sprague President Custom Autosound It Is advised that you do Not return defective units to your dealer There is generally no exchange e g as is standard Electronics Industry Policy Also most dealers do not have radio technicians test benches etc and a return to factory through a dealer can extend turn around times by weeks Please call Custom Autosound requesting technical assistance if a problem o...

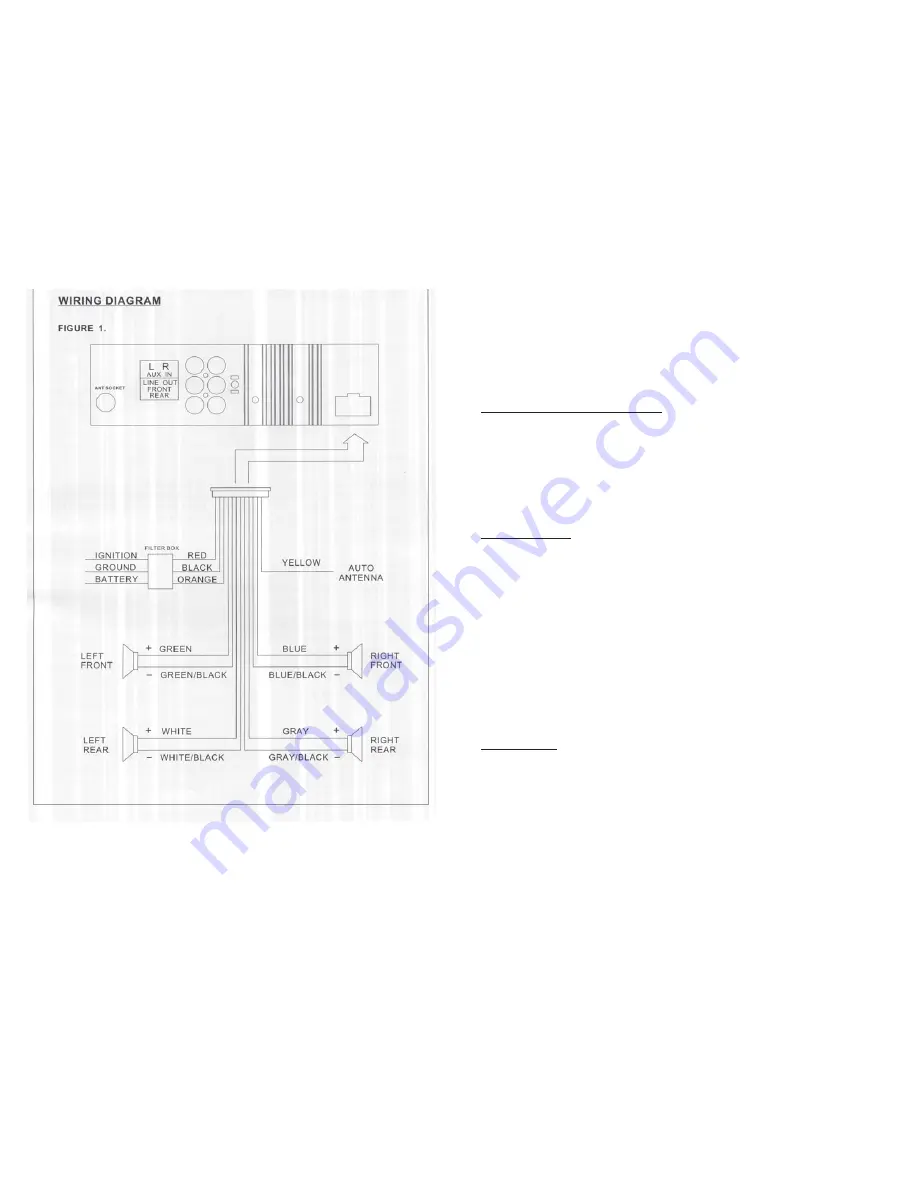
Page 4: ...remaining speaker leads to prevent a short Plug in or wire the red power wire to a switched 12volt source Plug in or wire the orange memory wire to a constant 12volt source Wire the black ground wire to a clean solid chassis point or original ground wire from the factory radio Good Listening Audio quality is only as good as speaker quality 3 12 Antenna Noise A static or crackle heard through the s...

Page 5: ... hours of play Tape demagnetizing cassettes should be used Do not open the unit to use discrete demag netizes Either use the special cassette or let your Autosound dealer perform this serv ice The tape head is delicate and easily damaged if you don t know what you are doing Noise Suppression All CAM Systems are designed for maximum electrical noise rejection In some installa tions however electric...

Page 6: ... be preformed with the radio ON 1 With the unit on press and release the Time Frequency Recall Button 12 so the time is displayed 2 Press the Time Frequency Recall Button 12 for 5 seconds The hour should be blinking on the display Release the button and rotate the Manual Tuning Control 10 gently to the right the Hour will advance Rotating the Manual Tuning Control 10 gently to the left the Hour wi...

Page 7: ...ough AUX Input Operation This feature is for connecting an optional portable audio device such as IPOD CD MP3 TV DVD Satellite radio etc The USA 1 radio comes with an AUX cable that can plug directly into a headphone connector of a portable device If this is not the style of con nector on your portable device you may need to purchase the appropriate cables or parts separately Once you have connect...

Page 8: ...AM and 18 FM stations memory presets using the numbered buttons located across the bottom of the display will access these presets A FM programming 1 Set the AM FM Band Selector 17 in the FM position one of the FM bands and view the FM Band Indicator 18 on the LCD Display 5 2 Select the station desired by using the Manual UP Down Tuning Control 10 3 Depress one of the 6 preset buttons for approxim...

Reviews: