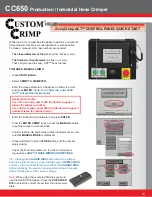
background image

CC650


Production / Industrial Hose Crimper

13

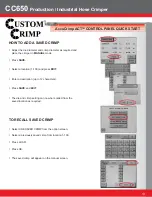
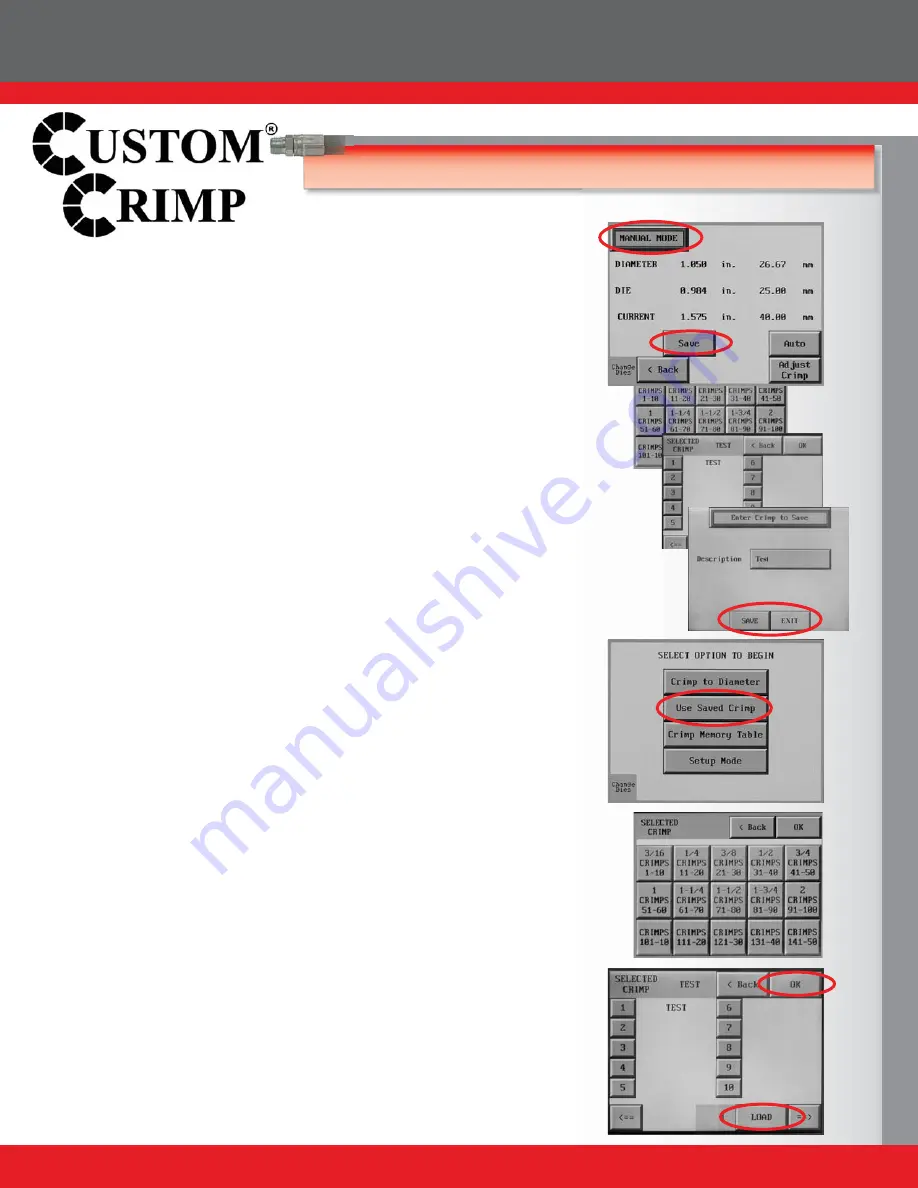
HOW TO ADD A SAVED CRIMP

• 

Adjust the die diameter and crimp diameter as required and  

  place the crimper in 

MANUAL

 mode.


• 

Press 

SAVE.

• 

Select a location (1-100) and press 

EDIT.

• 

Enter a description (up to 12 characters). 

• 

Press 

SAVE

 and 

EXIT.

• 

The die and crimp setting can now be recalled from the  

  saved location as required. 

TO RECALL SAVED CRIMP

• 

Select USE SAVED CRIMP from the option screen.

• 

Select a previously saved crimp from location 1-100.

• 

Press LOAD.

• 

Press OK.

• 

The saved crimp will appear on the manual screen.
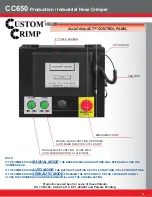
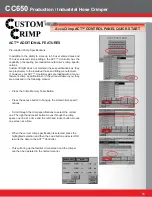
                         

AccuCrimp ACT

TM

 CONTROL PANEL QUICK START

Summary of Contents for CC440 series

Page 1: ...emory capacity for accurate repeatability Automatically converts inch to mm and mm to inch so that no calculation is ever required Th Th Th The e e CC CC CC CC CC6 65 65 65 650 0 0 0 0 S S Se Se Se i ri ri ries es es h h h hos os ose e e cr cr cri im im impe pe per r r i wi wi with th th th t t t th he he he P P P P t at at aten en ent te te ted d d d C AC AC AC ACT T T T C C C C Con on ont tr tr ...

Page 2: ...AND IDENTIFY ALL COMPONENT PARTS BEFORE USING CRIMPER CRIMPER CC650 CAN PRODUCE 350 TONS OF CRIMPING FORCE KEEP BOTH HANDS AWAY FROM PINCH POINTS CONSULT HOSE AND FITTING MANUFACTURER FOR CORRECT MACHINE SETTINGS AND CRIMP MEASUREMENTS ALWAYS WEAR EYE PROTECTION SAFETY PRECAUTIONS ...

Page 3: ...rimp ACTTM CONTROL PANEL 9 AccuCrimp ACTTM CONTROL PANEL QUICK START 10 AVAILABLE CC650MIC MANUAL DIAL MICROMETER 18 PLC RESET PROCEDURE 19 TROUBLESHOOTING 20 CC650 CRIMPER REPLACEMENT ACCESSORIES 21 COMPONENT PARTS BREAKDOWN 22 CC650 DIE PART IDENTIFICATION 34 CC650 PREVENTATIVE MAINTENANCE PACKAGE 35 CUSTOMCRIMP NO NONSENSE WARRANTY STATEMENT 37 CUSTOMCRIMP CONTACT INFORMATION 38 TABLE OF CONTEN...

Page 4: ...for use in Semi and Full automatic mode Main Power Switch Reservoir Small Footprint for minimum use of space Industrial Die Storage Shelves Patented ACTTM Controller Adjustable Mirror Manual Back Stop Available Manual Dial Adjustment Micrometer Crimper capacity is estimated based ontypical 1 piece fitting Actual results may vary depending on the hose and fitting manufacturer Max Head Opening W O D...

Page 5: ...tches to the crimper requirements as shown on the voltage decal on the electrical enclosure Electrical Requirements 7 5HP 230V 3Phase 20 Amp 7 5HP 440V 480V 3Phase 20 Amp 5HP 230V 1Phase 30 Amp Plug the cord directly into the appropriate wall outlet Caution Do not run the crimper on an extension cord as low voltage can damage the motor and or electrical components Check to be certain that the moto...

Page 6: ...ton in the lower left corner of the screen it will start to flash This button allows you to jog the crimper head in and out during die installation using the green CLOSE and OPEN button below the screen on the front of the ACT Controller Bring the master dies to the fully opened position as shown in photo 2 To have access to the 8 master die locking studs Install the 160 mm to 99 mm Adapter Dies a...

Page 7: ...ic Dies with the quick change tool as shown in photo 1 Note The die size stamped on the face of the hydraulic dies should face toward the operator Align the studs of the Hydraulic Dies with the holes in the Adapter Dies and with the crimper in manual mode SLOWLY close the crimper head on the hydraulic die set as shown in photo 2 Bring the crimper head to a fully closed position as shown in photo 3...

Page 8: ...losed position and lubricate the master dies through the 8 lubrication fittings in the protective plates as shown in photo 1 With the dies still in the fully closed position lubricate the 2 lubrication fittings visible through the two top lubrication fittings in the face of the crimper as shown in the photo 2 Bring the master dies to the fully open position lubricate the crimper through the lubric...

Page 9: ...WILL OPEN AND CLOSE THE CRIMPER HEAD IF THE CRIMPER IS IN AUTO MODE THE BUTTONS FUNCTION AS CYCLE START AND CYCLE STOP BUTTONS IF THE CRIMPER IS IN SEMI AUTO MODE PRESSING THE FOOT SWITCH OR THE CLOSE BUTTON WILL CLOSE THE CRIMPER HEAD AND RELEASING WILL HALT THE CLOSING ACTION AccuCrimp ACTTM CONTROL PANEL Products covered by all or some of these Patents US 7 383 709 US 8 230 714 EP 1 909 987 and...

Page 10: ...a 50 0 mm entry enter 5000 Controller will supply 2 decimal places for entries in mm Enter the finished crimp diameter and press ENTER From the ENTER CRIMP screen press the MANUAL button to put the crimper in manual mode Confirm that the die and finished crimp diameters are correct and that MANUAL MODE is displayed Press and hold the green CLOSE button until the crimper stops closing Check the fin...

Page 11: ...er of the fitting in either inches or mm Do not enter the amount of correction and press ENTER Press OK Make another crimp and verify that the fitting is within specifications EXAMPLE If the hose and fitting manufacturer specifies that the finished crimp should measure 1 500 to 1 520 and the measured crimp diameter was 1 530 simply enter the measured diameter 1530 Controller will supply 3 decimal ...

Page 12: ...description up to 12 alpha numeric characters Enter diameter units inch or metric Enter the closed diameter of the die Press SAVE and EXIT The saved die will now appear on the SELECTED DIE screen From this screen individual dies can be cleared or edited HOW TO RECALL A SAVED DIE Select CRIMP TO DIAMETER and from the OPTION screen select USE SAVED DIE Select the saved die 1 50 and press LOAD and th...

Page 13: ... 100 and press EDIT Enter a description up to 12 characters Press SAVE and EXIT The die and crimp setting can now be recalled from the saved location as required TO RECALL SAVED CRIMP Select USE SAVED CRIMP from the option screen Select a previously saved crimp from location 1 100 Press LOAD Press OK The saved crimp will appear on the manual screen AccuCrimp ACTTM CONTROL PANEL QUICK START ...

Page 14: ...ssing the FOOT SWITCH or the CLOSE button will close the crimper head and releasing it will cause the head to stop closing This mode allows the crimper to be jogged into position allowing more precise positioning of a fitting in the dies Pressing the SEMI AUTO button will toggle the crimper back to FULL AUTO mode In FULL AUTO mode pressing the foot switch will start the crimp cycle and the dies wi...

Page 15: ... point ACTTM ADDITIONAL FEATURES Additional features and functions of the ACTTM controller can be accessed by pressing the MORE button on the MACHINE SET UP screen When Allow Crimp to Diameter is set to YES all of the adjustment functions of the crimper are available When Allow Crimp to Diameter is set to NO only the settings entered as a saved crimp can be used English or Spanish language options...

Page 16: ...pre loaded with a manu facturer s crimp specifications or if they are available to you they are accessed in the following manner Press the Crimp Memory Table Button Press the access button to bring up the stored crimp specifi cations Scroll through the crimp specifications to select the correct one The right hand rocker button moves through the crimp specs one line at a time and the left hand rock...

Page 17: ...ickness of the hose Press the right arrow and take 2 more measurements of the hose wall thickness The Industrial Crimp Calculator will average the three measurements Enter the stem diameter of the fitting For example If the stem diameter is 4 inches you would enter 4000 and the ACTTM controller would supply the decimal place Measure and enter the wall thickness of the ferrule Next enter a compress...

Page 18: ... the closed diameter of the die at which the dies will stop closing Example If the required final crimp diameter for the hose and fitting being crimped is 65 5 mm the correct die set to use would be a 63 mm die set The micrometer would be set at 2 5 mm as shown and the final crimp diameter would be 65 5 mm 63 mm closed die diameter plus 2 5 mm Opening and closing of the crimper head is controlled ...

Page 19: ...screen RESETTING THE PLC TO ITS ORIGINAL SETTINGS IS A SIMPLE PROCEDURE Open the front of the Control Panel Power up the crimper from the main power switch The crimper must be powered on during the PLC reset procedure Move the three position toggle switch on top of the PLC right to the STOP position and then left to the RUN position Return the toggle switch to the center TERM position Repeat for t...

Page 20: ...equate electrical service Check motor rotation and be certain that the motor rotates in the direction of the arrow on the motor housing For three phase units rotation can be reversed by switching any two wires in the plug PROBLEM CRIMPER WILL CLOSE ON FITTING BUT DOES NOT DEVELOP POWER TO COMPLETE THE CRIMP Check oil level Position dies to the fully open position and check oil sight gage in rear o...

Page 21: ...es P N 101403 CustomCrimp Notched Digital Caliper IN MM P N CC Caliper Mini Grease Gun w CRIMPX Die Lubricant 3 oz mini grease tube P N 103889 CRIMPX Die Lubricant 3 oz mini grease tube P N 103887 CRIMPX Die Lubricant 14 oz large grease tube P N 103888 Industrial Hose O D Tape Pi Tape P N 103901 99mm Quick Change Tool P N 102571 CC Mirror P N 103471 Industrial Die Shelf P N 103572 Manual Back Stop...

Page 22: ...CC650 Production Industrial Hose Crimper 22 COMPONENT PARTS BREAKDOWN CC 650 Frame and Sliding V Block 103948 QTY DESCRIPTION PART NUMBER ITEM 1 CC600 Frame 103323 1 1 CC600 Sliding V Block 103324 2 1 2 ...

Page 23: ...t and Leg Assembly 103947 QTY DESCRIPTION PART NUMBER ITEM 1 CC600 Frame 103323 1 1 CC600 Left Foot 103377 2 1 CC600 Right Foot 103378 3 2 CC600 Right Leg Assembly 103376 R 4 2 CC600 Left Leg Assembly 103376 L 5 16 M12 X 35 SHCS MTS15612 6 16 1 2 Flat Washer WS23558 7 1 5 4 6 7 2 3 ...

Page 24: ...24 COMPONENT PARTS BREAKDOWN CC650 Cylinder Installation Assembly 103949 QTY DESCRIPTION PART NUMBER ITEM 1 CC 650 Cylinder Assembly 103913 1 2 Cylinder Mounting Bracket 103935 2 8 M12 X 50 SHCS MTS15615 3 4 1 2 Flat Washer WS23558 4 1 2 3 3 4 ...

Page 25: ...der Assembly 103913 1 1 Sliding V Block 103324 2 1 V Block Locating Pin 103246 3 2 Fixed Wear Plate 103337 4 4 Side Guide Plate 103350 5 4 CC650 Master Die Wear Plate 103929 6 8 Plate Mounting Bracket 103941 7 8 Wear Plate T Nut 103366 8 24 M4 X 12 SHCS MTS15499 9 48 M5 X 12 FHCS 91294A210 10 68 M10 X 30 SHCS MTS15583 11 5 11 10 7 6 8 9 4 3 1 10 7 2 ...

Page 26: ...12 FHCS 91294A210 2 8 Cover Plate 103943 3 16 M6 X 20 FHCS 91294A240 4 4 Protective Plate Key 103384 5 8 M5 X 16 FHCS 91294A212 6 2 CC650 Protective Plate 103944 7 4 Alignment Tab 103387 8 8 M8 X 30 SHCS MTS15554 9 1 Backstop Mount 103391 10 2 M8 X 20 FHCS 91294A284 11 1 2 3 4 5 6 8 9 7 11 10 COMPONENT PARTS BREAKDOWN COMPONENT PARTS BREAKDOWN ...

Page 27: ...witch 103473 1 1 Limit Switch Adjustable Bracket 103349 2 4 10 24 X 3 4 SHCS SKC2095 3 1 Potentiometer Bracket 103381 4 1 M10 X 100 SHCS 91290A548 5 1 CC600 1000 Linear Potentiometer 103472 6 4 M4 X 20 SHCS 103472 7 2 M12 X 50 SHCS MTS15615 8 1 M12 X 70 Set Screw 91390A181 9 4 2 3 3 1 6 5 7 9 8 COMPONENT PARTS BREAKDOWN COMPONENT PARTS BREAKDOWN ...

Page 28: ...12 BHCS MTS15552 3 1 Top Sheetmetal Wrap 103353 4 1 Front Die Sheetmetal Cover 103397 5 8 M6 X 16 BHCS 91239A321 6 4 M6 X 25 BHCS 91290A330 7 1 Rear Die Sheetmetal Cover 103397 R 8 1 Access Panel 103386 9 16 99MM Die Holder 101242 10 64 1 4 20 X 1 2 SHCS SKB14079 11 1 Industrial Die Compartment 103572 12 4 5 9 1 2 3 6 6 11 10 7 8 12 COMPONENT PARTS BREAKDOWN COMPONENT PARTS BREAKDOWN ...

Page 29: ...Neoprene Pad Installation 103768 QTY DESCRIPTION PART NUMBER ITEM 1 Front Neoprene Pad 103389 1 6 Cubbie Neoprene Pad 103390 2 1 Back Neoprene Pad 103388 3 5 Industrial Die Holder Mat 103573 4 1 2 3 4 COMPONENT PARTS BREAKDOWN COMPONENT PARTS BREAKDOWN ...

Page 30: ... PART NUMBER ITEM 4 CC650 Master Die Carrier 104128 1 4 CC650 Master Die Shoes 103930 2 4 CC650 Master Die Shoes 103930 R 3 8 Medium T Nut 103367 4 8 Short T Nut 103464 5 24 M4 X 12 SHCS 91290A148 6 32 Master Die Spring 103955 7 16 6mm Flush Style Grease Fitting 102793 8 1 3 2 4 6 8 9 5 7 COMPONENT PARTS BREAKDOWN ...

Page 31: ...63 Amp Disconnect Switch 103151 5 1 50 Amp Disconnect Switch 103050 5 2 8 75 Din Rail 103788 6 2 Ground Terminal Block 102365 7 1 Fuse Block 102367 8 2 2 Level Terminal Block 103775 9 4 Relay Block 102368 10 1 White Relay Block Motor 102368 11 3 Black Relay Block 103782 12 1 Midget 5 AMP Fuse Holder 230V 103777 13 1 Midget 5 AMP Fuse Holder 480V 103882 13 2 Midget 5 AMP Fuse 103778 13 1 8 75 Plast...

Page 32: ...2370 ACT 5 1 11 Plastic Wire Duct 103868 6 3 Ground Terminal Block 102365 7 2 2 Level Terminal Block 103775 8 9 Terminal Block 103785 9 2 Open Close Push Button 101545 GREEN 10 1 Emergency Stop Button 101545 RED 11 1 6 Touch Screen Text Panel 102600 ACT 12 1 USB Connector 103792 13 1 Foot Pedal Receptical 103874 14 1 3 4 NPT Cord Grip 103828 15 1 1 2 NPT Romex Cord Grip 103800 16 2 3 8 NPT Cord Gr...

Page 33: ...ifold Block Assembly 102523 2 1 CC1000 600 Motor and Pump Assembly 103760 3 1 Reservoir Top Plate 102618 03 4 12 5 16 18 x 3 4 FHCS SKF14342 5 4 M8 x 90 SHCS 91290A466 6 4 1 2 13 x 1 1 4 HHS NC51622 Z 7 4 1 2 Lock Washer WLK3508 Z 8 1 Venter Filler Cap 103048 9 1 Electrical Sub Assembly 103759 10 1 Sight Filler Glass 103808 11 1 Flange Gasket 101539 01 12 COMPONENT PARTS BREAKDOWN ...

Page 34: ... Dies 160mm to 99 mm Adapter Dies CC650 DIE PART IDENTIFICATION Master Die 160mm to 99mm Adapter Die 99mm Hydraulic Die Master Dies Accept 160 99mm Adapter Dies or 160S Series Dies 84 135mm 160OB Series Dies 142 190mm 160 99 Adapter Dies Accept 99S Series Dies 8 5 78mm 2 ...

Page 35: ...ents Replacement of the Master Die Springs Crimper Care Package Dies Studs Quick Change Tool Pins Grease Gun Screen Protector Oil Change If Customer Provides the Oil and disposal of used oil Update of ACT Controller software if needed New Grease Applied of All Wear Surfaces Crimper Calibration Written Crimper Documentation Report CustomCrimp s preventative maintenance program is an annual service ...

Page 36: ...of the Protective Plates Inspection Cleaning of Side Guide Plates Inspection Cleaning of Adapter Dies Inspection of Cylinder Inspection Cleaning of the Master Die Cover Plates New Grease Applied on All Wear Surfaces Inspection Cleaning of the Master Die Wear Plates Master Die Alignment Keys Inspection Cleaning of the Master Die Carriers Master Die Shoes Written Crimper Documentation Report PECTION...

Page 37: ... product to ATTN WARRANTY REPAIR DEPT Custom Machining Services Inc 318 North Co Rd 400 East Valparaiso IN 46383 If any product or part manufactured by CustomCrimp is found to be defective by CustomCrimp at its option CustomCrimp will either repair or replace the defective part or product and return via ground transportation freight prepaid CustomCrimp will not cover any incoming or outgoing freig...

Page 38: ...paraiso IN 46383 Ph 219 462 6128 Fax 219 464 2773 www customcrimp com See the complete line of CustomCrimp Crimpers and Accessories at 219 462 6128 CustomCrimp www customcrimp com CONTACT US CUSTOMCRIMP YOUR SINGLE SOURCE FOR HOSE ASSEMBLY PRODUCTS Products and services to support industry wide hose assembly needs ...

Reviews: